OneSixthFigures
Would you like to react to this message? Create an account in a few clicks or log in to continue.
OneSixthFigures

An online community to discuss and share news about sixth-scale figures, with an emphasis on either custom or commercial articulated figures.


You are not connected. Please login or register

first major steps with my 3d printer/update 04.01

Go to page : Previous  1, 2, 3, 4  Next

Go down  Message [Page 3 of 4]

Tjolnir


thanks, glad you like it
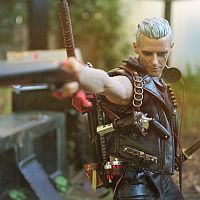
the leather helps to tighten the joints, apart from that arms and hip are fully moveable and rotate very freely giving you lots of different poses. knees and legs have a lot smaller radius of movement, still you can bend legs and knees to some minor degree.

i guess the leather wears down after some usage but it's very simple to replace the stripes.the parts pop in and out nicely and tight, the knees and feet were a bit "cracky" when you shove them together but the filament is quite flexible it seems. guess it's due to the honeycomb structure inside.

it's lorefriendly though they move very clunky ingame as well, not unlike stilts.

GubernatorFan


Founding Father
Very impressive and inspiring progress. Keep at it!

https://onesixthfigures.forumotion.com

dadrab


Mighty damn cool.

Tjolnir


another quick update, the robco terminal and radio turned out fine.
the terminal is put together from various parts leaving room for improvement like a real display in the far future.

on the other hand i´m printing some skeletons right now with only a 40/60% sucess rate. all the small parts/bones stick to the printing bed and stabilizing beams like crazy ony to be pulled apart piece by piece. time for some super glue Very Happy 

first major steps with my 3d printer/update 04.01 - Page 3 M110
kind regards

Stryker2011

Stryker2011
Founding Father
Really cool old school computer. Thumbs up.


_________________
Mark

He who dies with the most toys wins!

first major steps with my 3d printer/update 04.01 - Page 3 C8485110

GubernatorFan

GubernatorFan
Founding Father
Yes, very nice set up.


_________________
I'll be back!
https://onesixthfigures.forumotion.com

Tjolnir

Tjolnir
thanks again, right now i´m onto a couple of skeletons, if i can get my 3d printer to produce anything more than a chunk of single bone pieces.

who knew that printing every fine little bone in your foot with support beams would lead to peeling off the pieces from the foot instead of said support rabbit

oh and molerats on the way as well.... ok ONE molerat to be specific... lets not get ahead of myself.
only a few more hours waiting to see if the molerat turns out fine or horribly disfigured blob Very Happy

cheers


ps:
first batch of bones is done, with a so-so result

first major steps with my 3d printer/update 04.01 - Page 3 S110first major steps with my 3d printer/update 04.01 - Page 3 S210

as you can see "ed" is having a pretty crappy afterlife affraid 

it is (supposed to be) articulated, which i don´t doubt given the proper size and material. as for pla the small size of the ball joints make them prone to breaking, not to mention removing the support material without pulling off the single finger and toe bones.

guess this would be a prime example where abs is needed to make it moveable yet durable, as the details are on par with the coo model skeleton.
and the later ranging at 50-70€, where it´s still available the printed one is about 5-10 € in material both pla and paint.

the hair dryer trick is useable to some extend, for the material gets much softer quicker than we are used to from hands and head sculpts of professional figures, yet when cooling off they remain "floppy", not regaining their tightness.

so either risk breaking off the joints by stuffing them in cold(happened with one arm and a foot) or heating them and having lose joints afterwards. oh and cracked rips, lots of cracked rips*ouch*
didn´t have the problem with the protectron due to it´s size as i learned now. bigger joints mean more material, friction and overall strength.

but let´s not complain, its a 1/6 skeleton for 5€.... and i need a lot for a proper fallout background cheers

MerylAkiba


Are you selling these, they are amazing

GubernatorFan

GubernatorFan
Founding Father
I agree, very nice results, considering the trouble you mention.


_________________
I'll be back!
https://onesixthfigures.forumotion.com

Tjolnir

Tjolnir
MerylAkiba wrote:Are you selling these, they are amazing

GubernatorFan wrote:I agree, very nice results, considering the trouble you mention.

hi folks and many thanks for the huge compliment. unfortunately selling them wouldn´t feel like the right thing to do at the moment, the results of a print to another vary far to much due to my lack of skill.

for example the ribcage has several issues where the printer misaligned some 8+ hours into the print. this resulted in some ribs being shifted to a side midway while others are sticking more to the support material than the object itself.

so far i salvaged what i could, it´s gonna be background corpses anyway.

joints on the other hand pop in tightly yet when moving the limbs they´re prone to breaking right off the balljoint. something different filament could solve, i´ll look into that further down the road.

don´t get me wrong, i´m flattered that people consider buying what i make, yet the quality of the prints right now in hand are not what they appear on picture.
this and the fact that the hobby is a kind of resort for me where i don´t have any "pressure" of success, whereas if i sell something the quality has to match the expectations.

the skeleton as a whole takes roughly 14 hours to print and you should be at home in case something goes wrong. so i only can print bigger objects at a day off or on weekends.
on the other hand i had to print several feet and hands only to get 2 pairs that didn´t break to badly when removing the support material.

again, my thanks, i take it as a huge compliment, though the folks that create the models did the real work.

btw here´s another update.... i got rats.... yay.... bounce 
first major steps with my 3d printer/update 04.01 - Page 3 K110

dogmeat for scale =)

unfortunately its not poseable, just the real model ingame converted into something printable. but dogmeat isn´t articulate as well sooooo

oh and "ed" got a bleach, forgot to paint the teeth.... the don´t "rot" the same way as bone does afaik
first major steps with my 3d printer/update 04.01 - Page 3 K210

hope you like them, gonna give my printer a break.... don´t even wanna see my electricity bill affraid

cheers
tjolnir

dadrab

dadrab
Very cool stuff.

And, most importantly, it looks like you're having fun.

shazzdan

shazzdan
It might have only cost you 5€ in materials but it also cost you 14 hours of printer time as well as wear and tear and electricity. You'd need to build all of that into your price once you iron out the bugs and consider selling them.

I think you should concentrate on getting the skull right. There is a good market for low-cost 1:6 skulls; the only ones I can find are overpriced resin ones.

Don't waste the ones that don't turn out. A proper Fallout (or Fantasy) diorama needs plenty of detritus scattered on the floor. Partial skeletons are perfect for this. I usually use chicken bones but including a few distinctly-human bones such as a skull, pelvis, or ribcage would make the result look more convincing.

Love the molerat. When I started playing the game they scared the crap out of me the first time one jumped out at me.


_________________
More of my work can be found at One Sixth Arsenal
https://www.etsy.com/au/shop/OneSixthArsenal

Stryker2011

Stryker2011
Founding Father
I’m with shazzdan. Keep all the parts. Cool stuff.


_________________
Mark

He who dies with the most toys wins!

first major steps with my 3d printer/update 04.01 - Page 3 C8485110

Tjolnir

Tjolnir
thanks mates, glad you like ´em

don´t worry i don´t toss anything away, they´re still usable in some way. got another ribcage printed and it´s ready for cleaning.
hope this helps getting you a better idea of the printing result and what needs to be done to remove the support material.

first major steps with my 3d printer/update 04.01 - Page 3 B110
first major steps with my 3d printer/update 04.01 - Page 3 B210

this time only 2 ribs below the "left" clavicle are broken by removing it from the printing bed.
i´ll try the hair dryer trick with the next batch to heat it up slightly before pulling it from the printer, maybe it helps reducing the damage.
though it heats up/softens a LOT faster than you know from your original figures/heads. plus the material warps in some way not regaining its full form afterwards.
so only slightly warming it up it is then.

well in i few moments i´ll know if this torso comes out more intact than the last or if pulling slightly with a plier got out of and in rip and tear Laughing 
cheers
tjolnir

shazzdan

shazzdan
I'm thinking a small set of side cutters would help a lot. I have a few pairs of these at home and they work on plastic flumes.

first major steps with my 3d printer/update 04.01 - Page 3 S-l500

To clean it up I'd try the nylon polishing wheel on a Dremel.


_________________
More of my work can be found at One Sixth Arsenal
https://www.etsy.com/au/shop/OneSixthArsenal

Tjolnir

Tjolnir
thanks for the tip, gonna get my hand on a set of those next time i hit the hardware store. together with a 3d "pen", for i´m running out of super glue and after i saw one of them in action it seems the better option of "glueing" those broken parts back together since the pen melts pla just as the printer does.

as for the figure, well....

patient was declared deceased shortly after removing of the support material began. 3 ribs broke straight after touching with the spinal column following *ouch*
half a tube of glue and countless rubber gloves later i painted the parts and tried assembling them together, left arm joint broke right after inserting into the socket (again, seems a problem with the model, the other arm broke at the exact same place) and needed to be glued as well.

after that i had to replace the head socket for the ball joint did fit the spinal top only for the head to turn out to big, so i cobbled together a new neck out of chicken wire.
guess what, after setting the head into place, the neck broke.... bounce 

all in all though the figure turned out ok..... got a coo model in comparison in the pic.
the 3d author claims the model to be 1:6, strangly the limbs do seem correct while the head appears slightly to big. nothing that can be redone. thing is, where the coo model looks cartoonish the 3d printed is spot on except for size, so i call it a success in the end.
the limbs are articulated to a degree.
popping in the joints on the hip work ok cold, but you´ll need a hair dryer to soften the hands, feet, lower legs forearms etc. BUT heating it up for just a sec to long warps the structure, maybe you´ll spot it on the collar bones and upper rib cage.

impossible to pop in the arms into the shoulder cold without breaking the torso, heating it up though losens the joint.... its a hit and miss for now.

got different filament in stock that need higher temperatures to melt, maybe they´re more resilient to the hair dryer trick.
anyhow, hope you like it
first major steps with my 3d printer/update 04.01 - Page 3 N110
cheers
tjolnir

shazzdan

shazzdan
Every one of these projects just emphasises to me how cool and clever the COOMODEL skeletons are. I want to stock up on them but can't find anyone who has them available for sale.


_________________
More of my work can be found at One Sixth Arsenal
https://www.etsy.com/au/shop/OneSixthArsenal

Tjolnir

Tjolnir
ironically he had his first shelve dive and survived unharmed since i was to lazy to put him down while uploading the pic Smile there was an italian company named fattel selling pretty good skeletons in 1:6 but the price was rather high and i didn't see anyway to order them from germany.
they should be availabe as "army builder packs" 10 pieces / 100 €..... sadly i dont think that would even cover production cost, but one can dream Wink

oh and don't get me wrong, coo model skeletons are great but not without their own issues. i had 2 joints stiffen after being in a fixed position for a longer time and one break immediately after moving the limb. not even by force, just trying to lower the left arm, the shoulder joint broke right off the peg. kinda like "mego-melt" i suppose but in a lighter form. luckily i had white small pegs for replacement and made one fit. and even with the joints intact the range of motion is a little bit weird, ball joints would have been better imo.

second the head form and hip section seem off, cartoonish almost.

aside from those minor nitpicks its a solid skeleton, where it's still available for an affordable price.
just my 2 cents

ReverendSpooky

ReverendSpooky
Fascinated watching this come together. Skeletons really are looking awesome, and agree that even broken bones are great for fallout backgrounds. Hell, even "horribly disfigured blob" won't necessarily look out of place in a Fallout scene.

Your dios have always looked fantastic, but all this extra debris and detail are just taking things to the next level.


_________________
www.reverendspooky.com
http://reverendspooky.com

Tjolnir

Tjolnir
thanks mate, appreciated. well as for the "blob" fallout 1 and 2 / cross crit overhaul mod for fallout 4 to some extend, all had some interesting plasma death animations, they really stood out. basically in the end its all goo and mush Smile

maybe i'll melt one skeleton on purpose and add some gore to it. in the meantime i'll re arrange the sidewalk and buildings, add a bit here and there.
oh and there's a great deathclaw model just waiting to be printed. if i'll find some spare time thanks to my crappy work schedule that is.
again, glad you like it
cheers
tjolnir

Tjolnir

Tjolnir
hi guys, this time i tackled something big that was sitting on my shelve as a mere plan for ages. prior to my 3d printer it was neigh impossbile due to my lack of modeling skills. but thanks to the effort of talented 3d modelers and a very detailed source it is time to spice up my diorama with one of the most iconic critters of the wasteland.


the deathclaw.
first major steps with my 3d printer/update 04.01 - Page 3 Z110

first major steps with my 3d printer/update 04.01 - Page 3 Z210
first major steps with my 3d printer/update 04.01 - Page 3 Z310

granted its not really 1/6 scale, for that i guess it would at least have to be twice or 3 times the size. but printing this big boy took ages at it was and being limited to 20 cubic centimeters proofs to be a limit when it comes to big 1/6 props.

then again i could swap to a bigger printing head, while not as detailed it reduces the printing duration by a large margin. will be one of my next thingies on the list.

on the other hand i just recently bought a new gaming rig for fallout 76 so i guess 1/6 will be paused for a "little while" =)

hope you like it
cheers
tjolnir

Delanie

Delanie
Hi a few years ago I did some 3d art / modelling and one of the things that took up memory / space was the number of polygons might it be possible to find a program which can optimise your models for printing? It may be that they might be too high rez for the printer to handle and maybe some if not all the poly's on a flat surface for instance could be 'smoothed' out? perhaps its having to recalculate on the fly as it were


I remember having to do that and the reverse on a 3d plesiosaur model so that i could make it 'jointed' rather than solid a bit like our figures versus a statue in a virtual way.

I know there are programs on line that commercial printers ask you to run before you send them the 'meshes' to ensure they are possible to print and have no holes and thickness, example dragon wing membrains have to be thickened or they are physically impossible to print (mathematical line and point)

anyway these are just my ideas to speed things up for you may have already done some of this i don't after all know your set up.


A place to investigate btw might be Turbosquid for free models alternatively DAZ3d has free 'tell wear' softwear that might be worth playing with


Stryker2011

Stryker2011
Founding Father
That is wicked. Nicely done on that creature. It’s amazing what technology lets us do these days.


_________________
Mark

He who dies with the most toys wins!

first major steps with my 3d printer/update 04.01 - Page 3 C8485110

Tjolnir

Tjolnir
thanks for the tips. programs i use when theres something to fix with 3d models are meshlab meshmixer and autodesk "something" Smile meshmixer got an option to fill hollow models.quite useful after cutting game models in half, for they are often hollow to begin with. meshlab seems to have options to increase the poly count and reduces the blocky look.
the printer isnt the problem, as long as the file is on the usb stick or sd card in proper format, it gets printed. deathclaw took roughly 150+ hours and a whole unit of filamet(about 20€)
as far as i recall i found the model on thingyverse and it was already parted into limbs and other parts. the guy even created new sockets and joints, sadly it aint articulate.

you can use meshmixer to create joints but for the life of me i can't model anything proper. maybe i give it another try with soft filament and fill it with a type of "chicken wire" similar to bendable rubber snakes Smile
anyways, glad you like it
cheers

ps: if anything the issue with ingame models is the LACK of polygons, making them mostly unusable for printing directly.they trick a lot with textures and lighting. exception bein weapon models, though i tend to use the ones modeled after the real thing if they got an ingame counterpart,see the p90

ReverendSpooky

ReverendSpooky
Man, so much awesome! I think all of the random clutter is my favorite parts, although all of the big pieces are straight up mind blowing. Incredible. For some of the little issues, like the stimpack needle, just doing them with wire or a paperclip is the way to go. I think the difference in material will actually add to the look.


_________________
www.reverendspooky.com
http://reverendspooky.com

Tjolnir

Tjolnir
again, my thanks. its the little details that always makes me come back to fallout and its world. its gritty, dark and lived in and one of its core strengths is its ability to tell storys solely with obejcts, corpes and clutter. two skeletons hugging each other, one poor fellow kicking the bucket while taking a dump or even jerking off next to a plastic manequin, i kid you not. its either saddening or hilarious but always gets your attention while exploring. i love it

ReverendSpooky

ReverendSpooky
Tjolnir wrote:again, my thanks. its the little details that always makes me come back to fallout and its world. its gritty, dark and lived in and one of its core strengths is its ability to tell storys solely with obejcts, corpes and clutter. two skeletons hugging each other, one poor fellow kicking the bucket while taking a dump or even jerking off next to a plastic manequin, i kid you not. its either saddening or hilarious but always gets your attention while exploring. i love it

Yeah, I totally agree that it's that level of detail that really builds the world. And I love those subtle stories those dead bodies tell. You being able to add them to your scenes, and create your own moments like that really captures the essence of Fallout. It's a lot of that clutter that I need to build into my own photos to really sell that post apocalyptic world.

http://reverendspooky.com

Tjolnir

Tjolnir
first major steps with my 3d printer/update 04.01 - Page 3 R110first major steps with my 3d printer/update 04.01 - Page 3 R210first major steps with my 3d printer/update 04.01 - Page 3 R310

hi folks, another little update on my ever growing fallout project.
this time i took a break from fallout 76 (damn addicting even with all its flaws)

couldnt resist the screaming viking head, makes a really fine raider in my opinion.
had a blast using the "handmade rifle" playing fallout 76, based on an actual ak and found a pretty good 3d model of an ak74u, hope i got the type right =)

found a few ammo belts from my ww2 stuff and salvaged the armor from the latest heavy raider i had around but wasnt happy with the looks.
though there´s no dual wielding ingame i took some artistic liberty Very Happy


first major steps with my 3d printer/update 04.01 - Page 3 R410first major steps with my 3d printer/update 04.01 - Page 3 R510

the latest pic is a little sneak peak, got some 3d printing time, albeit couldnt finish them with a paintjob.
from top to bottom its a riot shotgun from fallout new vegas, the only proper wattz laser rifle from fallout 1, the new look never appealed to me,my favorite gun of fallout 2 the m72 gauss and last but not least another, better version of the city killer auto shotgun from fallout 1-2

sadly i got to work on sunday, so it´ll be next week at the earliest to post them finished.
hope you like ´em so far
cheers

Stryker2011

Stryker2011
Founding Father
Looking good. Cool weapons and character. I've heard of the game, but haven't played video games in over a decade, so I have no clue what's happening in them now (when it got to the point where you had to give yourself carpal tunnel just to make a character throw a punch or walk across a room, I was out).


_________________
Mark

He who dies with the most toys wins!

first major steps with my 3d printer/update 04.01 - Page 3 C8485110

Sponsored content


Back to top  Message [Page 3 of 4]

Go to page : Previous  1, 2, 3, 4  Next

Permissions in this forum:
You cannot reply to topics in this forum