OneSixthFigures
Would you like to react to this message? Create an account in a few clicks or log in to continue.
OneSixthFigures

An online community to discuss and share news about sixth-scale figures, with an emphasis on either custom or commercial articulated figures.


You are not connected. Please login or register

Post Apocalyptic Tonka Conversion Project, Part 2

Go down  Message [Page 1 of 1]

ThePhotogsBlog

ThePhotogsBlog
I've finally managed to get through the first stage of the conversion project, which was to give the vehicle a a main armament, in this case, the American version of the FN Mag General Purpose Machine Gun, (GPMG) which was first produced in the late 1950's and is still being made, and being used all over the world. The Canadian Army calls this weapon the C6, whilst the Americans call it the M240, but whatever designation you give it, it's one of the best, most reliable weapons of it's class ever built.

Post Apocalyptic Tonka Conversion Project, Part 2 51014219321_68cf1029b8_bPage_1 by Gary Menten, on Flickr

The gun itself was bought parted out from Monkey depot, while the gun mount, is an Armorpax resin casting of the British Army's GPMG softskin vehicle mount for the British version of this gun. They use it on the land rover and other vehicles.

Post Apocalyptic Tonka Conversion Project, Part 2 50993487033_73e1bb4c51_b
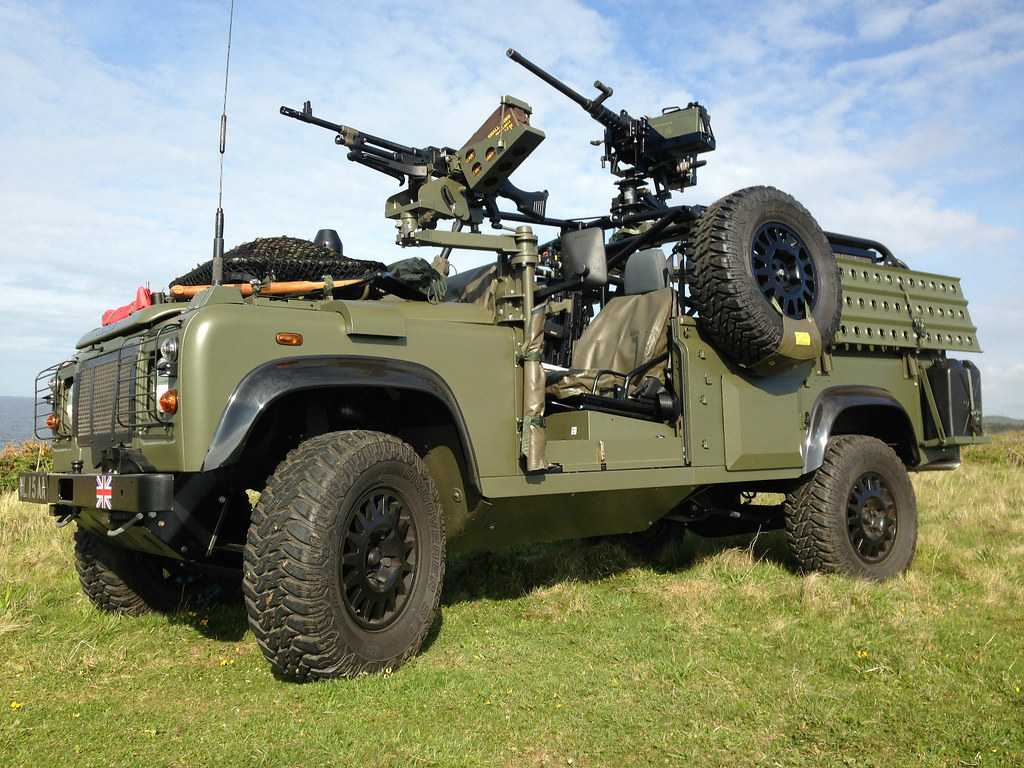
land rover with GPMG by Gary Menten, on Flickr

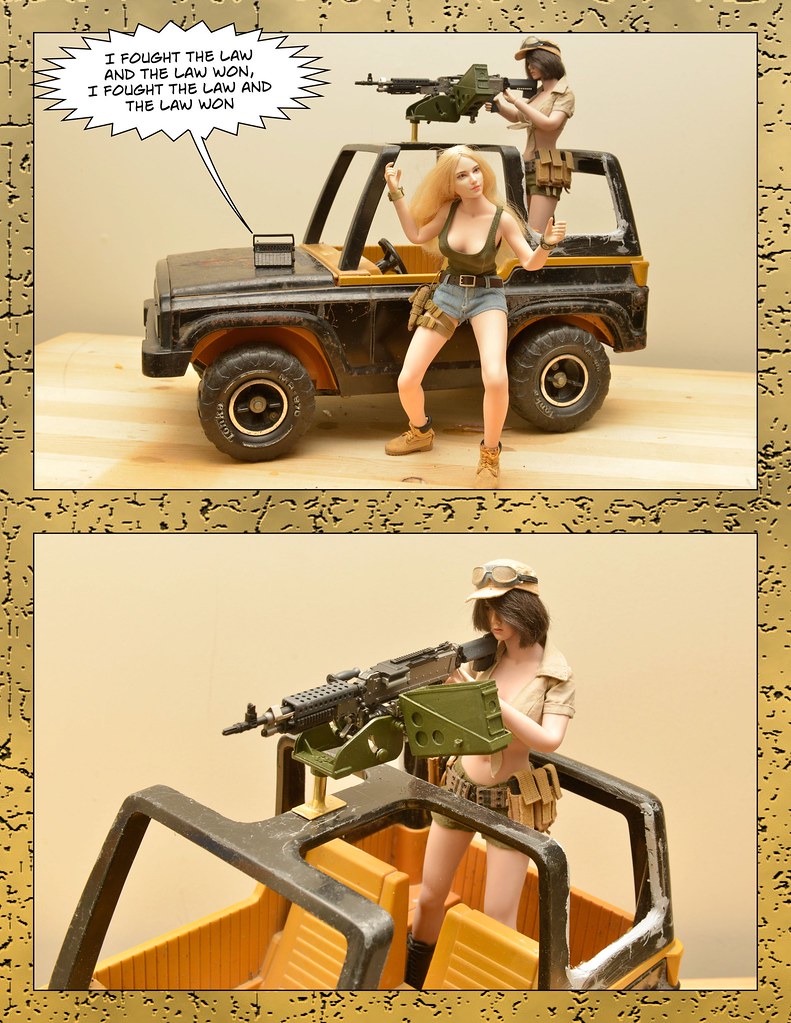
Overall, this is a very big gun and mount for such a small vehicle as the Tonka, which is one reason I chose to mount it on the roll cage instead of on the passenger side. The other reason is that on a narrow-bodied lefthand drive vehicle such as the Tonka, the ammo can would severely impair the driver's view if the gun were mounted on the right hand side where the front passenger sits. This meant that I had to cut a hole in the roof for the gunner. I considered two approaches; the more expensive but faster approach which was to buy a 2 1/4" hole cutting bit for my power drill and just bore a two inch hole in the roof or cutting away the roof altogether which I eventually chose and don't regret as it makes it much easier to get the figure in there. This as a time consuming and imprecise thing to do as the plastic roof was likely ABS and Tonka tough and my cutting technique with back saw, hack saw and coping saw was imprecise and messy. The grey putty which I've applied and was still hardening will help cover up some of those uneven cuts once sanded out and painted.

The Armorpax mount I should point out, being resin cast is much more fragile and prone to breakage than any plastic parts and will come off the scratch-built brass mounting post seen in the photos, built from brass tubing and strip brass from a local hobby shop. I have yet to paint it. Because of it's fragility, the mount will be removed whenever the vehicle is stored and not in use. I still have to install the bungee cord retaining clip that holds the ammo can securely in it's tray. I also need to get a scale 7.62 mm ammo belt section to put into the can and gun.

I've never seen a gun mount like this before where the ammo can is tilted at such an angle from the horizontal, but I suspect it's to ensure the smoother feed of the ammo belt into the gun's feed mechanism.

Future improvements on the vehicle will include adding extra lights to the front roll bar, and some sort of passenger side MG, possibly the M249 or Minimi, which is a 5.56mm scaled down version of the MAG and where the ammo box is actually slung down below the gun rather than to it's side. I'll also put some removable roof panels over the driver and passenger as the position of the gun on this small vehicle would mean both would likely be hit by ejected cases and belt links every time it fired without these being in place.

davidd

davidd
The Tonka is looking fantastic! I'm fascinated by the amount of thought you are putting in to this project, working to make the modifications "functionally plausible" was well as, y'know, looking cool!

Speaking of looking cool, the putty on the cut edges gives a "Bondo" look, as though it is a field repair or field modification. But then, some grunge and rust might look even better.

This project is really coming together. I would not want to tangle with this team! And it sounds like you're just getting started with the armaments and accessories!

BAMComix

BAMComix
Awesome work Gary! I love how you have chopped out the back to create a roll cage! The positioning of the weapon is perfect!

Ovy

Ovy
Ah nice to see this project getting started. Great of you to that you think about everyone's safety with the placement, high caliber shells on skin might hurt.

Stryker2011

Stryker2011
Founding Father
Nice conversion, Gary. Until you brought it up, I hadn’t noticed the cuts/and putty you made.


_________________
Mark

He who dies with the most toys wins!

Post Apocalyptic Tonka Conversion Project, Part 2 C8485110

ThePhotogsBlog

ThePhotogsBlog
Ovy wrote:Ah nice to see this project getting started. Great of you to that you think about everyone's safety with the placement, high caliber shells on skin might hurt.

If you've ever had a hot, spent casing fly under your collar and go down the back of your neck--I have--then you would know why I think this is important, even in a toy.

ThePhotogsBlog

ThePhotogsBlog
davidd wrote:The Tonka is looking fantastic! I'm fascinated by the amount of thought you are putting in to this project, working to make the modifications "functionally plausible" was well as, y'know, looking cool!

Speaking of looking cool, the putty on the cut edges gives a "Bondo" look, as though it is a field repair or field modification. But then, some grunge and rust might look even better.

This project is really coming together. I would not want to tangle with this team! And it sounds like you're just getting started with the armaments and accessories!


It's true...it could be Bondo or automotive body putty. I hadn't thought of that. We will have to see as the project continues, as I plan to add some equipment racks or something on the sides.

ThePhotogsBlog

ThePhotogsBlog
Ovy wrote:Ah nice to see this project getting started. Great of you to that you think about everyone's safety with the placement, high caliber shells on skin might hurt.

Thanks Mark. It's really just the first stage of the project. I'd been waiting until I got the gun mount from Armorpax to decide how to handle cutting a hole in the roof or whether to remove it entirely. Though I chose the more difficult and time consuming path, I'm convinced, given the cramped size of the rear compartment that it was the correct decision and so this looks more an more like a light attack vehicle.

skywalkersaga

skywalkersaga
Ooh, thanks for the update! Was wondering how this project was going. Think your modifications are great so far. The attention to detail and realism/functionality is admirable -- I'm looking forward to seeing this 'in action'. Smile


_________________
"The happy ending of the fairy tale, the myth, and the divine comedy of the soul, is to be read,
not as a contradiction, but as a transcendence of the universal tragedy of man."

Ignoring current 'official' Star Wars content for my own sanity.

ThePhotogsBlog

ThePhotogsBlog
skywalkersaga wrote:Ooh, thanks for the update! Was wondering how this project was going. Think your modifications are great so far. The attention to detail and realism/functionality is admirable -- I'm looking forward to seeing this 'in action'. Smile


Thanks. There are more mods to come, a little bit at the time.

Theboo-bomb

Theboo-bomb
Looing good so far, the machinegun is excellent and the mount is quite nice though as you've said quite interesting.

Looking at the tonka truck I'm filled with curiosity, I remember having a truck similar to that but made entirely out of plastic, perhaps a knockoff of it sold on kmart.


_________________
I do this for fun, otherwise it would be my job. alien

All of my alt-history themed figures in one convenient link! BooBomb's alt history figures! Post Apocalyptic Tonka Conversion Project, Part 2 1f60e

ThePhotogsBlog

ThePhotogsBlog
Theboo-bomb wrote:Looing good so far, the machinegun is excellent and the mount is quite nice though as you've said quite interesting.

Looking at the tonka truck I'm filled with curiosity, I remember having a truck similar to that but made entirely out of plastic, perhaps a knockoff of it sold on kmart.

The next mod I think will be to add a rear facing external seat, that will either carry two rear-facing passengers, or better still, a rear-gunner and rear-firing light MG, but smaller than the GPMG on top. Maybe a shortened M249.

davidd

davidd
Or perhaps a rear platform large enough for figs to stand on, with a railing around it, rather than a full seat, which would extend pretty far out the back. Could also be used as a cargo rack.

It's always easy to come up with ideas for other people's projects, isn't it? Razz

ThePhotogsBlog

ThePhotogsBlog
davidd wrote:Or perhaps a rear platform large enough for figs to stand on, with a railing around it, rather than a full seat, which would extend pretty far out the back. Could also be used as a cargo rack.

It's always easy to come up with ideas for other people's projects, isn't it? Razz

The rear stowage rack for the spare tire and jerry can is actually big enough to put the seat on and have some stowage underneath and I can move the spare tire to one side of the vehicle.

davidd

davidd
ThePhotogsBlog wrote:
davidd wrote:Or perhaps a rear platform large enough for figs to stand on, with a railing around it, rather than a full seat, which would extend pretty far out the back. Could also be used as a cargo rack.

It's always easy to come up with ideas for other people's projects, isn't it? Razz

The rear stowage rack for the spare tire and jerry can is actually big enough to put the seat on and have some stowage underneath and I can move the spare tire to one side of the vehicle.  


Ah, the vehicle already has a rear rack you can modify! Now the plan sounds feasible. Plus, a side-mounted spare tire will look cool!

ThePhotogsBlog

ThePhotogsBlog
davidd wrote:
ThePhotogsBlog wrote:
davidd wrote:Or perhaps a rear platform large enough for figs to stand on, with a railing around it, rather than a full seat, which would extend pretty far out the back. Could also be used as a cargo rack.

It's always easy to come up with ideas for other people's projects, isn't it? Razz

The rear stowage rack for the spare tire and jerry can is actually big enough to put the seat on and have some stowage underneath and I can move the spare tire to one side of the vehicle.  


Ah, the vehicle already has a rear rack you can modify! Now the plan sounds feasible. Plus, a side-mounted spare tire will look cool!

yeah...it should be pretty easy, actually. Of course, that's what Custer thought just before lauching his attack at the Little Bighorn

ThePhotogsBlog

ThePhotogsBlog
Post Apocalyptic Tonka Conversion Project, Part 2 51335065766_a077836ce5_bPage_1 by Gary Menten, on Flickr

Though I had not originally intended to repaint the vehicle, changing circumstances prompted me to rethink this. I have recently gotten a brand new dual action airbrush and plan to use it to paint my Dragon Jeep, hopefully when I am on holiday in the last two weeks of August. My previous airbrushing experience has always been with single action brushes and dual action brushes take some getting used to and a fair amount of practice, so I decided to test it out on my Tonka and give it an olive green and dark yellow camo paint job that pretty much matches the colours found in my version of Dinosaur Valley. I began by removing as much of the rust as I could with a wire brush, and cleaning the surface. If I had wanted to make this vehicle look like new, I should have also stripped off the old paint, but did not want to take that much time, or spend more money than I had to, so I just painted over the old paint including the spots where the paint ha bubbled up a bit. Still, it came out quite satisfactorily and there's more work to be done on this vehicle, which I hope to get done before late August when I want to be assembling and painting my Dragon jeep.

davidd

davidd
The paintwork looks fantastic! Smooth graduated transitions between the colours. Looks quite plausible and practical.

As does Laura's flight helmet; after all, this is a post-apocalyptic setting, and she looks very Mad Maxxian with her fighter pilot helmet and goggles.

The colour scheme of the recon vehicle matches the colour scheme of the team - gotta love that attention to fashion detail!

Xavion2004

Xavion2004
The Jeep (and the girls) look great!

BAMComix

BAMComix
Superb work Gary! It has certainly come a long way from that old battered tonka that originally turned up!

skywalkersaga

skywalkersaga
That turned out great!


_________________
"The happy ending of the fairy tale, the myth, and the divine comedy of the soul, is to be read,
not as a contradiction, but as a transcendence of the universal tragedy of man."

Ignoring current 'official' Star Wars content for my own sanity.

Stryker2011

Stryker2011
Founding Father
Nice repaint. Looks great.


_________________
Mark

He who dies with the most toys wins!

Post Apocalyptic Tonka Conversion Project, Part 2 C8485110

Theboo-bomb

Theboo-bomb
That camo is great and I personally wouldn't worry too much about it not being a smooth paint job, the old paint makes it look like it's been used well and repainted a few times.


_________________
I do this for fun, otherwise it would be my job. alien

All of my alt-history themed figures in one convenient link! BooBomb's alt history figures! Post Apocalyptic Tonka Conversion Project, Part 2 1f60e

Sponsored content


Back to top  Message [Page 1 of 1]

Permissions in this forum:
You cannot reply to topics in this forum