Note: More on reconstituted and modified Vader figures in THIS thread.
Update: More photos in Post 16 and Post 23 below.
Since I know some of you are picking up the second release of the HT ESB Vader (which may or may not be changed in some detail or other from the first release), I thought I'd share some information on some easy and recent mods.
I have not been willing to take a plunge and pay for a full Hot Toys Vader set after getting my Sideshow "second" Vader quite a few years ago. But I have bought many loose parts and reconstituted largely HT-based ANH/RO and ESB Vaders. With their tendency to lose balance and fall flat on their faces, damaging the tiny tusks (and some of the latter becoming irretrievably lost), I ended up with more than one head, and so have felt even more comfortable to make modifications to these expensive pieces.
Something I did to both the ANH/RO and ESB heads is line the inside of the lenses with bare metal foil, so that you can catch a little glimmer of red in the "eyes" (HT made them translucent, but it doesn't really show on the figure). The other thing I did is to alter the position of the helmet over the masked head -- the very first ANH release and at least the first ESB release have it wrong. In both instances, it sat too high, and in the second (ESB) instance, it was also meeting the face at a wrong angle (essentially, it was sitting too low and too far back to be screen accurate). Just remember that if you try to emulate this, proceed carefully and at your own risk!
Anyway, without further ado:
1a-c. The Hot Toys ESB Vader head has a good sculpt, but especially when looked at from the front can look off and outright disturbing. The problem is that the helmet proper sits too far back and too far up, meeting the "face" at the wrong angle and exposing the "eyebrows" over the lenses far too much. The front rim of the helmet should hang lower and farther forward over the "nose."

2a-c. The helmet proper is designed to be removable, as it snaps onto the top portion of the mask assembly.

3a-c. The top part of the mask assembly is glued only at its front, and with a little bit of pressure can be made to snap off. After this you can basically snap it in and out of place as you see fit.

4a-c. The front part of the mask, fitting over the face, is also a separate piece, which is glued to the bottom only at the lower edge. With some gentle pressure you can carefully make it snap off without breaking it (I didn't know this the first time I was modifying this head a couple of years ago and went another way, but this is a much better approach).
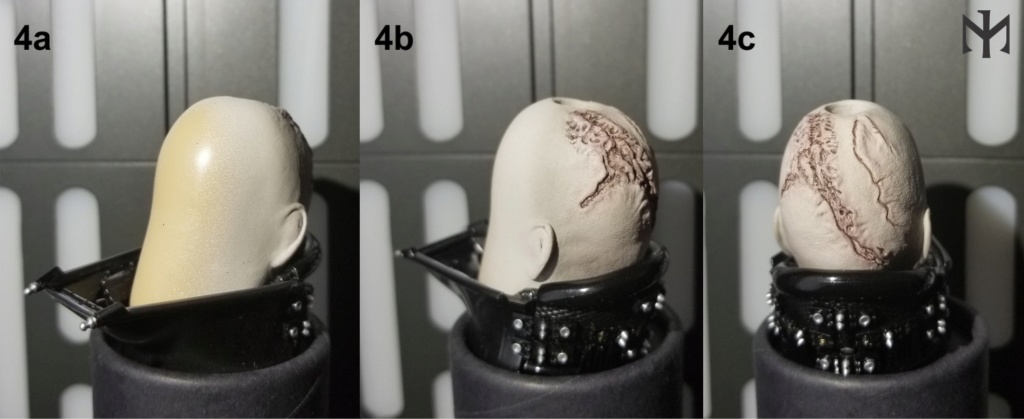
5a-c. The partial head sculpt is also removable, although that is not something you have to do to modify the lenses. I only show this here for completeness.

6a-c. Getting back to the facial part of the mask. The lenses are delightfully translucent, but you can only appreciate that if you handle the piece separately and look through them at a light source -- here I used a flash light to illustrate (6a). Then I cut a small rectangular piece of Bare-Metal chrome foil, enough to cover the inside of the lenses (6b). You apply the adhesive side to the inside of the lenses, then rub over it with a q-tip. This ensures perfect adhesion and removes any tiny folds or creases. With the foil lining the inside of the lenses, you can see a glimmer of red looking at them from the outside, provided they are hit by sufficient light (6c).

7a-d. Compare the before and after look, without (7a-b) and with (7c-d) the helmet. Note that without direct light on the lenses, they would look just black.
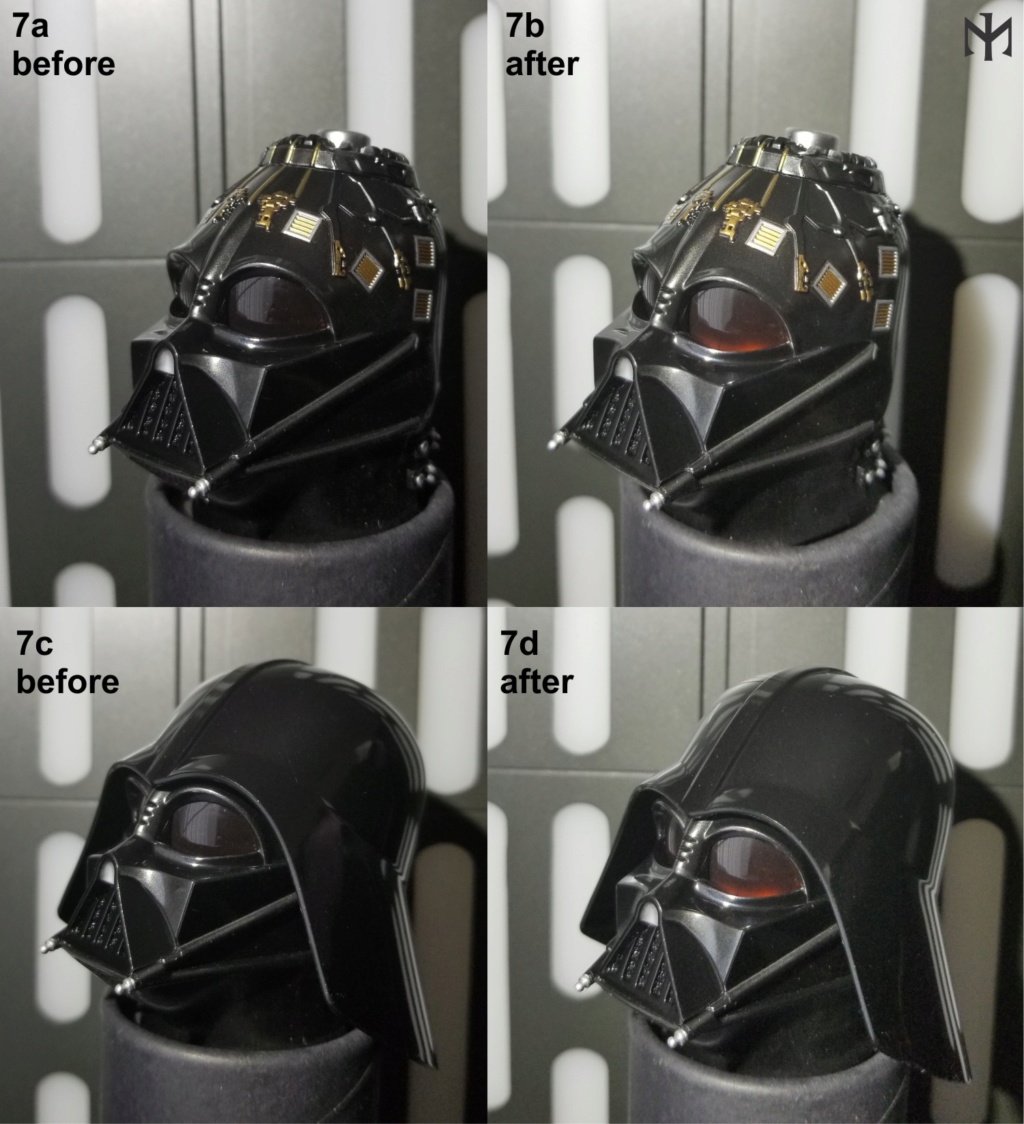
8a-d. I've been saving empty Oscillococcinum containers from whenever I've been sick, intending to use them for 1:6 kitbashing. While I imagined them serving as termuses or other types of vessels, the caps prove a good fit into the pre-existing hole at the very top of the head (8a). I lined the exposed part of the head around the cap with some plastic from a ziplock bag (8b). I began to construct a makeshift structure out of Kneadatite (the blue and yellow green stuff) by winding "snakes" round the cap and atop the plastic cover (8c). The plastic cover is so that the "structure" would not stick to the head itself and would remain removable. All told, I needed the "structure" to lift the helmet up at the back while keeping low in the front, and to push it towards the front. I also provided a makeshift protrusion to fit into the hole of the helmet (8d). Yes, I know what it looks like, and if you comment on that, it would be bad karma (so don't).

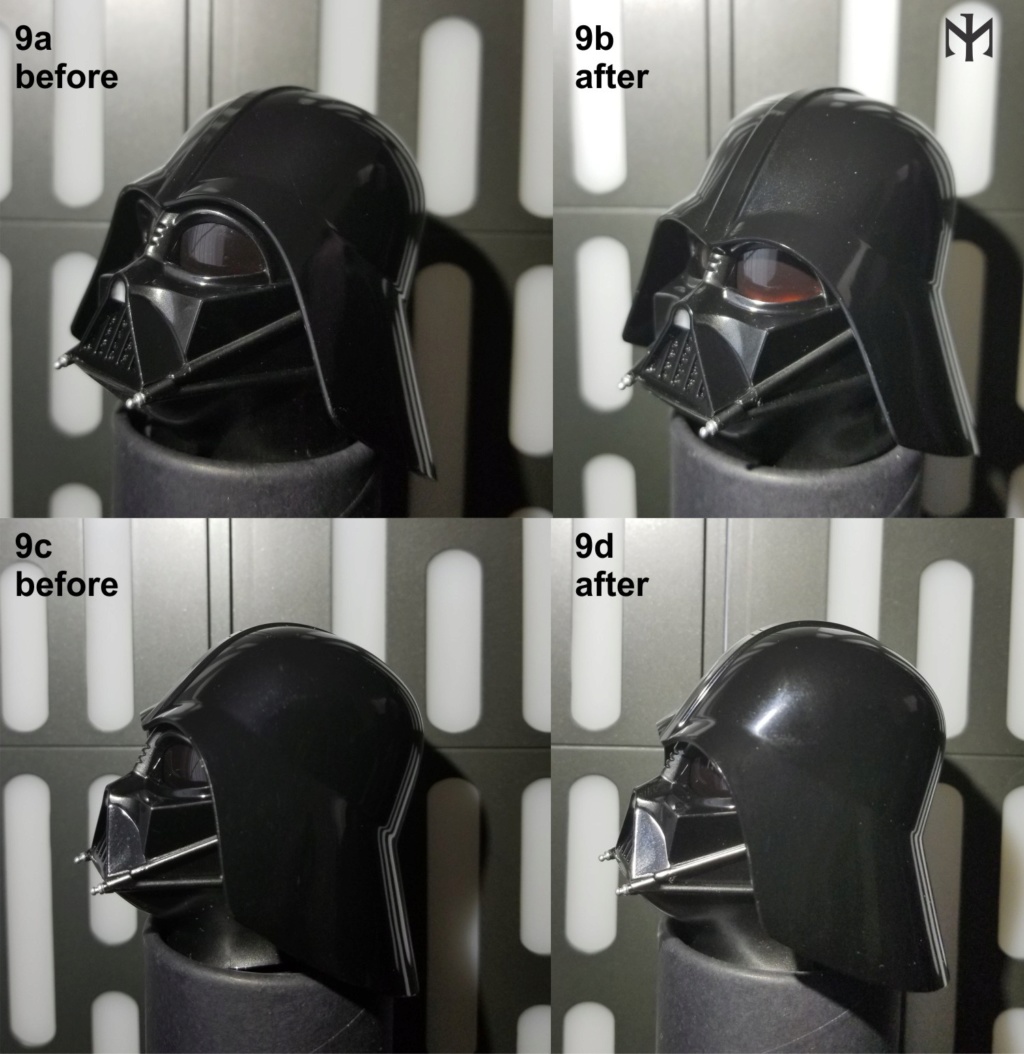
9a-c. With the structure still soft and malleable, I experimented with the helmeted look, adding material until satisfied with the way it sat. Then I let it cure. Here is the before (9a and 9c) and after (9b and 9d) comparison. Perhaps the difference looks cosmetic to most, but here's a Vader look I can appreciate without misgivings.
10a-b. Checking out the overall effect of the modified head on the body.

11a-c. Note that you can still see the "eyebrows," but only (and correctly) when lit from a lower angle (11c).

12a-b. Comparison of the before and after versions with a screenshot from The Empire Strikes Back. I think the helmet works much more accurately; I was not able to reproduce the lighting precisely -- otherwise you would be able to see the "eyebrows" (as above).

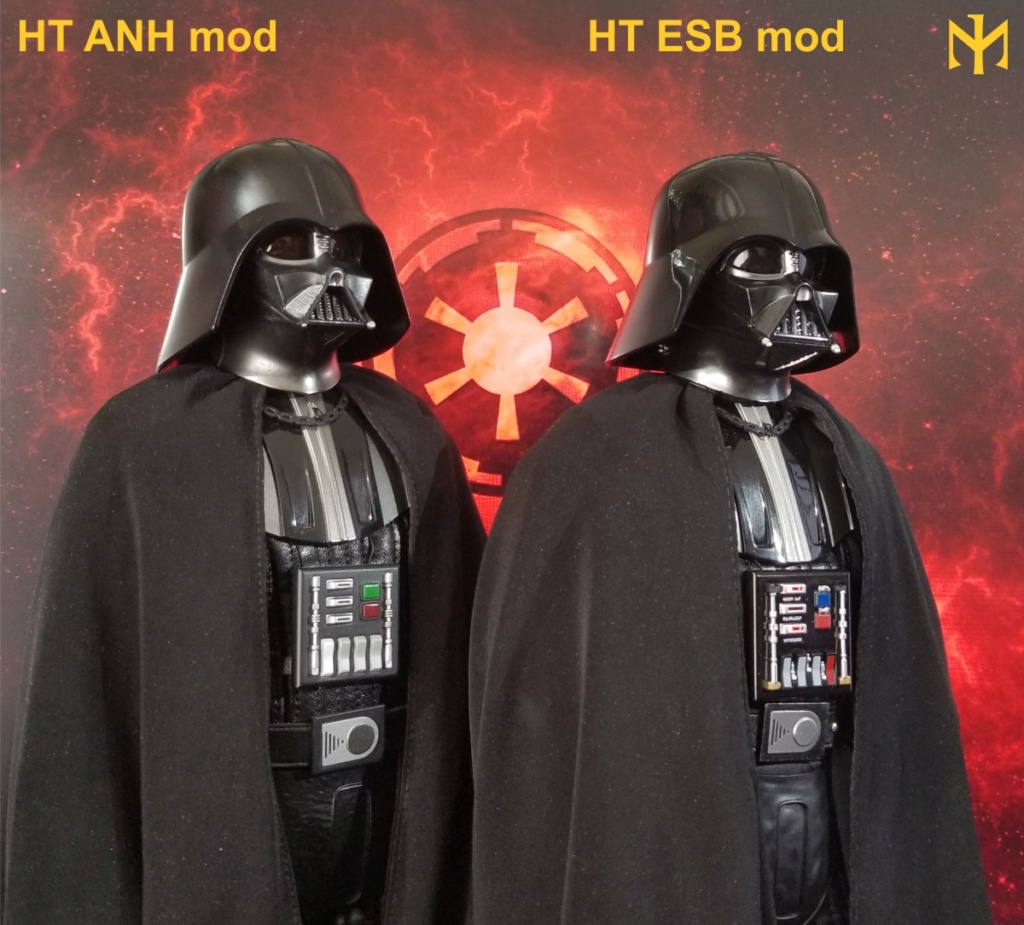
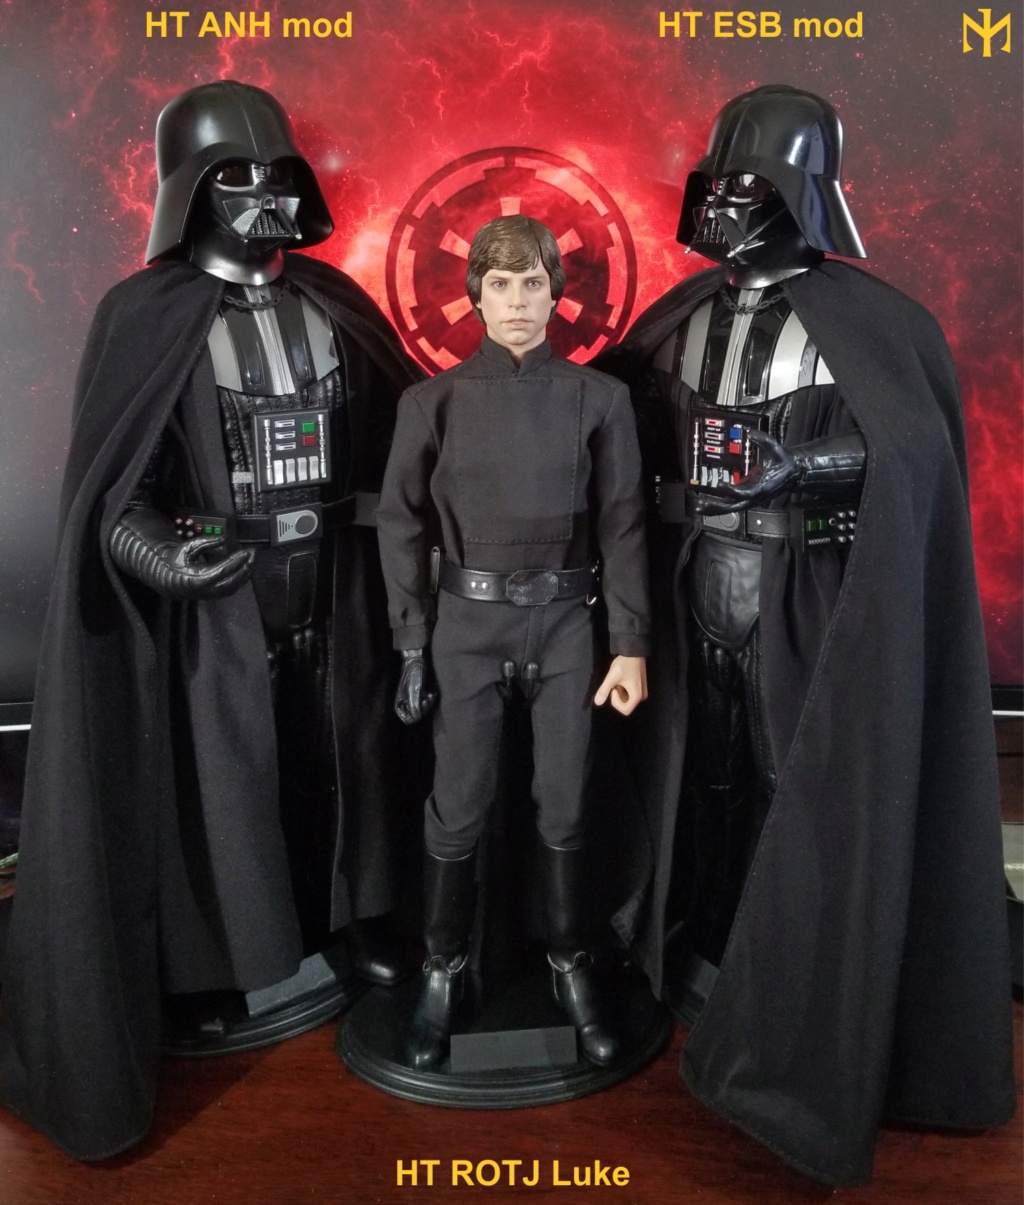
13. Just a comparison of my ANH/RO and ESB/ROTJ modified Vaders.

14. Another of the same.
15. Another of the same with a reconstituted HT ROTJ Luke.
Even if these modifications weren't particularly difficult, one should probably not have to go through so much trouble to improve sets as expensive as this. But the good news is that one can improve the slight imperfections.
I hope this has been useful. What do you think?
Note: More on reconstituted and modified Vader figures in THIS thread.
Update: More photos in Post 16 and Post 23 below.
#starwars #hottoys #darthvader #custom #mod #kitbash #scifi #male
Update: More photos in Post 16 and Post 23 below.
Since I know some of you are picking up the second release of the HT ESB Vader (which may or may not be changed in some detail or other from the first release), I thought I'd share some information on some easy and recent mods.
I have not been willing to take a plunge and pay for a full Hot Toys Vader set after getting my Sideshow "second" Vader quite a few years ago. But I have bought many loose parts and reconstituted largely HT-based ANH/RO and ESB Vaders. With their tendency to lose balance and fall flat on their faces, damaging the tiny tusks (and some of the latter becoming irretrievably lost), I ended up with more than one head, and so have felt even more comfortable to make modifications to these expensive pieces.
Something I did to both the ANH/RO and ESB heads is line the inside of the lenses with bare metal foil, so that you can catch a little glimmer of red in the "eyes" (HT made them translucent, but it doesn't really show on the figure). The other thing I did is to alter the position of the helmet over the masked head -- the very first ANH release and at least the first ESB release have it wrong. In both instances, it sat too high, and in the second (ESB) instance, it was also meeting the face at a wrong angle (essentially, it was sitting too low and too far back to be screen accurate). Just remember that if you try to emulate this, proceed carefully and at your own risk!
Anyway, without further ado:
1a-c. The Hot Toys ESB Vader head has a good sculpt, but especially when looked at from the front can look off and outright disturbing. The problem is that the helmet proper sits too far back and too far up, meeting the "face" at the wrong angle and exposing the "eyebrows" over the lenses far too much. The front rim of the helmet should hang lower and farther forward over the "nose."

2a-c. The helmet proper is designed to be removable, as it snaps onto the top portion of the mask assembly.

3a-c. The top part of the mask assembly is glued only at its front, and with a little bit of pressure can be made to snap off. After this you can basically snap it in and out of place as you see fit.

4a-c. The front part of the mask, fitting over the face, is also a separate piece, which is glued to the bottom only at the lower edge. With some gentle pressure you can carefully make it snap off without breaking it (I didn't know this the first time I was modifying this head a couple of years ago and went another way, but this is a much better approach).

5a-c. The partial head sculpt is also removable, although that is not something you have to do to modify the lenses. I only show this here for completeness.

6a-c. Getting back to the facial part of the mask. The lenses are delightfully translucent, but you can only appreciate that if you handle the piece separately and look through them at a light source -- here I used a flash light to illustrate (6a). Then I cut a small rectangular piece of Bare-Metal chrome foil, enough to cover the inside of the lenses (6b). You apply the adhesive side to the inside of the lenses, then rub over it with a q-tip. This ensures perfect adhesion and removes any tiny folds or creases. With the foil lining the inside of the lenses, you can see a glimmer of red looking at them from the outside, provided they are hit by sufficient light (6c).

7a-d. Compare the before and after look, without (7a-b) and with (7c-d) the helmet. Note that without direct light on the lenses, they would look just black.

8a-d. I've been saving empty Oscillococcinum containers from whenever I've been sick, intending to use them for 1:6 kitbashing. While I imagined them serving as termuses or other types of vessels, the caps prove a good fit into the pre-existing hole at the very top of the head (8a). I lined the exposed part of the head around the cap with some plastic from a ziplock bag (8b). I began to construct a makeshift structure out of Kneadatite (the blue and yellow green stuff) by winding "snakes" round the cap and atop the plastic cover (8c). The plastic cover is so that the "structure" would not stick to the head itself and would remain removable. All told, I needed the "structure" to lift the helmet up at the back while keeping low in the front, and to push it towards the front. I also provided a makeshift protrusion to fit into the hole of the helmet (8d). Yes, I know what it looks like, and if you comment on that, it would be bad karma (so don't).

9a-c. With the structure still soft and malleable, I experimented with the helmeted look, adding material until satisfied with the way it sat. Then I let it cure. Here is the before (9a and 9c) and after (9b and 9d) comparison. Perhaps the difference looks cosmetic to most, but here's a Vader look I can appreciate without misgivings.

10a-b. Checking out the overall effect of the modified head on the body.

11a-c. Note that you can still see the "eyebrows," but only (and correctly) when lit from a lower angle (11c).

12a-b. Comparison of the before and after versions with a screenshot from The Empire Strikes Back. I think the helmet works much more accurately; I was not able to reproduce the lighting precisely -- otherwise you would be able to see the "eyebrows" (as above).

13. Just a comparison of my ANH/RO and ESB/ROTJ modified Vaders.

14. Another of the same.

15. Another of the same with a reconstituted HT ROTJ Luke.

Even if these modifications weren't particularly difficult, one should probably not have to go through so much trouble to improve sets as expensive as this. But the good news is that one can improve the slight imperfections.
I hope this has been useful. What do you think?
Note: More on reconstituted and modified Vader figures in THIS thread.
Update: More photos in Post 16 and Post 23 below.
#starwars #hottoys #darthvader #custom #mod #kitbash #scifi #male




 Hosted on Fotki


