OneSixthFigures
Would you like to react to this message? Create an account in a few clicks or log in to continue.
OneSixthFigures

An online community to discuss and share news about sixth-scale figures, with an emphasis on either custom or commercial articulated figures.


You are not connected. Please login or register

Ayane (DOA) Custom (Updated 5-2-23)

Go down  Message [Page 1 of 1]

1Ayane (DOA) Custom (Updated 5-2-23) Empty Ayane (DOA) Custom (Updated 5-2-23) Sat 23 Apr 2022 - 23:59

MeMyself&I

MeMyself&I
It has been awhile since I posted anything really project related, so I figured I would post this since I just recently finished her up and took some photos. Do forgive me but I am going to link out to Flickr as there are several photos and they are higher resolution, so that platform just plays nicer for me.

Her Flickr Album

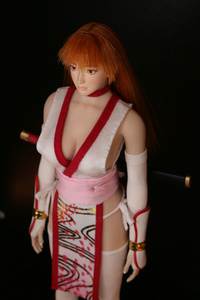
Here is Ayane from the DOA series of games! I grew up playing the games, with my first one being DOA2 some 20-ish years ago. While it is obvious that the series mascot Kasumi is my favorite character (see other posts, my avatar, etc), it wouldn't feel right to not have her half-sis Ayane to go with her. Kasumi is finished (working on the photos still as she is my "baby" as it were. We all have that one project we protect and treasure above the others, right?), but I am waiting to show her off and the work I did until I have her diorama made. She does make an appearance in the photo album for Ayane though.

Some notes for those who are curious:

  • EST. time to make (not counting planning): 10 hours for clothing/paint, 3 days for the hair (counting drying time of the glue).

  • EST. cost of materials: $150 (mostly the head sculpt and of course the body)

  • EST. cost of time: A LOT

  • Body used: TBLeague S20A (pale)

  • Scale used: 1:5 and 13/16th scale (to match my Kasumi project). This results in her being more at her DOA1 height than her height in later games, but with her boots it doesn't matter much anyway.

  • Most everything made by hand (only the underwear (not shown), body, and 3D print of the head were not made by me). I painted anything needing paint, and sewed all but the underwear.

  • As with any fighting game there are a dozen different outfits to chose from. I really like the white version of her classic dress, but seeing as Kasumi is in the white version of her classic outfit, I went with the better color option so it wasn't just a wall of pale body/white outfit. Plus the purple dress is her classic look, so it works well

  • I am still learning on the eyes and eyelashes, but considering I really don't know what I am doing I will take this result. It gives her a sort of intense expression, which honestly fits her personality. I need better brushes and a much steadier hand either way lol

  • Yes, there is wire in the hem of her dress to help it keep its shape. Pain in the butt to do by hand, but it turned out well.

  • The hair is NOT rooted, but rather resides on a wig cap. SUPER useful and easy to do, plus it allows for easy change out of hair styles if needed.


For other details there is information under the photos sort of "sectionally" throughout the flickr album. All in all, I think she turned out really well and definitely captures the character's sass.

I have a number of characters I am wanting to make from the series, each with a degree of difficulty to them. Next is Honoka (which already is 1,000% better than the VS Toys attempt), who will sport an outfit I doubt many would have a clue where it came from (more sewing!). Then there is Hitomi and Kokoro, both of whom I can use some premade clothing and just worry about the head/hair for. Not sure how I will do any of the male characters without hiring someone to do the head sculpts, but that bridge will be dealt with in time (stupid Hayabusa...).

GubernatorFan

GubernatorFan
Founding Father
I'm completely unfamiliar with the source, but she looks nicely done, like the other figure.


_________________
I'll be back!
https://onesixthfigures.forumotion.com

Stryker2011

Stryker2011
Founding Father
Nicely done figure. The outfit looks great.


_________________
Mark

He who dies with the most toys wins!

Ayane (DOA) Custom (Updated 5-2-23) C8485110

4Ayane (DOA) Custom (Updated 5-2-23) Empty Re: Ayane (DOA) Custom (Updated 5-2-23) Sun 24 Apr 2022 - 10:56

Randam Hajile

Randam Hajile
Very nice figure! Great work painting the head and tayloring the outfit!

5Ayane (DOA) Custom (Updated 5-2-23) Empty Re: Ayane (DOA) Custom (Updated 5-2-23) Sun 24 Apr 2022 - 13:09

FreakinLobster

FreakinLobster
Duuuuude, this is incredible! My head is spinning here in awe. You truly are passionate and talented, and your Ayane rendition reflects that. It couldn't be more amazing.
Your idea of wigging is indeed a great feature and it's even cooler to know that you painted the HS. The dress fits perfectly in every curve, specially on the upper side, where I believe is the trickiest part. The wiring solution was worth the effort. Heck, every bit of work there was worth it.

Now you ruined my expectations of SD making this set, because it will never be as detailed and impressive as your masterful creations. Laughing
And since you hinted my favorite female character from DoA, Hitomi, I'll be here rooting for your project to come true.

6Ayane (DOA) Custom (Updated 5-2-23) Empty Re: Ayane (DOA) Custom (Updated 5-2-23) Sun 24 Apr 2022 - 14:52

Tabul


it looks great, even if my taste is different I truly appreciate you sharing your work and dedication. some of us can only dream on achieving what you have done. from experience, I would recommend to use the "CLEAR" Protein Styling Gel from cvs and tin foil to fix her hair. ps you can also make a hair plastic bag to flatten her hair from Vacuum Sealer Bags and a cigarette lighter, by making a band strip and folding the ends to heat them, adjust to get tight fit.

7Ayane (DOA) Custom (Updated 5-2-23) Empty Re: Ayane (DOA) Custom (Updated 5-2-23) Sun 24 Apr 2022 - 20:14

skywalkersaga

skywalkersaga
That looks beautiful! The paintjob on the sculpt is very nicely done, and the outfit is top notch. It's always great to see figures that have been made with such obvious care.


_________________
"The happy ending of the fairy tale, the myth, and the divine comedy of the soul, is to be read,
not as a contradiction, but as a transcendence of the universal tragedy of man."

Ignoring current 'official' Star Wars content for my own sanity.

MeMyself&I

MeMyself&I
GubernatorFan wrote:I'm completely unfamiliar with the source, but she looks nicely done, like the other figure.

Ha, no worries! And thanks!

Stryker2011 wrote:Nicely done figure. The outfit looks great.

Thank you!

Randam Hajile wrote:Very nice figure! Great work painting the head and tailoring the outfit!

Thank you! More details below!

FreakinLobster wrote:Duuuuude, this is incredible! My head is spinning here in awe. You truly are passionate and talented, and your Ayane rendition reflects that. It couldn't be more amazing.
Your idea of wigging is indeed a great feature and it's even cooler to know that you painted the HS. The dress fits perfectly in every curve, specially on the upper side, where I believe is the trickiest part. The wiring solution was worth the effort. Heck, every bit of work there was worth it.

Now you ruined my expectations of SD making this set, because it will never be as detailed and impressive as your masterful creations. Laughing
And since you hinted my favorite female character from DoA, Hitomi, I'll be here rooting for your project to come true.

Thanks, I am glad you like it, and I didn't mean to ruin your expectations! Though you saying that definitely made my day and made me laugh  Very Happy  Laughing

You are right, the front part of the dress that covers her chest was tricky. The pattern I made took some trial and error, but I was able to get it to where it covered correctly in both the front and sides. Sewing was a delicate operation as I folded the edge over and needed to make sure everything was tight enough around her under bust and waist so that nothing would fall away without the sash. Stretchy fabric was the real hero here though as it let me cut and sew to accommodate a lot of this.

Tabul wrote:it looks great, even if my taste is different I truly appreciate you sharing your work and dedication. some of us can only dream on achieving what you have done. from experience, I would recommend to use the "CLEAR" Protein Styling Gel from cvs and tin foil to fix her hair. ps you can also make a hair plastic bag to flatten her hair from Vacuum Sealer Bags and a cigarette lighter, by making a band strip and folding the ends to heat them, adjust to get tight fit.

Thanks! Interesting recommendation for the hair! A lot of the styling comes from my, frankly, lack of personal style. Simple and looks the part? Cool! I want to improve though, so I will check this out. I am also looking at what Skywalkersaga recommended with the wax trick she uses, as Honoka needs some help, and I would like to add some better styling to Ayane. Anything that sticks up on top is, annoyingly, due to my clumsy self moving that headband of hers and it grabbing hair as I pushed it back into place. Nylon hair is super smooth stuff, but when it catches it catches. Tons of volume too...steam may not be a good idea because of the wig cap and how it is made, but gels and wax have my attention!

skywalkersaga wrote:That looks beautiful! The paintjob on the sculpt is very nicely done, and the outfit is top notch. It's always great to see figures that have been made with such obvious care.

Thank you! Considering your attention to detail with your SW projects this is a great compliment and I am very appreciative!


Some process details:

  • The wig idea came from a doll maker on youtube (Lomi's Playground) who was showing how to make wig caps for 1/4 scale heads. It is super simple to do, just requires some cling wrap to protect the head, some nylons (which are super cheap on amazon), some clear Elmers/craft glue, and a rubber band to hold the nylons down tight. Once you've done a few layers of the glue, you have a nice, flexible cap you can cut to size and hairline. I put superglue on top as a final layer to allow for more styling options because water and craft glue usually don't cooperate. You can usually make one in about half a day. Best part is if you mess up like I did, you have plenty of material to try again and it obviously doesn't take that long!


  • Sewing with a pattern is a must. I use fabric to get the rough idea for the pattern, then I draw it out on a nice thick piece of paper. Rinse and repeat until I have the desired look. Lots of trial and error, lots of common sense. I usually buy my fabric a full yard at a time. It is relatively cheap, and lets you mess up a lot until it's right. I went through 2 other variations of her dress before I got to this one. I could easily make another 2 if needed. Sure, I have a box of fabric and a ton of scraps, but if it cost me $5 for that yard and I got it right with stuff left over, then that is a win!


  • I want to get better at eyes in general as well as eyelashes. Kasumi got a treatment that is hardly normal for the eyelashes, and while I think it came out super interesting and great, I did not do it with Ayane or Honoka, and will not with Hitomi and Kokoro. More details on that specific process when I post for Kasumi, but all I did for Ayane was try to have a steady hand and use a .05mm archival pen. The eyes were the usual paint the head, make the eyes white (or whatever shade of white you wish), and then use a finely sharpened black colored pencil to draw in the iris. Then it is just painting inside the lines with a good brush. Believe me, that got messed up more than once, but the outlining helped a ton!


The paint job steps:

  • Using all Vallejo paints, I found that a good paint color ratio that seems to play nice with some of the older, and even some newer, versions of the TBL Pale skin tone is as follows: 20 drops of Light Flesh, 2 drops Salmon Rose, 3 drops White, and 2 drops Flat Yellow. Gives a good base to work off of. I recommend using a 2oz plastic portion cup to mix everything in for the air brush.

  • First, I sanded down carefully as much of the head as possible using 2000 grit sand paper. This provided a nice, smooth finish for the major areas of the skin. Finish off with a quick bath of 70% isopropyl and a drying with canned air or the air brush.

  • I then primed the sculpt with two separate colors, both from Vallejo as well: Desert Sand and White, with my airbrush (an Iwata TRN1). Air brush set to about 18-20PSI For primer and other colors, add in air brush thinner until you get to a nice, thin consistency. It should pour into the brush smoothly but without being water. Very light coats is key, and doing these coats in bursts until the head is covered for each coat. Dry with a hair dryer or heat gun at a distance.

  • Desert Sand was the initial primer. This was to set the underlying tone of the skin tone as white is translucent to some degree and this particular sculpt was done in a pink-ish/red resin. White then went over this, also as a primer.

  • Once primed and dry, I used the above ratio in a 4X batch through my air brush to cover the head. Roughly 12-18PSI. Again, thin coats applied in a bursting fashion. The benefit here aside from control is that of a subtle skin texture

  • Once this is done, remove any left over base skin tone mixture into the cup you mixed it in and set aside. Clean out the air brush with some water. Mix together in a separate container of Salmon Rose and the air brush thinner. You will want a decent amount of Salmon Rose. Then take this mixture, put it in the brush, and turn down the pressure on the brush to about 4-6PSI.

  • Get close to the sculpt and gently pull on the trigger, targeting the areas of the face that would have a warm tone to it (forehead, nose, chin, cheeks, ears). Be gentle and careful and patient as the brush can and will overspray if you are not careful. Add color to desired area in amount you want. Return excess paint to its mixing container. Clean the air brush with some water.

  • Put the base skin tone back into the brush and on the same 4-6PSI setting, and at a distance of about 20cm, do some short, simple quick sprays of the base skin tone on the sculpt. This helps to blend the salmon rose in with the base tone and provide you with transitions and blending.

  • By hand I then did the lips and eyes and ears and eyelashes, along with some highlighting on the nose, followed by varnishing through the air brush yet again. First a gloss varnish as that is the strongest varnish Vallejo makes and it will protect the best. Then a matte varnish to dull the shine. About 3 light to moderate coats each. Then with a brush do some satin varnish on the lips, and gloss those eyes again. Let air dry for 24 hours and it is ready to go.

9Ayane (DOA) Custom (Updated 5-2-23) Empty Re: Ayane (DOA) Custom (Updated 5-2-23) Mon 25 Apr 2022 - 17:43

Xavion2004

Xavion2004
That is truly a labor of love. It takes a rare combination of talent and drive to create something that beautiful. The color and depth of the belt and bow are amazng!

10Ayane (DOA) Custom (Updated 5-2-23) Empty Re: Ayane (DOA) Custom (Updated 5-2-23) Mon 25 Apr 2022 - 20:44

MeMyself&I

MeMyself&I
Xavion2004 wrote:That is truly a labor of love.  It takes a rare combination of talent and drive to create something that beautiful.  The color and depth of the belt and bow are amazng!

Thank ya! The belt especially is one of my favorite parts. I love shiny things admittedly, so the red, orange and gold really catch my eye Smile

I used Deco-foil transfer paper on both. The belt was made using orange fabric as the base, cut and sewn to the correct size, with red Deco-foil making up the pattern. Deco-foil has iron on glue sheets for their transfer paper which are pretty cheap and easily cut into various patterns. Cut the pattern, iron it on, peal back the top layer and then iron on the transfer paper. The best part, at least to me, is that I can technically run it through the washing machine Smile The bow not so much as that is ribbon with the same Deco-foil treatment, but I am not worried about it.

11Ayane (DOA) Custom (Updated 5-2-23) Empty Update for 5-2-2023: New Head Sculpt Wed 3 May 2023 - 0:01

MeMyself&I

MeMyself&I
Hey everyone, I have an update for this project, namely that Ayane now has a new head sculpt!

The reason for the change is that while making Honoka, Kokoro and Hitomi, I realized I had a good bit of inconsistency going on. First it was in the source of the head sculpts (which game in the series) followed by how I was doing their eyes.

Her head sculpt was going to get replaced at some point, either from something I printed or something I had someone make. Thankfully, I was able to rectify this without breaking the bank!

Then there is the matter of her eyes. Truth be told, I hated my previous attempt. You can see them in all their "dude trying this out and hoping it works" glory in the posts above and my Flickr album. I painted them and hoped it worked.

And for awhile it did. But as I tried my hand at using decals, and UV resin instead of gloss varnish, well, the results started to really show the discrepancy between my eye painting skill and what decals/resin provide.

So I printed her new head, painted it up, and gave her her new eyes. The results are a vastly cleaner, much more pleasing look that brings her in line with the rest of my lineup. I'm no where close to pro level, but I think I have improved and I know I am happy with the results. I have one gripe but it took me asking a buddy about it for them to even notice. Eventually the whole line up (minus Kasumi) will get minor upgrades to their head sculpts.

Anyway, you guys don't want me to talk, you want pics. So here are my favs of the new version, in no real order, courtesy of my new Canon R7 camera. Check out the full resolution and additional comments and pics in my Flickr album linked in the original post. Thanks for looking!

Ayane (DOA) Custom (Updated 5-2-23) Kas12110
Ayane (DOA) Custom (Updated 5-2-23) Kas12310
Ayane (DOA) Custom (Updated 5-2-23) Screen12

This last one is probably my favorite of her to date. The way the sunlight makes her eyes radiate and the subtle texture of her skin on both body and face adds some fantastic realism. Really need to see it at full resolution though, so I dunno if servimg is going to get that across.
Ayane (DOA) Custom (Updated 5-2-23) Kas12010

GubernatorFan

GubernatorFan
Founding Father
Very beautifully done, with all your usual attention to detail. And I agree, that last photo is very artistic.


_________________
I'll be back!
https://onesixthfigures.forumotion.com

BAMComix

BAMComix
Very nice indeed! Top work.

skywalkersaga

skywalkersaga
Oh, I can see the difference in the comparison pics for sure. Even though I thought the original looked good, too, I know the feeling about wanting your figures from the same fictional world to all be in line with one another. It can be hard to coordinate and can take years sometimes, so it's a good feeling to finally achieve it. ^,^


_________________
"The happy ending of the fairy tale, the myth, and the divine comedy of the soul, is to be read,
not as a contradiction, but as a transcendence of the universal tragedy of man."

Ignoring current 'official' Star Wars content for my own sanity.

15Ayane (DOA) Custom (Updated 5-2-23) Empty Re: Ayane (DOA) Custom (Updated 5-2-23) Wed 3 May 2023 - 13:43

Stryker2012

Stryker2012
Founding Father
Wow! What a difference. That’s a marked improvement. Great work.


_________________
Mark

-----------------------------------------------------------------------------------------------------------
He who dies with the most toys wins!

Ayane (DOA) Custom (Updated 5-2-23) 1f10

16Ayane (DOA) Custom (Updated 5-2-23) Empty Re: Ayane (DOA) Custom (Updated 5-2-23) Wed 3 May 2023 - 23:28

MeMyself&I

MeMyself&I
GubernatorFan wrote:Very beautifully done, with all your usual attention to detail. And I agree, that last photo is very artistic.

Thanks Gubernator! I appreciate the kind words and hope to be posting a more photo-centric thread like what some of the others have done. She will be part of it for sure.

BAMComix wrote:Very nice indeed! Top work.

Thanks!

Stryker2012 wrote:Wow! What a difference. That’s a marked improvement. Great work.

Thanks Stryker! I appreciate the kind words!

skywalkersaga wrote:Oh, I can see the difference in the comparison pics for sure. Even though I thought the original looked good, too, I know the feeling about wanting your figures from the same fictional world to all be in line with one another. It can be hard to coordinate and can take years sometimes, so it's a good feeling to finally achieve it. ^,^

Thanks Sky and amen to that! Funny enough I finished this almost a year to the day after I had finished the first version (according to my notes and pics) Laughing Funny how it works out.

Sponsored content


Back to top  Message [Page 1 of 1]

Permissions in this forum:
You cannot reply to topics in this forum