At the suggestion of Skywalkersaga, since I was working on it anyway, I put together this little hairing tutorial.
Let's take as an example Hot Toys' Thena figure. Gorgeous head sculpt, with the usual molded long locks of hair, which are impressive, but even if they might look cool (though perhaps not fully realistic), they definitely get in the way of poseability. So, of course they had to go. So did the the diadem. And I was not set on recreating the same look. The tutorial is essentially my take on Morezmore's tutorial from a few years ago.
What you need:
Of course, I forgot to document every stage at the right time, but I believe there is enough here to illustrate the process relatively clearly. So here it goes...
Unless you are starting with a bald headsculpt...

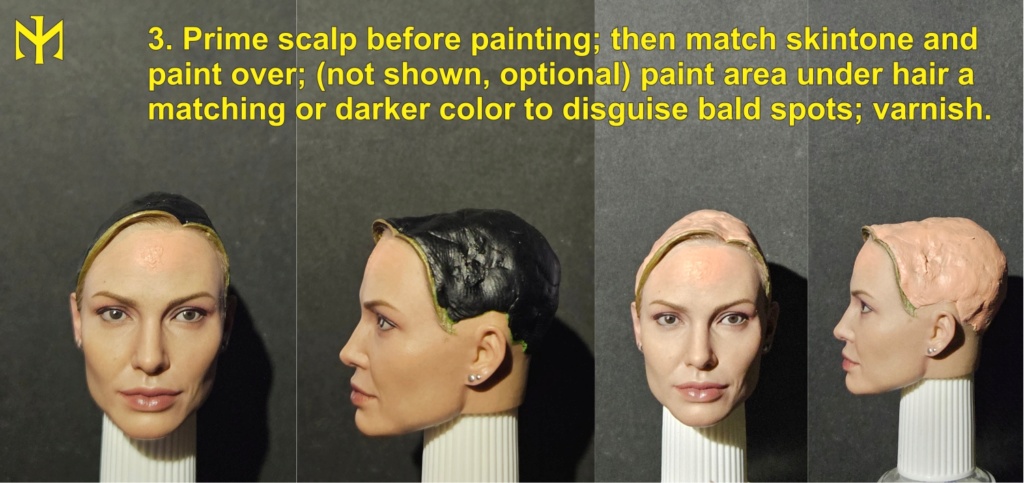
In theory, it makes sense to remove all molded hair, but sometimes leaving the separately molded hairline in place can actually be helpful to achieving a good final look.

For the next illustration, I forgot to take a shot of the final paint of the scalp in a color more or less matching the hair; you can see it at a later stage, when already partly haired.
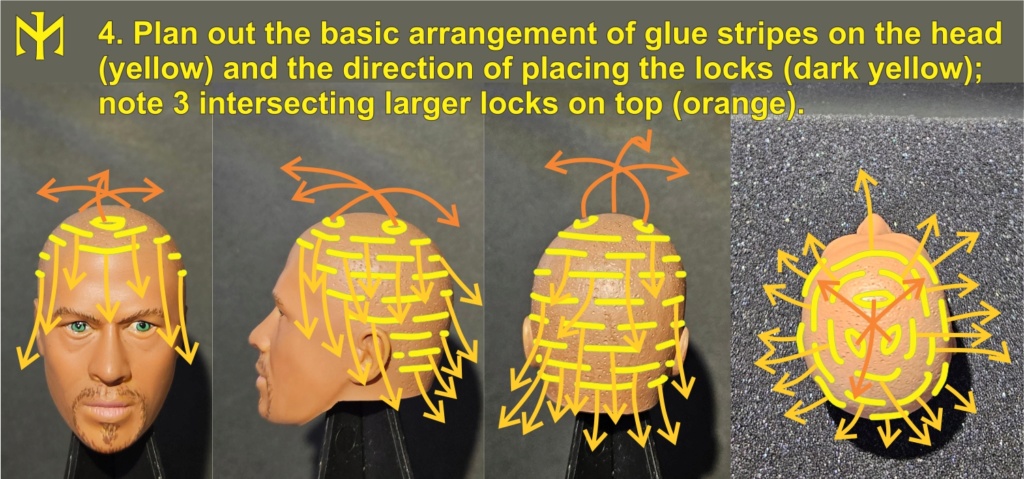
Using a different head to chart out the hairing strategy, below. One doesn't have to actually draw on the head before proceeding with the application of glue and locks of hair, but some might find it helpful; either way, this is the sort of thing you should have in mind. Also, since glue dries, you are not going to apply all the glue stripes first, then come back for applying all the locks of hair. I usually alternate, one at a time.
The original Morezmore tutorial had one apply the glue to each lock of hair, but I find that inconvenient and messy, and recommend applying a stripe of glue directly onto the scalp, then placing and pressing the "base" of the lock onto it.

When I say "wash," I really mean rinse... And be warned, removing loose hair strands can be an alarmingly "productive" process, but if you did you job right, there would still be plenty of hair left, glued in place. I don't know if fabri-tac glue causes residue like superglue does, but the residue can be handled, as below.
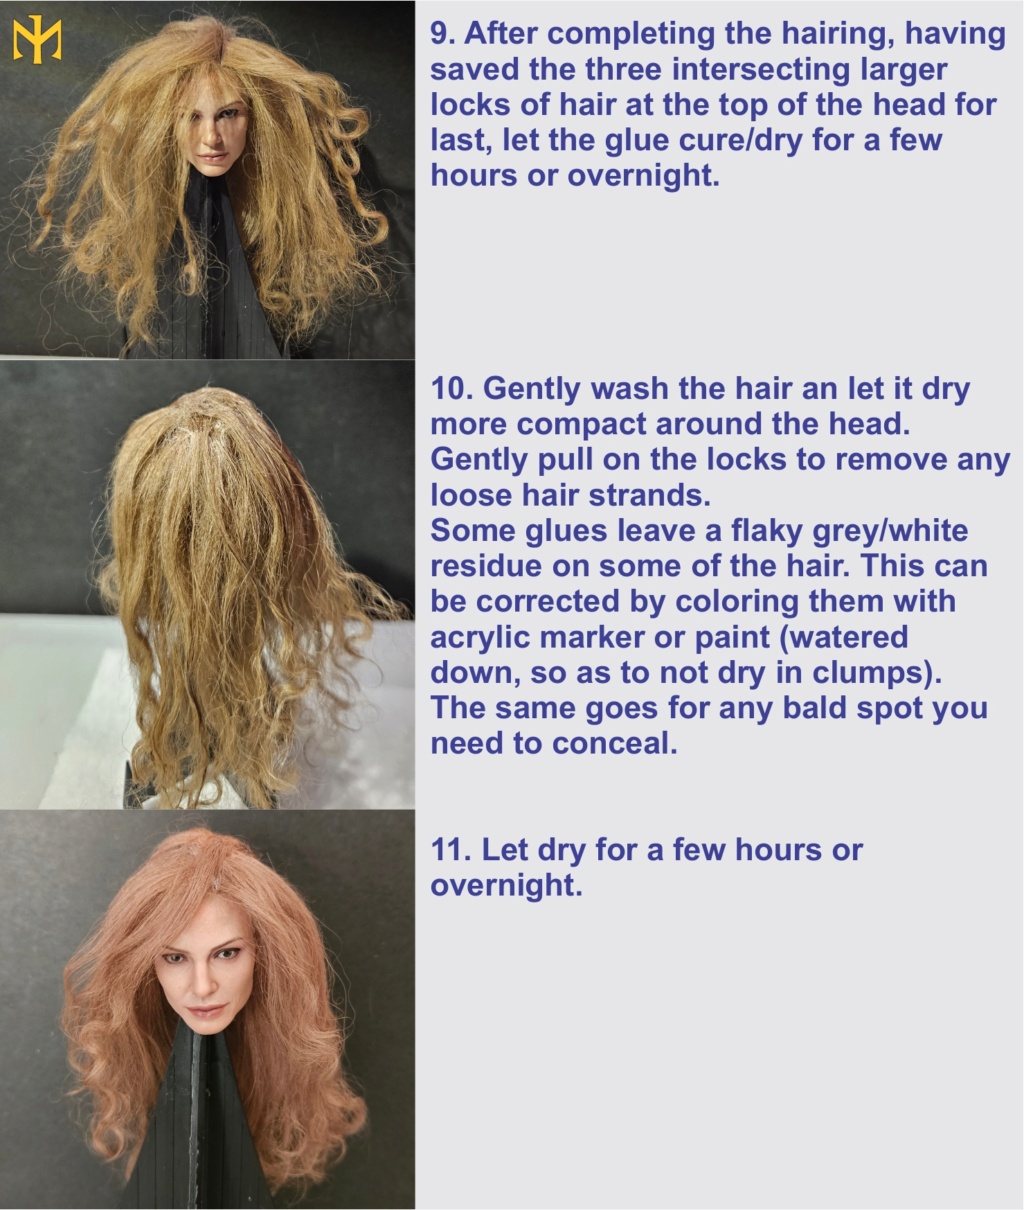
Below, be aware that ample application of hair conditioner can result in an overly wet-looking or clumpy look, although that is easily rectified with a light rinse or just futzing with the hair.

And you're done... Deploy your newly haired head as needed.

More photos of this HERE.
More photos of rehairing projects using the same technique from various posts on the forum HERE.
I hope this was useful.
Let's take as an example Hot Toys' Thena figure. Gorgeous head sculpt, with the usual molded long locks of hair, which are impressive, but even if they might look cool (though perhaps not fully realistic), they definitely get in the way of poseability. So, of course they had to go. So did the the diadem. And I was not set on recreating the same look. The tutorial is essentially my take on Morezmore's tutorial from a few years ago.
What you need:
- Headsculpt to hair or modify and rehair.
- Air-drying clay or sculpey or green stuff (kneadatite) if modifying head sculpt surface -- this is not something you'll be sticking in an oven.
- The hair of your choice (lamb wool in this instance, for me).
- The glue of your choice (Morezmore recommends fabri-tac, but I hate the stuff -- and it hates me -- so I use Gorilla Superglue Gel).
- Sharp scissors.
- A whole bunch of toothpicks (use separate ones for applying the glue and pressing hair locks in place, and clean or better yet change to avoid glue transfer and an escalating mess).
- (Recommended) hair gel or conditioner -- and water, of course.
- (Recommended) acrylic paints or markers (besides painting the scalp as needed at the beginning, you might need to obscure any remaining bald spots or glue residue at the end).
Of course, I forgot to document every stage at the right time, but I believe there is enough here to illustrate the process relatively clearly. So here it goes...
Unless you are starting with a bald headsculpt...

In theory, it makes sense to remove all molded hair, but sometimes leaving the separately molded hairline in place can actually be helpful to achieving a good final look.

For the next illustration, I forgot to take a shot of the final paint of the scalp in a color more or less matching the hair; you can see it at a later stage, when already partly haired.

Using a different head to chart out the hairing strategy, below. One doesn't have to actually draw on the head before proceeding with the application of glue and locks of hair, but some might find it helpful; either way, this is the sort of thing you should have in mind. Also, since glue dries, you are not going to apply all the glue stripes first, then come back for applying all the locks of hair. I usually alternate, one at a time.

The original Morezmore tutorial had one apply the glue to each lock of hair, but I find that inconvenient and messy, and recommend applying a stripe of glue directly onto the scalp, then placing and pressing the "base" of the lock onto it.

When I say "wash," I really mean rinse... And be warned, removing loose hair strands can be an alarmingly "productive" process, but if you did you job right, there would still be plenty of hair left, glued in place. I don't know if fabri-tac glue causes residue like superglue does, but the residue can be handled, as below.

Below, be aware that ample application of hair conditioner can result in an overly wet-looking or clumpy look, although that is easily rectified with a light rinse or just futzing with the hair.

And you're done... Deploy your newly haired head as needed.

More photos of this HERE.
More photos of rehairing projects using the same technique from various posts on the forum HERE.
I hope this was useful.