Stryker2011 wrote:
By the way, I have a question for all you diorama builders:
I’m curious how some of you folks go about doing your room boxes. I’m a big-time over-thinker, and tend to get lost (and often overwhelmed) with my research and planning stages. ... I‘ve actually purchased a dozen or so books on building dollhouses... I’ve even been taking screen shots from Westerns to attempt to make out how the floor plan of the homes work....

Don't worry, I'm laughing
with you, not
at you; although admittedly, I don't know if
you are laughing at this point.
I'm adding in a TL;DR line here at the top: get yourself 2 sheets of foamcore board (20x30), a hot melt glue gun, an Xacto knife with a new blade, a ruler to use as a straight edge, and go to it.
It really
is that simple. Or it can be.
I have never yet purchased a book about building dollhouses, although coincidentally, I was looking
for books on dollhouse construction at the city library a couple of weeks ago. The only book they had was simplistic and "craft level," very toylike, with crummier looking examples than what I make out of cardboard boxes, so I passed on that. I have no doubt that I would love reading and looking at the pictures in a nice book about constructing well-made, attractive doll houses and figure display spaces. Then I would doubtless find myself overwhelmed by Information Paralysis. And by a compelling desire to purchase expensive power tools.
It sounds like you are seriously stuck in the over-thinking stage of Information Overload.
My "dioramas" are no great shakes compared to the work of others. In my experience, the Best of the Best are the late MiskatonicNick, whose work can be seen on Flickr, and the OSF forum's own Reverend Spooky. The Rev (Adam) is, in my experience,
always happy to discuss the process and offer specific ideas on how to accomplish something in 1/6 scale. Like the sorely-missed Nick, The Rev is a super nice guy.
When I'm looking for ideas, my go-to source is to review Reverend Spooky's posts here or on his website (reverendspooky.com), or to look back at Nick's Flickr photos, which are still relevant today, even though most of his builds are now ten or more years old. Nick had a second Flickr account, Toyville Appendix ( https://www.flickr.com/photos/131468295@N07/ ), that, in addition to cat photos, offers a few additional behind-the-scenes pix of some of his dioramas.
Nick's "Setting the Scene" album on Flickr is particularly helpful when it comes to seeing how he did things: https://www.flickr.com/photos/toyville/albums/72157626093082480
I'll take the liberty of sharing one of Nick's images because it offers an idea of how he "did a lot with very little":
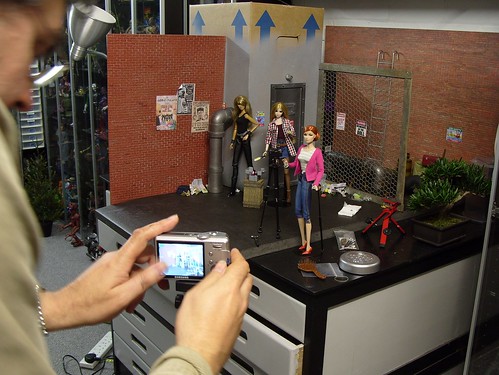
Exit the Fourth Wall, stage right by MiskatonicNick, on Flickr
'Kay, with
that rambling out of the way, my own question to you, which should have come
first (but The Rev's and Nick's stuff is way better than mine, so they warrant the initial mention), is
The Most Important Question To Ask Yourself Before You Start:
What do you want to do with your dioramas?
Specifically, what is your intent: permanent displays (that can occasionally be used for photography)? Or photography settings (that can be used in whole or in part for displays)?
If you're looking at a permanent display, find the topic here on the forum about the Jabba's Palace build, and start there (
https://onesixthfigures.forumotion.com/t1166-jabba-the-hutt-diorama-the-viewing-frame-wip). That topic is amazing, and it details the entire "thought process" from initial figure purchase, through looking at examples, to mockups, to completion.
My own dioramas are almost entirely for photo purposes, so they do not need to be complete. I have not yet crafted a photo-story in which relative room placement is important. Sometimes scenes "suggest" room arrangement within a location, but nothing is set in stone. Much like many motion pictures, the fictional room arrangement is whatever suits the story.
Because my dios are not intended for permanent display, I can cut a lot of corners...
and I do not need ceilings or roofs! Including a permanently attached ceiling or roof significantly limits the options for photography. Boxes without tops are much better for lighting and for camera access, not to mention setting up figures and furnishings.
I basically build walls out of flat pieces of cardboard, and I cut holes in them for doors or windows. That's really about it. For exteriors, I decorate the panel to look like the outside of a building. For interiors, I decorate it like interiors. For most interior scenes I can get away with having two walls that come together at a corner. That way I can do head-on photos looking in to the room, or angled photos toward a corner, showing a portion of a projecting wall. I usually end up building a third wall for the other end of the dio so I can reverse the angle without taking everything down and re-using a wall.
Having followed this topic from the beginning, it appears to me you are going for a more "realistic" look than for stylized or cartoony, and that you'd like to have things "actually exist" as opposed to be "suggested." That being the case, I once again refer you to the work of The Reverend Spooky. His house from The House of Seasons saga looks, to me, like if you were to remove just a few of the modern amenities, your Old West characters could practically walk right in.
https://onesixthfigures.forumotion.com/t5555-movie-night-from-the-world-of-house-of-seasonsAs you continue to
think about rooms, homes, businesses, floor plans, and false fronts, my suggestion would be to get a flat piece of cardboard or foam core board and just start. Make a wall. Decide what kind of wall -- maybe a parlor wall you can set the piano against for starters, as it would be relatively simple.
I use 20 inch by 30 inch sheets of foamcore board these days. It warps less than cardboard. Glueing two sheets together offers greater rigidity than single sheets. I know that forum member BAMComix uses thin plywood or MDF board for his builds. I'd recommend starting on your first wall with cardboard or foamcore so you don't have to invest in a lot of tools or invest too much time on each piece. You can always recycle what you've done for use in a better or more robust version as things evolve and progress.
For photography purposes, you really need the back wall height to be at least 18 inches, which is 9 feet in scale. This is a bit high relative to "real" in the modern world, but Old West houses, unless they were dark, cramped cabins, often had high ceilings.
I've left out an important initial question: how much space do you have to set up your display and in which to work? Constructing things true-to-scale in 1/6 scale gets really big really fast. A "small" room in a house today would be 12x12 feet. That's 24 inches square in 1/6 scale. Even "large" dioramas that people build in 1/6 scale, like pubs or nightclubs, are often limited to 5 or 6 feet in width, and about 2 feet deep: or about 12 x 30 feet -- the size of a very tight fitting single-car garage. Imagine packing twenty or thirty people and a bar and a dance floor and a piano in your garage -- usually not realistic for most of us (although in your case, you might be able to move the motorhome and the boat outside and get away with it

), and nowhere near the size of a real world bar or dance club. Most photos we see of 1/6 scale dioramas are unrealistically compacted in true-scale terms, but they look right to the eye. Rooms constructed to true-scale can actually look too big; plus, it takes a lot more stuff to fill them convincingly. Constructing a miniature room involves a sort of forced perspective effect, and it's partly a process of figuring out what looks right to the eye rather than on paper, and everything is tempered by what is realistic considering the real world space available.
Take a look at raaen99 on Flickr to get an idea of
how much stuff it is possible to squeeze in to a tight scene against a flat wall; and keep in mind, raaen99 works in 1:12 scale:
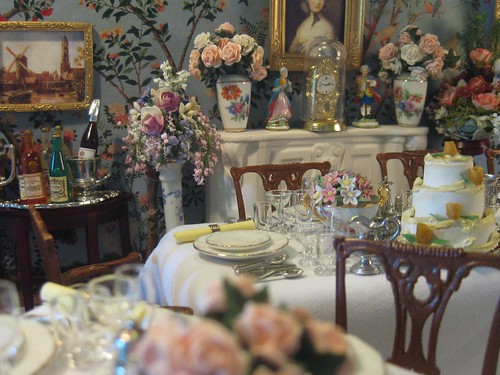
Secret Desires and Despises at the Wedding Breakfast by raaen99, on Flickr
My advice would be to get a sheet or two of foamcore, cardboard, or thin plywood, about 20 inches by 30 inches, and find a pic of a relatively simple parlor or bedroom wall that you like the looks of, and try to emulate that one wall, just to get an initial idea of what is feasible and how things look.
In my experience, drawing things out to scale and "doing the math" ends up not looking right.
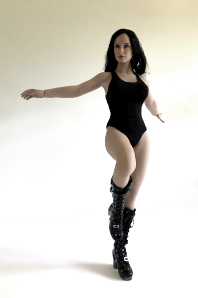
Once you get further along in the process, and have enough constructed that you can put a couple of figures in to a scene, you'll start to see that the style and shape of the figures might influence your design. For all their flexibility and "apparent" realism, even seamless figures do not actually represent the range of motion or the relative size of body parts of real people very well. Stairs are a case in point. But that's getting way ahead of where we are at the beginning.
I'll leave you with one more Flickr link -- OddMod:
https://flickr.com/photos/oddmod/51170342039/
Oddmod doesn't allow the embedding of images, but that link will give you an idea of how large an almost-true-to-scale house in 1/6 scale would be.
OM's Flickr is well worth a visit. The photo-stories are a delight, charming and cute and fun, and the world she created for her characters is truly remarkable in its stylized realism. Here's a representative image that would almost work for your Old West aesthetic:
https://flickr.com/photos/oddmod/51261169516/
But start with something simple. One. Little. Thing. That would be my suggestion.


 1 ... 8 ... 12, 13, 14


Actually... no, I guess I didn't! If he can build something like that, then an Old West house should be a lead pipe cinch!