OneSixthFigures
Would you like to react to this message? Create an account in a few clicks or log in to continue.
OneSixthFigures

An online community to discuss and share news about sixth-scale figures, with an emphasis on either custom or commercial articulated figures.


You are not connected. Please login or register

first major steps with my 3d printer/update 04.01

Go to page : Previous  1, 2, 3, 4  Next

Go down  Message [Page 2 of 4]

Ephiane


Like Stryker. Think the best option is the " Host an Image " here in the chat funktions ?

See the pics now in Your secound post. Great Stuff.... Now i know a Guy with a 3D Printer, cool. Can we be Friends ? Laughing

Tjolnir


gonna give the other host option a shot next time i upload some new pics, guess by tomorrow. feeling a lot better and will paint the next batch of items by tomorrow, saturday at the latest.
funny thing about the 3d printer is that i'm now using more greenstuff than ever Smile

3d models in games look all well and good but i just learned that most of them are "hollow".
guess ingame you don't need substance so once cut in half you end up with something similar to dracular and a mirror. and this seems to irritate the printer since he wants a solid base to print upon.
some programs seem to help fill the gaps but some models come out partially "raw". kinda seth brundles teleporter if that makes any sense Wink
most empty spaces i was able to fill with super glue and greenstuff and i hope once painted it won't stand out badly.

next is time: so far i had 2 weeks vacation and 1 week off due to a bad cold, but anything bigger than a few inch needs hours to print. and you shouldn't leave a 200degree celsius printing head unmonitored. so bigger items are limited to the weekends or days off.
got a new figure in the making and the first piece took 7hours to print....

oh and sure we can be friends;) i consider everyone patient and dedicated enough to put up with this hair pulling hobby a buddy of mine
cheers
tjolnir


small update: wind and spraypaint doesn´t mix.... i know i know.... common sense, though i just wanted to get something done today. result ain´t to bad, yet i´ll wait for better weather and after work on saturday with the bulk of items so i´ll upload new pics rather monday than tomorrow.

Tjolnir


hi folks, another small update.

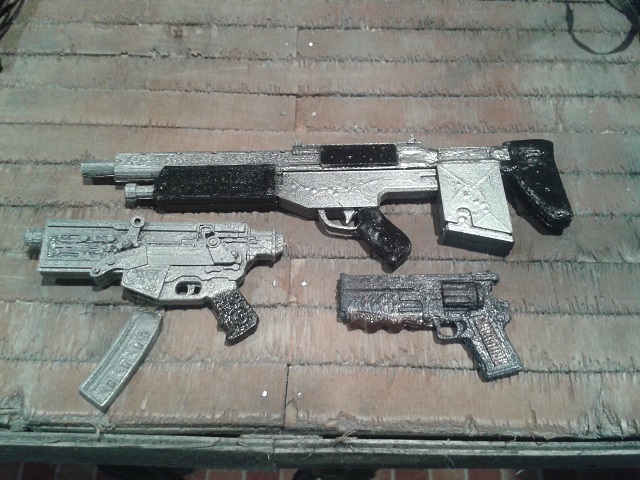
first batch of fallout 1 themed weapons just dry after painting, sadly my smartphone doesn´t show the colors very accurate so the pic looks a bit "off"

still i´m happy with the result in hands.

first major steps with my 3d printer/update 04.01 - Page 2 G110

the bigger on top is the city killer shotgun first major steps with my 3d printer/update 04.01 - Page 2 Latest?cb=20110207063715

lower left is the fallout 3 version of the 10mm smg, painted in the theme of fallout 1. haven´t found a printable model of the real old version yet, so this will have to make due. as a little bonus i had the option to make the mag removable. first major steps with my 3d printer/update 04.01 - Page 2 Latest?cb=20110211035545

last but not least the starting pistol of the game. yes it´s a magazin fed drum revolver, odd but so it is written in the fallout lorefirst major steps with my 3d printer/update 04.01 - Page 2 Latest?cb=20110211035324

more fallout stuff coming soon....
cheers

shazzdan


Nice job but You are right about them being too thin.

https://www.etsy.com/au/shop/OneSixthArsenal

Tjolnir

Tjolnir
another update and a few pics, with the same crappy smartphone though.

wasn´t quite satisfied with only the "modern" 10mm smg so i dug through older mod files and bingo, classic fallout 1 smg, "eureka"

first major steps with my 3d printer/update 04.01 - Page 2 C311

hand for scale Very Happy

first major steps with my 3d printer/update 04.01 - Page 2 C410

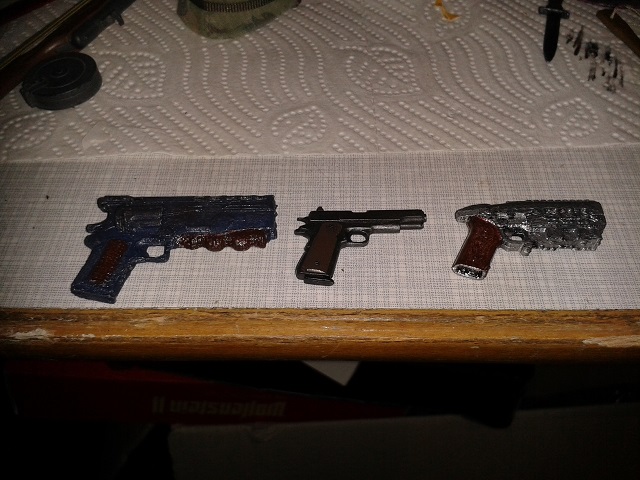
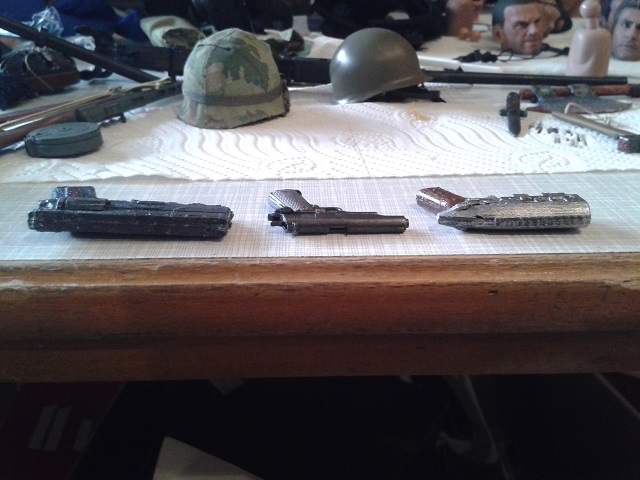
don´t think they come out too thin, took a .45 pistol i had around for comparison

first major steps with my 3d printer/update 04.01 - Page 2 C111

first major steps with my 3d printer/update 04.01 - Page 2 C211

the issue i had earlier was with the models being hollow by default, something i only understood recently by accident.
tested another tool named mesh mixer and stumbled over an option to make objects "solid"
though the option slightly decreases the sharpness of the model, it fills the empty spaces to the printer has something to work with.
on the other hand the size of the model explodes 100fold.
so there´s the reason why those ingame files don´t have any substance in them. would be a hell of a 1 tb game minimum at unplayable framerates.

so, technical stuff aside here are a few more pics of my fallout weapon collection to date, still growing

first major steps with my 3d printer/update 04.01 - Page 2 C510


cheers
tjolnir

shazzdan

shazzdan
There is a way to get rid of the layering lines. Put the item in a sealed container with a small amount of acetone. The fumes act to even out the surface. It is called vapor-smoothing. It can't be used with everything because some of the other fine detail also gets lost but a good paint job can fix a lot of that.


_________________
More of my work can be found at One Sixth Arsenal
https://www.etsy.com/au/shop/OneSixthArsenal

Stryker2011

Stryker2011
Founding Father
Now I'm not seeing any pics at all. What photo-hosting are you using?


_________________
Mark

He who dies with the most toys wins!

first major steps with my 3d printer/update 04.01 - Page 2 C8485110

Tjolnir

Tjolnir
this time i used the host image option here on the board. they do load eventually, though it seems to take ages for any browser to complete the loading sequence.

try to reupload smaller versions of the pics the next days
cheers

ps: reduced the amount of redundant pics as well, might load quicker this time

Stryker2011

Stryker2011
Founding Father
Now I got them. Cool work. I wonder how SC’s vapor smoothing technique would work for you, I’d be curious to see (I can’t imagine trying to sand something that detailed would be easy).


_________________
Mark

He who dies with the most toys wins!

first major steps with my 3d printer/update 04.01 - Page 2 C8485110

GubernatorFan

GubernatorFan
Founding Father
They seem to be working flawlessly now. When I tried to look at them yesterday, they were taking a very long time to load. When I post images I always use ones that are reduced in size to (usually) 6 inches or less in width, so it may have been (at least in part) about the size of the photos. Anyway, you seem to have fixed it.


_________________
I'll be back!
https://onesixthfigures.forumotion.com

Tjolnir

Tjolnir
as far as i read acetone works with abs filament but since i´m using pla it would just disolve upon contact.
technical stuff aside i´m far to much of a sissy to use "chemicals" to some extend, some fumes don´t mix well with my well-being. even go overboard when spray painting my stuff, didn´t wear eye protection once only to have them burn afterwards without even getting in contact with the stuff in the slightest.....

sanding might be out of the question due to the size of the items but mainly because i´m to lazy to do so atm Wink
gotta narrow down some issues with my printer first before i go full detail with my objects.

working on a protectron right now, takes a hell of a time to print the items one by one, some have "missing layers" but not consistently so.
read something about underextruding.... looking into it with the next try.

cheers

shazzdan

shazzdan
Why PLA and not ABS?


_________________
More of my work can be found at One Sixth Arsenal
https://www.etsy.com/au/shop/OneSixthArsenal

Tjolnir

Tjolnir
cheaper and needs lower temperatures to print apart form giving off almost no odor or nasty smell. right now i got my printer in my figure-room where i keep the shutters down and windows closed most of the time. when printing (mostly in the evening hours) i open the windows a bit but most of the time i´ll try to avoid sunlight on my figures.

so i figured pla would be less harmfull and to some extend less abrasive on the printhead. though i might be wrong on the later.

shazzdan

shazzdan
That can be a problem. 3D printers don't like any sort of air movement but humans don't like the fumes they emit when there is no ventillation.


_________________
More of my work can be found at One Sixth Arsenal
https://www.etsy.com/au/shop/OneSixthArsenal

Tjolnir

Tjolnir
no doubt i'll start experimenting here and there with various materials once i got the hang of my printer to some extend. right now as a bloody beginner i'm happy if the print resembles the model i chose Smile. next week i'll have to ask the company that build it how to calibrate the thing since the farther i get to the outer right edge the more objects get f'ed up.

they sure told me upon sale but amongst the dozens of things i was shown it was kinda overwhelming.
this and having some empty layers in bigger objects are among my top priorities now in order to get better.

right now i'm trying a gatling laser from fallout 1/2, the right half came out ok'ish with the last 3-4 layers missing even though the program was displaying a flawless printable object.
but that what green stuff is for, right?

cheers
tjolnir

Tjolnir

Tjolnir
first major steps with my 3d printer/update 04.01 - Page 2 P110
first major steps with my 3d printer/update 04.01 - Page 2 P210
first major steps with my 3d printer/update 04.01 - Page 2 P310

first major steps with my 3d printer/update 04.01 - Page 2 P410


another few "thingies" for my fallout diorama/collection, as i propably won´t be able to fit everything iinto it.

at the top is a sunbeam gatling laser, late game weapon of fallout 1/2.

first major steps with my 3d printer/update 04.01 - Page 2 Latest?cb=20130109135721

later versions from fallout 3 or 4 i found far less appealing, not giving me any "gatling" vibe.

below is a h&k p90c (yep in the fallout version it´s not build by herstal but heckler&koch instead)

first major steps with my 3d printer/update 04.01 - Page 2 Latest?cb=20110308054325

last but not least a couple of clutter such as stimpak, holotape and tv dinner tray. gonna fix the needle of the stimpak in a later step, though my printer could get the fine lines done, getting it from the printing bed without breaking is another story. guess a bit of super glue and wire will do the trick

hope you like them
kind regards
tjolnir

shovelchop81

shovelchop81
Well you're certainly challenging yourself! These are not easy guns to so start with! Great choices though and the results are definitely improving!

Tjolnir

Tjolnir
thanks mate, not much skill though on my part, it all depends on the quality of the 3d models.(when i say quality i mean if they are solid enough to print)

i tried to paint some zombie heads years ago and was quite happy with the result but somehow for the life of me i can't get guns right.
anyhow, just had a little mishap after 19! hours of printing. tried to remove the upper protectron torso only to have the bottom stick onto the printer and rip some layers apart.
nothing that can't be salvaged though luckily. imagine the rage Wink.
but the lower torso is twice the size almost, that adds up to 35+hours straight printing. now imagine if i increase the infill % as well.
on the bright side i got 1 week off so i guess there gonna be some looong nights Smile

cheers
tjolnirr

Ephiane

Ephiane
https://i.imgur.com/0xdFEks.gif

So Great ! Please make me a 1:1 one. I have a date at the Tax office

Stryker2011

Stryker2011
Founding Father
The Gatling laser is pretty cool.


_________________
Mark

He who dies with the most toys wins!

first major steps with my 3d printer/update 04.01 - Page 2 C8485110

Tjolnir

Tjolnir
thanks guys, glad you like 'em.

well technically i could print one in 1:1 but i guess  my grandkids would have to finish the job even if i died of old age Wink.
got a 1/6 protectron in the making and a third of the upper body took 19+ hours to print, being one part of i guess around 15-20 after cutting them so the parts lay flat on the printing bed, i estimate the better part of my 1 week vacation babysitting my printer day and night Smile
talked to the guy thats building them and he showed me a 1:1 new vegas ranger helmet. pretty cool stuff though he has the luxury of monitoring his printer at work and i guess he's got a few of them tasked with the same job.
only having 20*20*20cm to work with means you gonna break everything down into tiny pieces and bring them back together afterwards in a stable fashion.
i know some folks working for a company owning a "metal printer", sadly it's off limits for private stuff.
otherwise i'd be strutting around in my very own power armor Wink


small headsup:

after 50+ hours of printing here´s how the protectron looks so far.
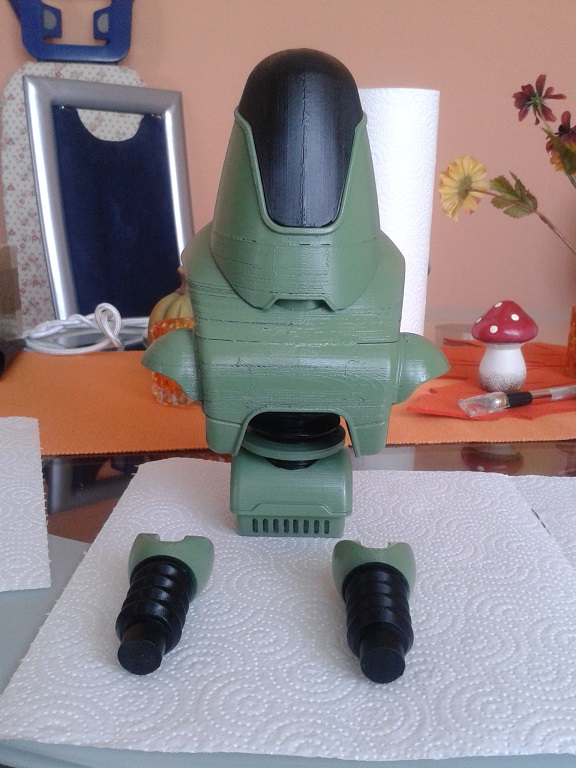
first major steps with my 3d printer/update 04.01 - Page 2 V110

after realizing there´d be no chance to finish the project in 1 week vacation i put another small project in between, fallout 4 combat armorfirst major steps with my 3d printer/update 04.01 - Page 2 V210
so far so good, put a blackwash on the paint though it looks like the shoulder armor is a tad to small even if the scale is correct to the original size.
here are the links to the models as well as thankfull credits to the guys that made it even possible

https://www.thingiverse.com/thing:3094176 (armor)
https://www.myminifactory.com/object/3d-print-fallout-4-protectron-action-figure-15585 (protectron)

Tjolnir

Tjolnir
another small update on my neverending fallout project Very Happy

just a little "in hand" look on the gatling laser, i think i got the scale about right. any bigger and the figure wouldn´t be able to weild it properly, even this is dragging him down severely even if the infill rate was about 30-35% so it´s 65% hollow.

on the other hand you can see how my combat armor from fallout 4 comes along, sadly i haven´t found any reliable 3d model of the classic armor so far, still looking though.

first major steps with my 3d printer/update 04.01 - Page 2 Ac110
first major steps with my 3d printer/update 04.01 - Page 2 Ac210

so far the magnets do the trick, luckily i get an abundance from packaging boxes at work.

cheers

Pontiacivan

Pontiacivan
Incredible work!
3D printers really are changing the world, not just in the 1/6 Hobby either.
That "dang blasted little plastic part " that breaks on EVERY product in the world is now replaceable from home!
You are doing great, I hope you look back on these pictures some day and say " I remember when I was just starting out....." as you 3D print your latest custom item!

Tjolnir

Tjolnir
thanks mate, today i finally finished my first bigger project. a fallout 4 protectron.

first major steps with my 3d printer/update 04.01 - Page 2 X110
first major steps with my 3d printer/update 04.01 - Page 2 X210

small edit for putting the thing together: the joints and places you put the single parts together are quite loose, what i found to work pretty well is stripes of fake leather or similar fabric you put in between joints, gives for a good portion of friction. tried super glue first yet due to the size of the figure it aint enough to keep the joints tight without locking them in place.


had some quirks and issues with the 3d models and my printer, some holes and incorrect lines but all in all it came out quite well.

for everyone considering getting a 3d printer i´d say do it.
material costs right now for the filament is crazy cheap, the whole figure (standing a bit taller than 12") was about 15€, 17,65$ tops.

add primer and spray paint you´ll end up at about 50€ for the whole thing and you´ll not using up the entire spray cans either so there´s plenty left for other projects.

here´s the deal though, time. you´ll need plenty of it, about 120+ hours went into printing + editing the models where needed.(the guy that uploaded it did a really good job, i had to cut some pieces down nontheless for i have 20 cubic cm printing bed and his design was scaled at 6" rather than 12")
plus it ain´t a good idea to leave a 3d printer to itself for the whole day. so i put the big parts in between sleep shifts while on vacation at home.

still i´m really happy with whats possible with this neat gadget, no more fiddeling with modeling clay ending up with something a 3rd grader could do better in art class with my skills Very Happy

onto the next projects....
cheers
tjolnir

Stryker2011

Stryker2011
Founding Father
Really neat Potectron. I have a question, is he mobile? Or is it essentially a statue, due to the leather holding the loose parts in place?


_________________
Mark

He who dies with the most toys wins!

first major steps with my 3d printer/update 04.01 - Page 2 C8485110

Tjolnir

Tjolnir
thanks, glad you like it
the leather helps to tighten the joints, apart from that arms and hip are fully moveable and rotate very freely giving you lots of different poses. knees and legs have a lot smaller radius of movement, still you can bend legs and knees to some minor degree.

i guess the leather wears down after some usage but it's very simple to replace the stripes.the parts pop in and out nicely and tight, the knees and feet were a bit "cracky" when you shove them together but the filament is quite flexible it seems. guess it's due to the honeycomb structure inside.

it's lorefriendly though they move very clunky ingame as well, not unlike stilts.

GubernatorFan

GubernatorFan
Founding Father
Very impressive and inspiring progress. Keep at it!


_________________
I'll be back!
https://onesixthfigures.forumotion.com

dadrab

dadrab
Mighty damn cool.

Tjolnir

Tjolnir
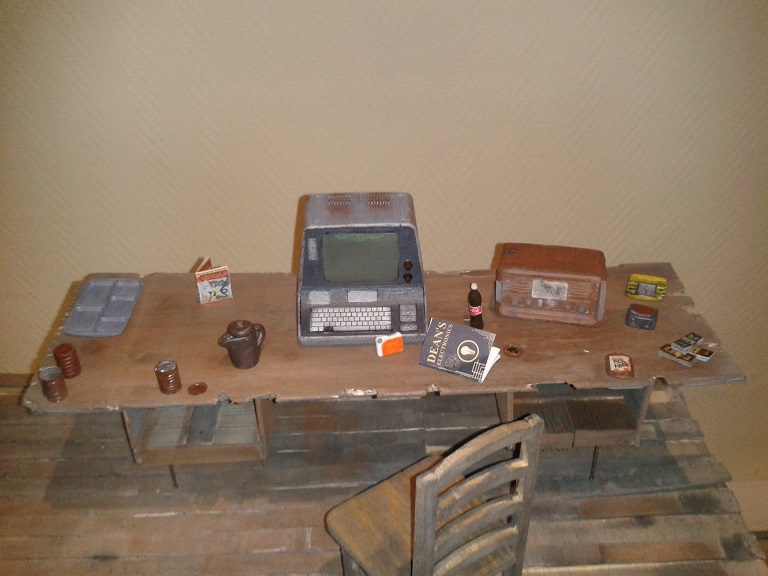
another quick update, the robco terminal and radio turned out fine.
the terminal is put together from various parts leaving room for improvement like a real display in the far future.

on the other hand i´m printing some skeletons right now with only a 40/60% sucess rate. all the small parts/bones stick to the printing bed and stabilizing beams like crazy ony to be pulled apart piece by piece. time for some super glue Very Happy 

first major steps with my 3d printer/update 04.01 - Page 2 M110
kind regards

Sponsored content


Back to top  Message [Page 2 of 4]

Go to page : Previous  1, 2, 3, 4  Next

Permissions in this forum:
You cannot reply to topics in this forum