OneSixthFigures
Would you like to react to this message? Create an account in a few clicks or log in to continue.
OneSixthFigures

An online community to discuss and share news about sixth-scale figures, with an emphasis on either custom or commercial articulated figures.


You are not connected. Please login or register

Repainting head sculpts to match body (updated with Part III)

Go to page : 1, 2  Next

Go down  Message [Page 1 of 2]

GubernatorFan

GubernatorFan
Founding Father
Part II in Post 13
Part III in Post 24

Part I

This will eventually be placed in the Tutorials section.

What do the following four head sculpts have in common? I mean, other than their sex and arguably enviable looks. Smile

TBLeague - Repainting head sculpts to match body (updated with Part III) Hmrp0110

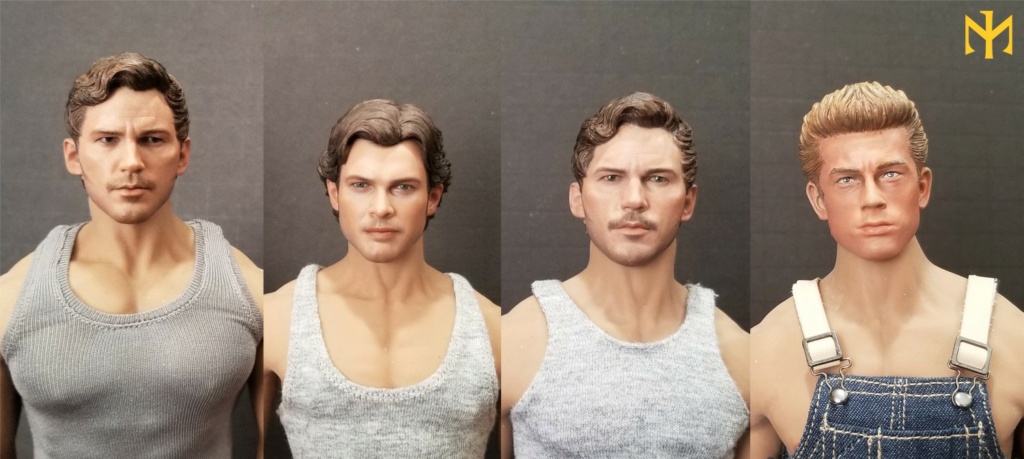
They are all partly repainted to match the TBLeague bodies that carry them. In the first three instances these are Hot Toys sculpts, and between the expense of procuring them and the excellence of the detail, my repaint is very subtle, essentially a thin film to lessen the gap between the slightly lighter and cooler skin tone of the original sculpts and the the quite tan TBLeague body. In the fourth instance my repaint was a little less subtle, for various reasons.

Sometimes you get lucky with a head sculpt matching the body right out of the box, like this HY gladiator John Cena. Sometimes you do not, like this Dragon Sam Worthington (which also required quite a lot of modification to fit bodies with integral necks like DAM, TBLeague, etc).

TBLeague - Repainting head sculpts to match body (updated with Part III) Hmrp0210

It is this last head sculpt that I have been meaning to repaint for quite a while, but its pale and yellowish skin tone is so big a contrast that it was going to take something more than the very subtle repaints I normally give head sculpts. Here it is again, compared to the slightly repainted Hot Toys Chris Pratt.

TBLeague - Repainting head sculpts to match body (updated with Part III) Hmrp0310

Here is what we need: several acrylic colors (I prefer Vallejo) to mix to approximate the TBLeague suntan skin tone (in this instance), and some Liquitex Professional Ultra Matte Medium (thanks, Sky!) to keep the paint from curing too shiny.

TBLeague - Repainting head sculpts to match body (updated with Part III) Hmrp0410

The mix that I find works well in approximating the TBLeague male suntan skin tone (as used for M31 to M36A) is cork brown with lesser amounts of dark vermillion, iraqui sand, and leather brown. I also used some burnt umber and German black brown (not shown) for some darker details on the face. Lip color (the bane of my repainting experience) was achieved by mixing dark vermillion, cork brown, ivory, and some blue. It came out a little fresh, but is pretty close to the reference photo I used. I could probably have used even more Liquitex matte medium (which appears white in the photo).

TBLeague - Repainting head sculpts to match body (updated with Part III) Hmrp0510

I mixed the matte medium and the acrylic paint thoroughly to achieve an even color with a toothpick.

TBLeague - Repainting head sculpts to match body (updated with Part III) Hmrp0610

Then I tested how the resulting color compares with the body's skin tone. Since it was close enough, I proceeded to paint the ears and the area between the hairline and the edge of the back of the head. Since these areas will sit right next to the neck, and since (except for the ears themselves) they form a notionally separate surface than the face, I was not worried about making the paint application particularly thin or transparent here. I think the match is pretty close (keep in mind that light, screen settings, and individual perception would vary). Here I should point out that a proper head sculpt paint (or repaint) job would involve stripping the original paint (if any) by dipping in acetone, etc., and starting with thin layers from scratch. My approach is more basic and less ambitious, essentially a touch up. Given the great disparity between the skin tone of the head sculpt and what I needed to match, that was not necessarily the best strategy in this case. But anyway...

TBLeague - Repainting head sculpts to match body (updated with Part III) Hmrp0710

After this, using a fine brush (except for painting tiny details you don't actually need to use a 000 micro brush) with plenty of water, I applied some of the mixed paint onto the face, and then proceed to spread it as a thin layer with a cotton q-tip. In fact, I did not use enough water or start with a small enough area, and while I was fiddling with the camera it began to dry faster than I could attend to it properly with the cotton swab. That is why I had to do some damage control, which provides the occasion of noting that you might want to have a little container with alcohol standing by, so that you can quickly fix any errors by wiping them away with another q-tip dipped in it.

TBLeague - Repainting head sculpts to match body (updated with Part III) Hmrp0810

Repeating this in other areas to cover the face, largely avoiding any fine details I was trying to preserve (like the eyebrows and the eyes), I covered everything that needed to be covered. Panting in thin layers produces an initial dirty and somewhat uneven effect, which is one of several reasons why you would want to go for a second or third layer. I still wanted a little bit of translucency to the skin, but between damage control and the stark contrast between the original and desired skin tone, that was not going to be very noticeable on this particular experiment. While I am not necessarily done tinkering with it, the result is this.

TBLeague - Repainting head sculpts to match body (updated with Part III) Hmrp0910

The dark line over the eyes (which is there in the reference photos I used) is much less obvious and less fake looking in hand than in the macro photos. While I do feel I have lost a little bit of the fine subtle detail of the original paint job (as I expected in this instance), I think the result is passable and, as far as matching the body's skin tone is concerned, successful.

TBLeague - Repainting head sculpts to match body (updated with Part III) Hmrp1010

Lighting makes a big difference in perception, so there are a few more images.

TBLeague - Repainting head sculpts to match body (updated with Part III) Hmrp1110

Finally, this time I did remember to take before and after photos (there is hope for us all!), although I had to resort to some color manipulation to make them properly comparable due to somehow different light conditions.

TBLeague - Repainting head sculpts to match body (updated with Part III) Hmrp1210

What do you think?

Part II in Post 13
Part III in Post 24

#tbleague #dragon #head #repaint #custom #tutorial


_________________
I'll be back!
https://onesixthfigures.forumotion.com

TravelGuide

TravelGuide
Well done cheers


_________________
Lexi is my (TBLeague) travel companion.
Lexi's holiday with Allison and Bernadette

GubernatorFan

GubernatorFan
Founding Father
TravelGuide wrote:Well done cheers

Thank you very much, I'm glad you like them.


_________________
I'll be back!
https://onesixthfigures.forumotion.com

Annalise

Annalise
Wow, what a difference. Good job and thanks for sharing your method.

Stryker2011

Stryker2011
Founding Father
Interesting technique. And while it may have lost some of the detail, I still think it turned out fine. Thanks for the details on what paint you used, etc.

Not sure it would be useful for the future, but if you want to try to strip the original paint off and start from scratch: When I was in Art School — way back when — one of the things I learned in “Color” class is to start with a really dark layer first, let it dry, and add subsequently lighter, and watered down, layers (drying and curing between each) until you reach the desired color. The underlying dark color, and subsequent lighter layers, gives the “skin” that level of translucency that you were talking about, and then doesn’t really require the added additional skin tone colors (like highlights or lowlights), as the light source used will do that for you. (Of course you will have to add all the other details like eyes, eyebrows and eyelashes, lips, hair, etc. — and “makeup” where applicable — but the overall skin tone won’t need it.) Granted, this is also the more ambitious, and time consuming, method — and not one a lot of model painters use, but I thought I’d share the tip in the event you feel crazy interested in trying it out on a cheap head to see how you feel about it. (The same technique can be used for the hair, but I used to add in highlights/lowlights there myself).


_________________
Mark

He who dies with the most toys wins!

TBLeague - Repainting head sculpts to match body (updated with Part III) C8485110

skywalkersaga

skywalkersaga
Thanks for sharing your method, GF! I think it works well for heads that you don't want to totally repaint, but want to match better to the tbleague.

Something to bear in mind is that acrylic paints tend to dry darker -- in that, when they're wet they look a bit lighter than they do when dry. So, something I've had to do when trying to colour-match is to mix the colour in question, then paint a bit on a piece of paper (or whatever) and let it dry. Only then can I see for sure if the colour will match. It's a bit tricky of course though as you then have to remember the precise ratio of colours you use to achieve the right mix. That's where perhaps having a covered container to keep the paint wet in the meantime can help.


_________________
"The happy ending of the fairy tale, the myth, and the divine comedy of the soul, is to be read,
not as a contradiction, but as a transcendence of the universal tragedy of man."

Ignoring current 'official' Star Wars content for my own sanity.

BAMComix

BAMComix
Wow! nicely done! They look so much better re-panted to match the bodies, but only if you have the skill, which you clearly have! Most envious! lol!

Gizems nice Kittens

Gizems nice Kittens
Great effect with the colours. This is definitely worth adding to the tips section.

collectorofmany

collectorofmany
GubernatorFan wrote:TBLeague - Repainting head sculpts to match body (updated with Part III) Hmrp1210

What do you think?

Wow, that is a night and day (excuse the pun) difference!

I was noticing last night that while both of my HS’s are ‘close’ in color, neither are exact. I surely don’t have the confidence to paint over what I’ve already got. I’m wondering how it would look if one tried to blend in the color around the neck (just above the chin and jawline) so as not to have to paint over the face. I mean it might look weird, but depending on how well the blending is done, it *may* work...


_________________
—Steven

GubernatorFan

GubernatorFan
Founding Father
Annalise wrote:Wow, what a difference. Good job and thanks for sharing your method.

Thank you very much! Yes, this is (was) one of the most contrasting sculpts I own.

Stryker2011 wrote:Interesting technique. And while it may have lost some of the detail, I still think it turned out fine. Thanks for the details on what paint you used, etc.

Not sure it would be useful for the future, but if you want to try to strip the original paint off and start from scratch: When I was in Art School — way back when — one of the things I learned in “Color” class is to start with a really dark layer first, let it dry, and add subsequently lighter, and watered down, layers (drying and curing between each) until you reach the desired color. The underlying dark color, and subsequent lighter layers, gives the “skin” that level of translucency that you were talking about, and then doesn’t really require the added additional skin tone colors (like highlights or lowlights), as the light source used will do that for you. (Of course you will have to add all the other details like eyes, eyebrows and eyelashes, lips, hair, etc. — and “makeup” where applicable — but the overall skin tone won’t need it.) Granted, this is also the more ambitious, and time consuming, method — and not one a lot of model painters use, but I thought I’d share the tip in the event you feel crazy interested in trying it out on a cheap head to see how you feel about it. (The same technique can be used for the hair, but I used to add in highlights/lowlights there myself).

Thank you very much, I'm glad you agree. I have seen the start from scratch technique, but got spoiled by my success with the Hot Toys sculpts where one does not want to do that (unless one is truly an experienced and talented artist in this scale). That, and trying to preserve some of the details. Anyway, if I had started from scratch, I would have tried to use exactly the technique you describe. I have other heads that are not painted to begin with in the queue, and apart from one I have already started, I will try to do that. Are you saying the darker underlayer would automatically produce the necessary translucency without special differing application of the lighter overlayers on my part?

skywalkersaga wrote:Thanks for sharing your method, GF! I think it works well for heads that you don't want to totally repaint, but want to match better to the tbleague.

Something to bear in mind is that acrylic paints tend to dry darker -- in that, when they're wet they look a bit lighter than they do when dry. So, something I've had to do when trying to colour-match is to mix the colour in question, then paint a bit on a piece of paper (or whatever) and let it dry. Only then can I see for sure if the colour will match. It's a bit tricky of course though as you then have to remember the precise ratio of colours you use to achieve the right mix. That's where perhaps having a covered container to keep the paint wet in the meantime can help.

Welcome and thank you. Indeed, usually it would not take so much drastic change, and the results would be better, as in the four heads shown in the first photo. Just remember to dilute the paint with enough water and spread evenly (or at least seamlessly) with the q-tip. I think what you say about the acrylic paints drying darker is true of all paint -- at least we had the same experience with the house siding and trim paints last summer, so I expect that. In this instance, I had already used this mix before (most recently on James Dean), so I largely knew what to expect, although I do not yet have a system of ensuring the exact same proportion in the mix every time. It is indeed a good idea to have a covered container for the paint mix if one is testing to see how it dries. I have tried to work around that by painting a thin layer on transparent saran wrap or plastic baggie material and helping it dry faster, then placing it on the body to test for a match. But it helps when you don't have to hurry.

BAMComix wrote:Wow! nicely done! They look so much better re-panted to match the bodies, but only if you have the skill, which you clearly have! Most envious! lol!

Thank you very much. I'm not sure the head used in this tutorial ended up looking better in itself, but it is certainly more usable now -- for these bodies.

Gizems nice Kittens wrote:Great effect with the colours. This is definitely worth adding to the tips section.

Thank you very much, I'll do exactly that.

collectorofmany wrote:Wow, that is a night and day (excuse the pun) difference! I was noticing last night that while both of my HS’s are ‘close’ in color, neither are exact. I surely don’t have the confidence to paint over what I’ve already got. I’m wondering how it would look if one tried to blend in the color around the neck (just above the chin and jawline) so as not to have to paint over the face. I mean it might look weird, but depending on how well the blending is done, it *may* work...

All puns are welcome, and thank you. I agree, painting under the jawline and under/behind the ear and hairline is a partial solution that ought to help, provided the contrast between the face and those areas is not overly great. But it is arguably a different surface and it is those areas that meet the neck. I did this with (for example) the Alden head sculpt, before I decided it was not enough (in that case) and applied a very subtle paint treatment to the face too.


_________________
I'll be back!
https://onesixthfigures.forumotion.com

Valiarde

Valiarde
Definately a helpful thread as usual from GF! Looks so much more fitting than the old color.
Just in time as I wanted do paint some heads in the upcoming weeks.

I also use vallejo colors. I had some problems when i did a first layer that the second layer often put a whole into the first and I had to do it all over again lol

The q-tip method is interesting


_________________
The knight is darkest just before the dawn.

GubernatorFan

GubernatorFan
Founding Father
Valiarde wrote:Definately a helpful thread as usual from GF! Looks so much more fitting than the old color. Just in time as I wanted do paint some heads in the upcoming weeks. I also use vallejo colors. I had some problems when i did a first layer that the second layer often put a whole into the first and I had to do it all over again lol The q-tip method is interesting

Thank, I'm glad you liked it, and I hope it helps. Yes, if you apply thick layers, they tend to be fairly soft, and you an end up with a mark or indent if you are not careful. Or, if one layer hasn't fully dried yet, applying the next can cause damage. If you are using the q-tip method I use, remember to have somewhat watered-down paint mix in the first place (the q-tip itself doesn't have to be wet), apply a little (not as much as I did in that photo), and immediately begin gently spreading/smudging it across this and nearby areas of the head. Then repeat nearby, and so on. Later on, when these have dried, go for another layer if needed. A wet q-tip can repair a very very fresh mistake, or a q-tip sipped in alcohol a slightly older one.


_________________
I'll be back!
https://onesixthfigures.forumotion.com

GubernatorFan

GubernatorFan
Founding Father
Part II

I tested out the technique of applying a darker color to a head sculpt and building up lighter layers on top of it. I did so on an old action-figure body and head that had long since lost its accessories to a higher-end ensemble, but happened to still have around. I scrubbed down any oils from the head sculpt (didn't go as far as removing the original paint, as the level of detail was very basic), applied a layer of dark brown-red mix, and, giving it time to dry to the touch every time, proceeded to apply a succession of thin layers of my trusty TBLeague male suntan mix. I lost count of how many layers I applied, until I realized the desired translucent effect was going to get lost before I achieved an actual skin tone match (not that I was going to use this on a TBLeague body, but that match is the target). I mixed in some more iraqui sand and cork brown, which helped a little, but I didn't want to apply too many layers, as the skin tone was becoming increasingly even and possibly flat. So I stopped short of an exact match, a fairly even skin tone (which in itself is something, because you don't want an unrealistic artistic effect), hopefully not too flat (at least in hand it seems to have retained some subtlety), but definitely getting there. I did not repaint the hair or clean up the hairline. Here it is (next to a TBLeague arm), in two different kinds of natural light.

TBLeague - Repainting head sculpts to match body (updated with Part III) Hpea0110

TBLeague - Repainting head sculpts to match body (updated with Part III) Hpea0210

What do you think?


_________________
I'll be back!
https://onesixthfigures.forumotion.com

Stryker2011

Stryker2011
Founding Father
To answer your question about the technique i mentioned— yes. The dark underlying tone (so, essentially what would be the “1st” layer) should be really dark — not black, unless you plan on doing someone with very dark skin. And then mixing as you essentially did with the head directly above, a couple of thin layers. I think you did good with your experiment — it looks like the skin tone would indeed match most of the male TBL bodies out there — and notice you didn’t have to add any additional tones to cheekbones, etc.


_________________
Mark

He who dies with the most toys wins!

TBLeague - Repainting head sculpts to match body (updated with Part III) C8485110

skywalkersaga

skywalkersaga
The overall effect looks very smooth!

It's definitely good to use multiple layers at this scale (even with Vallejo, which is already forumulated specifically for use on small models). I'm guessing if you are using Stryker's method of fully repainting the face (or at least the skin), then losing some of that translucent quality of the plastic is inevitable. That doesn't have to be a bad thing... and that's where the highlights come in with adding more depth/dimension.


_________________
"The happy ending of the fairy tale, the myth, and the divine comedy of the soul, is to be read,
not as a contradiction, but as a transcendence of the universal tragedy of man."

Ignoring current 'official' Star Wars content for my own sanity.

Ovy

Ovy
Wow Gubernator you have been busy!

Your first guy reminds me of Flex Mentallo.
TBLeague - Repainting head sculpts to match body (updated with Part III) P7f0ujjlta6yfecrluyf
On your personal bane of the lips, I think they need to look different unless you want to go for that brown bodybuilder/tanning b look. That pinkish tone makes them stand out. I would go for a darker red and lighten it up until you are pleased.

I like the stylized look of the second one.

Have you tried this sprinkling pigmentstion method yet? Kinda effective if not overdone, works best for custom of course as it is not precise.

GubernatorFan

GubernatorFan
Founding Father
Stryker2011 wrote:To answer your question about the technique i mentioned— yes. The dark underlying tone (so, essentially what would be the “1st” layer) should be really dark — not black, unless you plan on doing someone with very dark skin. And then mixing as you essentially did with the head directly above, a couple of thin layers. I think you did good with your experiment — it looks like the skin tone would indeed match most of the male TBL bodies out there — and notice you didn’t have to add any additional tones to cheekbones, etc.

Thank you for the comments and clarification. So my experiment was more or less successful in terms of applying the technique (apart from not quite matching the target skin tone)? The dark first layer mix I used was pretty dark (red and brown), and I applied it fairly opaquely. But I should have thought to compensate for the darker underlayer by adjusting the "TBLeague male suntan" mix I normally use on top of already somewhat close in skin tone heads.

skywalkersaga wrote:The overall effect looks very smooth! It's definitely good to use multiple layers at this scale (even with Vallejo, which is already forumulated specifically for use on small models). I'm guessing if you are using Stryker's method of fully repainting the face (or at least the skin), then losing some of that translucent quality of the plastic is inevitable. That doesn't have to be a bad thing... and that's where the highlights come in with adding more depth/dimension.

Thank you very much. I noticed this, too -- no brush strokes visible at all. I think we are talking about different translucent effects --  I agree that losing any translucency in the plastic is pretty much a given, but the thin layers of watered down paint build up a different feeling of some translucency. Maybe I'm not using the word correctly. Smile

Ovy wrote:Wow Gubernator you have been busy! Your first guy reminds me of Flex Mentallo. On your personal bane of the lips, I think they need to look different unless you want to go for that brown bodybuilder/tanning b look. That pinkish tone makes them stand out. I would go for a darker red and lighten it up until you are pleased. I like the stylized look of the second one. Have you tried this sprinkling pigmentstion method yet? Kinda effective if not overdone, works best for custom of course as it is not precise.

I had no idea who that was, until I looked him up. I guess his name is Devan Long. And yes, he is usually quite tan. Smile Unlike Sam Worthington, whom I don't particularly think of as tan, but here I was trying to match to bodies like DAM and especially TBLeague, in case we need to see the neck or more. I like the lip color I managed to get on the experiment head better. Here is the reference photo of a pretty pale Sam -- of course one might have to consider how this would differ if it were tanned like my repaint (ideas?), and I have come to realize that it does look a little different in other photos --
TBLeague - Repainting head sculpts to match body (updated with Part III) Sam_Worthington_4%2C_2013

Tell me more about the sprinkling pigmentation method when it comes to face sculpt repaints, please.


_________________
I'll be back!
https://onesixthfigures.forumotion.com

Theboo-bomb

Theboo-bomb
Thanks for showing the colors since I can approximate them to what I have and give it a try.

I struggle with painting human skin, recently I managed to get a close enough skin color and then went over it with oil pastels like another one of your tutorials, seemed to look decent.


_________________
I do this for fun, otherwise it would be my job. alien

All of my alt-history themed figures in one convenient link! BooBomb's alt history figures! TBLeague - Repainting head sculpts to match body (updated with Part III) 1f60e

GubernatorFan

GubernatorFan
Founding Father
Theboo-bomb wrote:Thanks for showing the colors since I can approximate them to what I have and give it a try.

I struggle with painting human skin, recently I managed to get a close enough skin color and then went over it with oil pastels like another one of your tutorials, seemed to look decent.

You are very welcome. I hope it is helpful. Just remember that the mix I showed works well when touching up a head sculpt that is already not too far in skin tone from the TBLeague body. It was a little harder to make it convincing on the much paler Dragon head, and the application was more heavy-duty. The experiment with the dark underlayer required correcting the mix, which I only realized after applying a few layers of it, and I didn't want to overdo it, so in the end I did not quite reach the target match. It is probably worthwhile to spend some more time on preliminary testing, taking all variable into account. Put your paint mix in a closeable container so it doesn't dry out while you test it. If you're going to use a dark underlayer, simulate that before testing, and figure out how many layers (or paint mix adjustments) are required.

Sorry, I don't quite understand -- you got a close enough color but then went over it with oil pastels? Are we talking TBLeague bodies? Oil pastels would rub right off a hard plastic body. But if we are talking TBLeague bodies, what did you use on it before the oil pastels? Or are you saying you got a decent enough color on the head and then matched it with oil pastels on the body?


_________________
I'll be back!
https://onesixthfigures.forumotion.com

Theboo-bomb

Theboo-bomb
GubernatorFan wrote:You are very welcome. I hope it is helpful. Just remember that the mix I showed works well when touching up a head sculpt that is already not too far in skin tone from the TBLeague body. It was a little harder to make it convincing on the much paler Dragon head, and the application was more heavy-duty. The experiment with the dark underlayer required correcting the mix, which I only realized after applying a few layers of it, and I didn't want to overdo it, so in the end I did not quite reach the target match. It is probably worthwhile to spend some more time on preliminary testing, taking all variable into account. Put your paint mix in a closeable container so it doesn't dry out while you test it. If you're going to use a dark underlayer, simulate that before testing, and figure out how many layers (or paint mix adjustments) are required.

Sorry, I don't quite understand -- you got a close enough color but then went over it with oil pastels? Are we talking TBLeague bodies? Oil pastels would rub right off a hard plastic body. But if we are talking TBLeague bodies, what did you use on it before the oil pastels? Or are you saying you got a decent enough color on the head and then matched it with oil pastels on the body?

I should have given more details on what I did. For starters I used some heads that I had already experimented on with different skin tone shades, since it was all matte acrylic paint the end result is also matte and allows for the oil pastel to stick on. Now for the oil pastel part, I took the oil pastel and gently brushed it on a make up sponge then gently rubbed it over the matte painted head.

I hope I explained what I did better this time. 😊


_________________
I do this for fun, otherwise it would be my job. alien

All of my alt-history themed figures in one convenient link! BooBomb's alt history figures! TBLeague - Repainting head sculpts to match body (updated with Part III) 1f60e

GubernatorFan

GubernatorFan
Founding Father
Theboo-bomb wrote:I should have given more details on what I did. For starters I used some heads that I had already experimented on with different skin tone shades, since it was all matte acrylic paint the end result is also matte and allows for the oil pastel to stick on. Now for the oil pastel part, I took the oil pastel and gently brushed it on a make up sponge then gently rubbed it over the matte painted head.

I see. Thank you for the clarification. I didn't even realize such acrylics (matte) existed to begin with. Interesting technique.


_________________
I'll be back!
https://onesixthfigures.forumotion.com

Theflyingman


Thank you so much for this! Much needed.

GubernatorFan

GubernatorFan
Founding Father
Theflyingman wrote:Thank you so much for this! Much needed.

You're very welcome, I hope it is helpful.


_________________
I'll be back!
https://onesixthfigures.forumotion.com

GubernatorFan

GubernatorFan
Founding Father
Part III

Remember that VTS Furiosa head?

TBLeague - Repainting head sculpts to match body (updated with Part III) Tblfbp11

It was neither perfect nor the most iconic look, but more to the point I wanted to repaint it to fit the skin tone of a TBLeague seamless body. Keep in mind this is primarily a skin tone matching experiment and while I am working with a Furiosa head and tempted to imitate some (not all) of her signature make up, I'm not actually trying to make Furiosa or any specific Charlize Theron character.

I began by painting over the head in a dark reddish brown color as an underlayer and proceeded to apply several thin layers of watered-down paint mix (Vallejo cork brown, ivory, iraqui sand and Liquitex ultra matte medium).

TBLeague - Repainting head sculpts to match body (updated with Part III) Ctfh0110

This time I didn't manage to keep the surface as smooth as in Part II, although some of this is due to the head actually having a more textured surface. I glossed the eyes, applied their make up (as in the film), and repainted the lips. The only thing I did to the hair was dry brush a little bit of Vallejo matte varnish (which isn't really matte) onto its raised parts to both liven it up and to approximate the greasy look in the film.

TBLeague - Repainting head sculpts to match body (updated with Part III) Ctfh0210

I think she gives off some Annie Lennox vibes...

TBLeague - Repainting head sculpts to match body (updated with Part III) Ctfh0310

TBLeague - Repainting head sculpts to match body (updated with Part III) Ctfh0410

I'm not necessarily done tinkering with this head, but I think the skin tone color match is about right.

What do you think?


_________________
I'll be back!
https://onesixthfigures.forumotion.com

skywalkersaga

skywalkersaga
The skintone does seem to match very well! Great job, you transformed that head and made it useable!


_________________
"The happy ending of the fairy tale, the myth, and the divine comedy of the soul, is to be read,
not as a contradiction, but as a transcendence of the universal tragedy of man."

Ignoring current 'official' Star Wars content for my own sanity.

Sponsored content


Back to top  Message [Page 1 of 2]

Go to page : 1, 2  Next

Permissions in this forum:
You cannot reply to topics in this forum