After passing these MDF (wood-based product) surfaces and elements for dioramas and dollhouses by a few times, I decided to give them a chance, and ordered the first few months ago from LaserLines, an Arizona-based shop selling through Etsy. They arrived quickly and safely, and I was struck by how sturdy and precise they were. So I ordered more on a couple of additional occasions. Having been pretty busy, I did not have the chance to do anything with them, apart from see how they come together and work, which was all pretty easy. Since Mark is advancing in his construction of his own little Westworld, I thought these could possibly be useful.
Let me point out that the surfaces are meant to be painted or covered up with printed (or 3D printed?) elements of your choice, and what I show below is a bare minimum intended to demonstrate the basic appearance and possibilities of the product that would be mailed to you. I intend to keep them modular and to be able to use both sides of each wall, so I did not glue the couple of brackets they provide to keep the surfaces perfectly flush with each other, or anything else, so they will not align perfectly in the photos. But you can achieve that easily.
Even after three orders and several sets, taken apart, the surfaces and elements are very compact.

I ordered effectively four sets, almost every one of which allows for various custom options. Mine were:
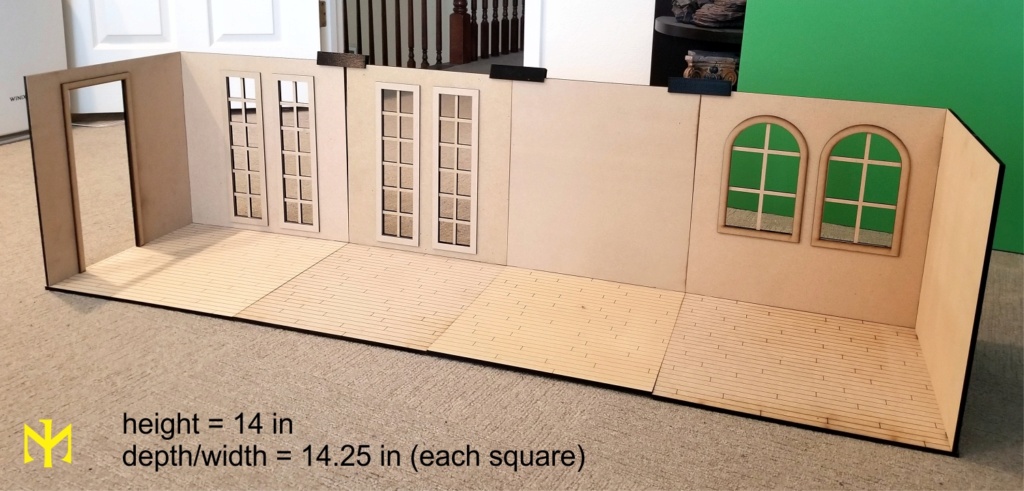
A corner set with hardwood floor pattern, one wall with a door, and one wall with tall windows.
A corner set with hardwood floor pattern, one plain wall, and one wall with arched windows.
A middle set with hardwood floor pattern, one plain wall.
A middle set with hardwood floor pattern, one wall with tall windows.
Additionally, I purchased trim for the door, two trim sets for the two sets of tall windows, and a trim set for the arched windows. These trims are quite low in price. I also bought a little chalkboard. Included for free were a couple of brackets to keep the walls flush with each other (which I didn't use), and a little gift in an envelope.

Unimaginatively putting together the four sets side by side (perhaps compensating for how cramped sixth scale environment pieces can be), we get the following. I attached the trim temporarily using Sticky Putty. Again, one can make the floor and wall surfaces flush with each other, but I was in a bit of a hurry and did not want to attempt any potentially permanent solutions. The four "squares" measure 14.25 x 14.25 inches at the bottom, and the height of the walls is 14 inches. They can be assembled in different configurations (the squares do not actually attach to each other, the corner walls interlock where they meet).

I would say that the result is a workable minimal depth and height for sixth scale figures and furniture (of course, a different configuration would add more depth instead of width, etc). For example, here it is with a larger bed.


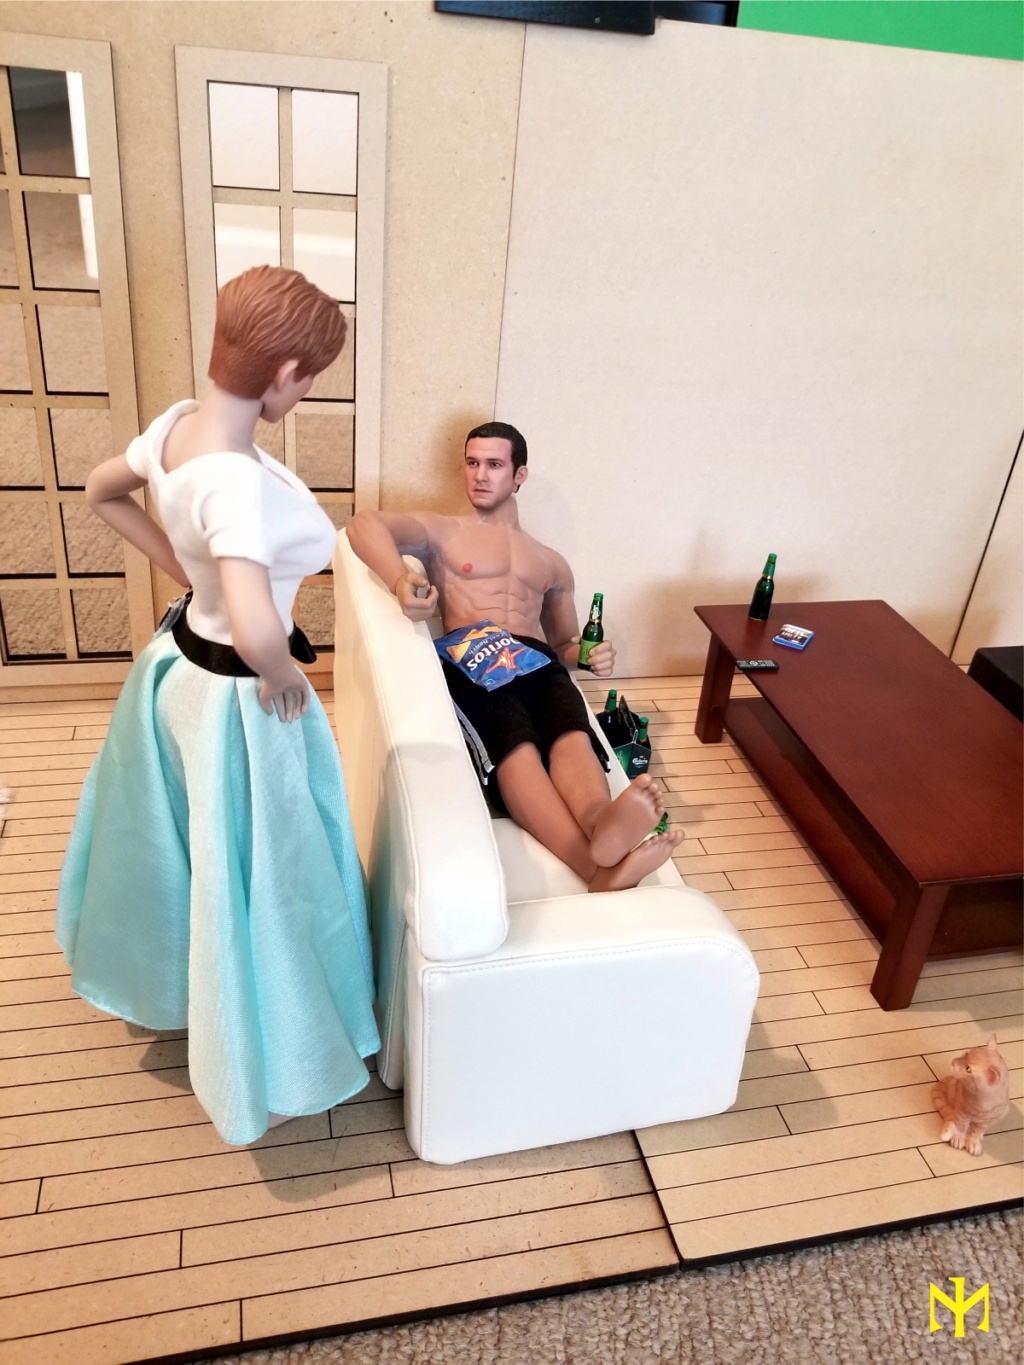
And here with a sofa, coffee table, and flat screen TV (of course, these could be lined up against the wall, and then there would be plenty of space in front of them). Note: the flat screen TV, remote control, and DVDs, all very simple affairs but the look is effective, come from a different Etsy shop, BijouDollsHouseShop.


Different configuration with much the same elements. Of course, the windows and door are see-through, more on that below.


I have yet to get a door -- they have that too, with tiny hinges that work -- but here I've moved the right corner area to make a new left corner area to the other side of the door. Didn't even have to reassemble it or the items inside it. Because I swapped the walls but did not transfer the trim to the other side, you can see how the arched windows look without trim.

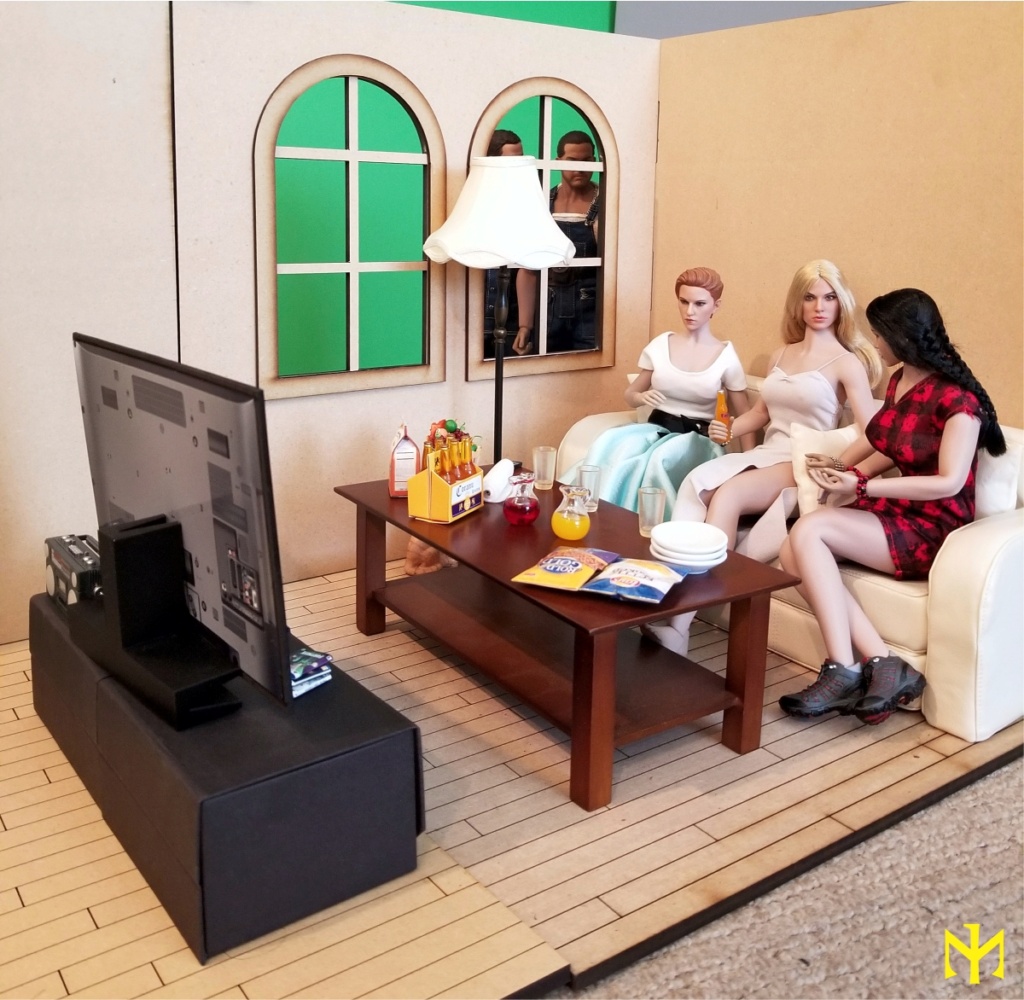
An older photo, when I had different figures lying around, demonstrating the suitability of seeing a landscape (or cityscape, or whatever) image on a screen beyond the windows. I'd say it works pretty well, especially if you watch the perspective and angle (which is less than ideal in the photo).

While I have clearly not used these to their full potential yet (that will be in Part II, if it happens), I think these pieces are very promising. With a handful of sets and a couple of extra elements, one could do so much. Even permanent treatment to a surface still allows us to use the other side, and I suppose one could overlay if needed. The sturdiness of these MDF surfaces seems to me a great advantage over cardboard and foamboard, which warp (even more so if you get them wet with paint or glue).
I may be rediscovering the wheel (no experience with doll houses), but finding these sturdy modular pieces in sixth scale seemed like a worthwhile find and something to share. Most of the floor and wall sets are about $30-45 (USD), depending on whether it is two surfaces or three. Trims and other elements are significantly lower in price. Shipping is free (at least to the US), although that might depend on the price of what's in your cart. Given that one can use both surfaces, and that they are very sturdy, I think it was worth it. Of course, now I have to actually put them to good use.
Hope this is useful.
Links:
https://www.etsy.com/shop/LaserLines
https://www.etsy.com/shop/BijouDollsHouseShop
#diorama #wall #floor #window #mdf #laserlines
Let me point out that the surfaces are meant to be painted or covered up with printed (or 3D printed?) elements of your choice, and what I show below is a bare minimum intended to demonstrate the basic appearance and possibilities of the product that would be mailed to you. I intend to keep them modular and to be able to use both sides of each wall, so I did not glue the couple of brackets they provide to keep the surfaces perfectly flush with each other, or anything else, so they will not align perfectly in the photos. But you can achieve that easily.
Even after three orders and several sets, taken apart, the surfaces and elements are very compact.

I ordered effectively four sets, almost every one of which allows for various custom options. Mine were:
A corner set with hardwood floor pattern, one wall with a door, and one wall with tall windows.
A corner set with hardwood floor pattern, one plain wall, and one wall with arched windows.
A middle set with hardwood floor pattern, one plain wall.
A middle set with hardwood floor pattern, one wall with tall windows.
Additionally, I purchased trim for the door, two trim sets for the two sets of tall windows, and a trim set for the arched windows. These trims are quite low in price. I also bought a little chalkboard. Included for free were a couple of brackets to keep the walls flush with each other (which I didn't use), and a little gift in an envelope.

Unimaginatively putting together the four sets side by side (perhaps compensating for how cramped sixth scale environment pieces can be), we get the following. I attached the trim temporarily using Sticky Putty. Again, one can make the floor and wall surfaces flush with each other, but I was in a bit of a hurry and did not want to attempt any potentially permanent solutions. The four "squares" measure 14.25 x 14.25 inches at the bottom, and the height of the walls is 14 inches. They can be assembled in different configurations (the squares do not actually attach to each other, the corner walls interlock where they meet).

I would say that the result is a workable minimal depth and height for sixth scale figures and furniture (of course, a different configuration would add more depth instead of width, etc). For example, here it is with a larger bed.


And here with a sofa, coffee table, and flat screen TV (of course, these could be lined up against the wall, and then there would be plenty of space in front of them). Note: the flat screen TV, remote control, and DVDs, all very simple affairs but the look is effective, come from a different Etsy shop, BijouDollsHouseShop.


Different configuration with much the same elements. Of course, the windows and door are see-through, more on that below.


I have yet to get a door -- they have that too, with tiny hinges that work -- but here I've moved the right corner area to make a new left corner area to the other side of the door. Didn't even have to reassemble it or the items inside it. Because I swapped the walls but did not transfer the trim to the other side, you can see how the arched windows look without trim.

An older photo, when I had different figures lying around, demonstrating the suitability of seeing a landscape (or cityscape, or whatever) image on a screen beyond the windows. I'd say it works pretty well, especially if you watch the perspective and angle (which is less than ideal in the photo).

While I have clearly not used these to their full potential yet (that will be in Part II, if it happens), I think these pieces are very promising. With a handful of sets and a couple of extra elements, one could do so much. Even permanent treatment to a surface still allows us to use the other side, and I suppose one could overlay if needed. The sturdiness of these MDF surfaces seems to me a great advantage over cardboard and foamboard, which warp (even more so if you get them wet with paint or glue).
I may be rediscovering the wheel (no experience with doll houses), but finding these sturdy modular pieces in sixth scale seemed like a worthwhile find and something to share. Most of the floor and wall sets are about $30-45 (USD), depending on whether it is two surfaces or three. Trims and other elements are significantly lower in price. Shipping is free (at least to the US), although that might depend on the price of what's in your cart. Given that one can use both surfaces, and that they are very sturdy, I think it was worth it. Of course, now I have to actually put them to good use.
Hope this is useful.
Links:
https://www.etsy.com/shop/LaserLines
https://www.etsy.com/shop/BijouDollsHouseShop
#diorama #wall #floor #window #mdf #laserlines


