OneSixthFigures
Would you like to react to this message? Create an account in a few clicks or log in to continue.
OneSixthFigures

An online community to discuss and share news about sixth-scale figures, with an emphasis on either custom or commercial articulated figures.


You are not connected. Please login or register

Jabba The Hutt Diorama (The Viewing Frame WIP)

Go to page : Previous  1 ... 12 ... 20, 21, 22 ... 30 ... 39  Next

Go down  Message [Page 21 of 39]

skywalkersaga


I understand being a perfectionist about these things, but honestly from the pics they don’t look bad at all. Sometimes it does take several tries to get things right. Don’t give up, my friend! What you have so far is already looking good, and I think it’s going to turn out fine. <3

Delanie


From what I can see the walls look great. I think I've only really sat down to watch the movie once but as I recall the room is sandstone and as a collector of rock samples I can assure you that even in the same vein of rock the colour varies so as long as there are no straight lines, unless there are supposed to be, you could for instance have a sand colour at one end and a brown mud at the other just fade one into the other.

Tbh when you have it blocked up and the lights on there will be shadows anyway.


if you are worried about the colour mix why not get some say 50cc syringes I think I've seen them in decorators shops so you can get the mix the same.

Stryker2011


Founding Father
Thanks for the encouraging replies. I do indeed have issues with perfectionism, and a bit of OCD, so I'm not always the most objective judge when it comes to my own work. At this point, I don't think I'm going to mess with the walls anymore; other than getting the arch design on all of the arches. Not sure how to do those, as I don't want them to be too neat or even finished. I'm thinking I need to make a mask and then lightly dry brush them on.

As far as the steps, they do need to be lightened just a bit, but they weren't the same color as the walls -- they were more of a gray-brown color. Right now they're too brown -- almost purple.

Peaches


Man that's looking so cool! This is the thread that draws me in even so I have no time in my life ATM, LOL

Stryker2011

Stryker2011
Founding Father
Thank you, Peaches. I hope you’ve had time to work on your Firefly figures.


_________________
Mark

He who dies with the most toys wins!

 Jabba The Hutt Diorama (The Viewing Frame WIP) - Page 21 C8485110

GubernatorFan

GubernatorFan
Founding Father
Just received my Hasbro carbon chamber set (the one I linked above) for the 3.75" figures. It is quite well made but not screen accurate: it crops off the two slanted side wall surfaces. Speaking of which, I realized you have done the same although the Sideshow carbonite chamber wall environment centerpiece actually has the slant in the frame. I'm sure there's a good reason you went this way (too complicated?) but could that be an additional reason for the difficulty getting the light/shadow grating effect?


_________________
I'll be back!
https://onesixthfigures.forumotion.com

Stryker2011

Stryker2011
Founding Father
Too complicated is indeed the reason I didn’t do that with the wall — much more work than I was willing to do for an area that isn’t really supposed to be the main focus — yet is still taking up a great deal of attention.


_________________
Mark

He who dies with the most toys wins!

 Jabba The Hutt Diorama (The Viewing Frame WIP) - Page 21 C8485110

GubernatorFan

GubernatorFan
Founding Father
That is understandable. I do wonder if simply placing two straight rectangular pieces at the appropriate angle (dictated by the Sideshow environment) would not do the job; and I suppose one could add a triangular piece to fill in the front from the side. I mean there is no need to integrate them into the actual construction design, if that was the difficult part.


_________________
I'll be back!
https://onesixthfigures.forumotion.com

Stryker2011

Stryker2011
Founding Father
To match the SS piece would require creating a wall that comes out further and a setback for the carbonite "alcove" to nestle in; the entire side wall would then have to extend to the back of the display, which would mean the arch with the curtain would have to be remade and narrowed even more. Moving that wall inward to create that alcove would also take up valuable floor space that I wouldn't be able to use for any additional figures I might be able to acquire in the future -- there are some customizers on the Freaks who are making some Jabba palace head and hand sculpts to be casted for anyone who wants them -- I've already put my name in for 2 different characters -- the clothes, body and accessories would be up to me to provide, but at least it's a start.


_________________
Mark

He who dies with the most toys wins!

 Jabba The Hutt Diorama (The Viewing Frame WIP) - Page 21 C8485110

GubernatorFan

GubernatorFan
Founding Father
Ah, I see. Well you don't want to be messing with the overall size and construction. I hadn't realized that at the base the Sideshow slanted side frames were wider than the side wall of the side arch. You know what I mean. I think except perhaps for that extra overhead light slot you are long done with actual construction. Which figures are you going to be kitbashing with those heads and hands you mentioned? Or is it going to be a surprise? Smile


_________________
I'll be back!
https://onesixthfigures.forumotion.com

Stryker2011

Stryker2011
Founding Father
I just looked, I forgot one additional:

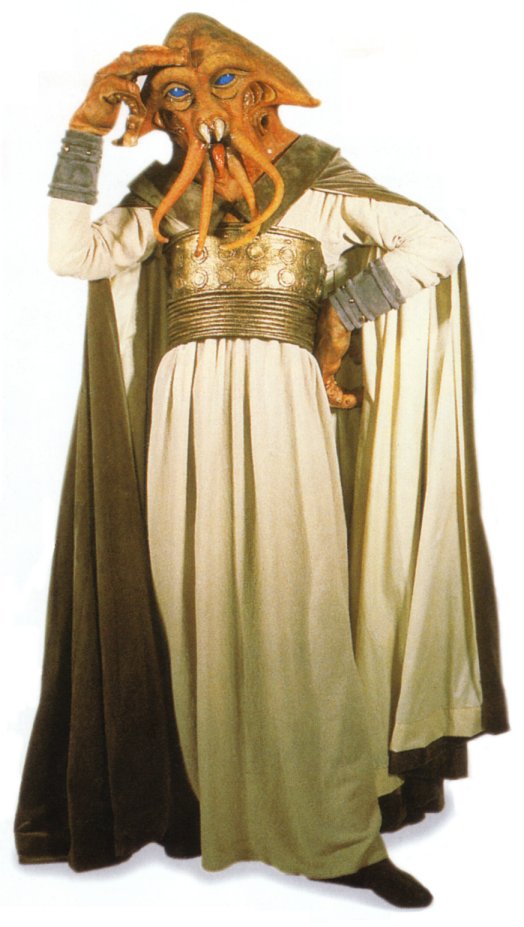
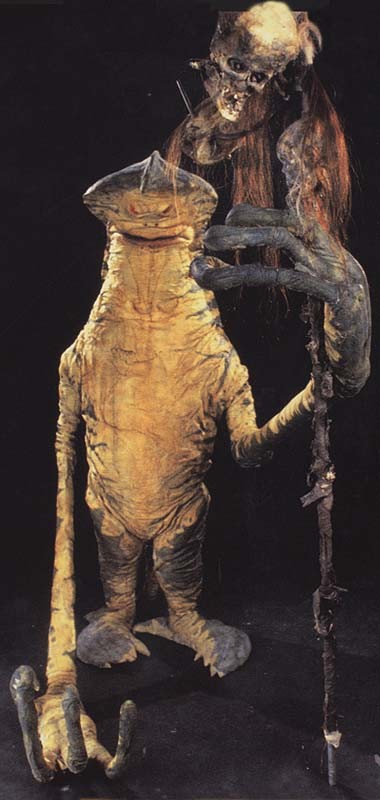
These are the three characters I put my name in for:

ReeYees:

 Jabba The Hutt Diorama (The Viewing Frame WIP) - Page 21 Proxy_47


Tessek:

 Jabba The Hutt Diorama (The Viewing Frame WIP) - Page 21 Proxy_48

And Amanaman (which would actually be the complete figure, I'd have to paint them all):

 Jabba The Hutt Diorama (The Viewing Frame WIP) - Page 21 Amanic10


_________________
Mark

He who dies with the most toys wins!

 Jabba The Hutt Diorama (The Viewing Frame WIP) - Page 21 C8485110

GubernatorFan

GubernatorFan
Founding Father
These would be very cool indeed! And Amanaman is going to be huge and fill up a corner.


_________________
I'll be back!
https://onesixthfigures.forumotion.com

Stryker2011

Stryker2011
Founding Father
GubernatorFan wrote:These would be very cool indeed! And Amanaman is going to be huge and fill up a corner.  

Yes, indeed. I’ve seen the WIP pics in the sculpting stage and it looks amazing. He wanted to make the entire thing poseable, but I think he’s going to settle for either hinged shoulders, or ball joint (I guess it depends on the casting and engineering stage before that decision is made).


_________________
Mark

He who dies with the most toys wins!

 Jabba The Hutt Diorama (The Viewing Frame WIP) - Page 21 C8485110

Stryker2011

Stryker2011
Founding Father
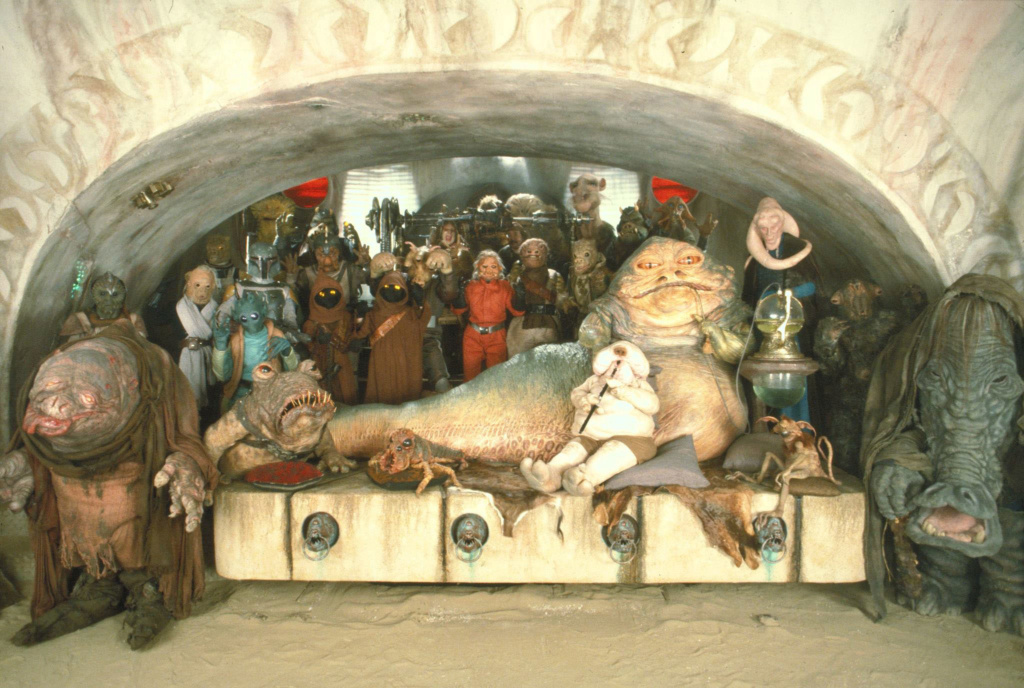
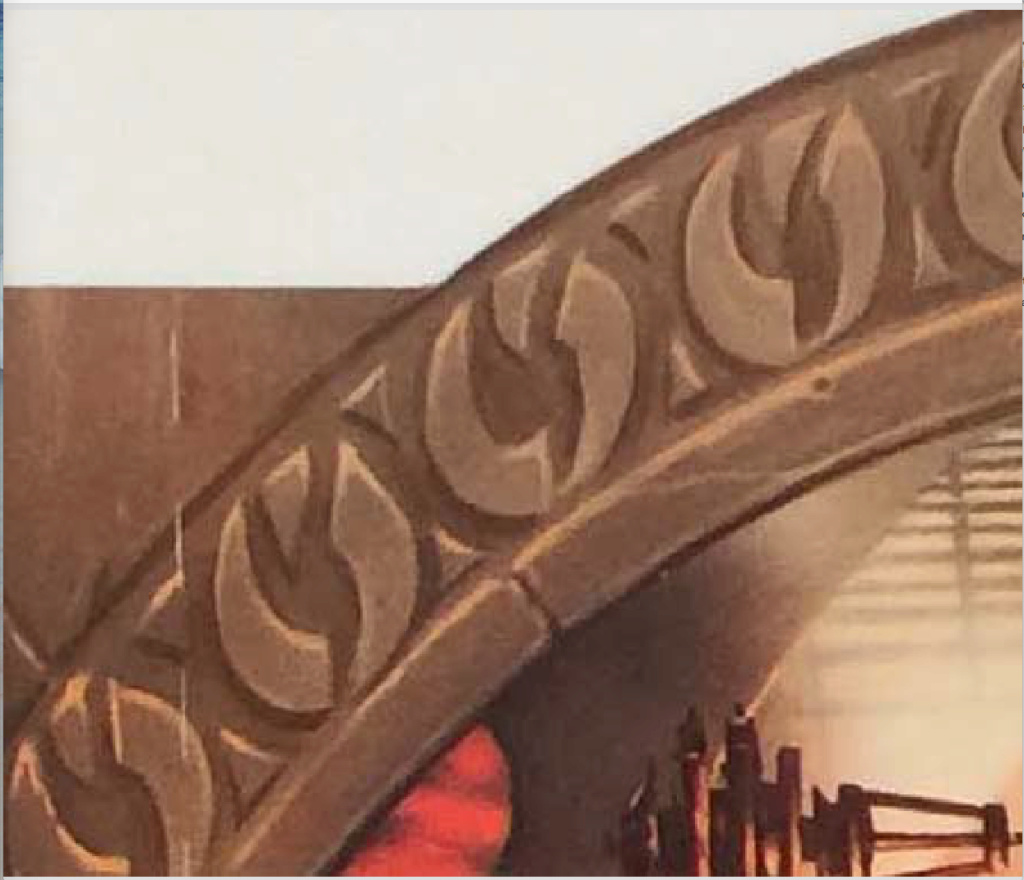
Okay, here's a question for anyone who may have some ideas. I need to make the arch design -- particularly over the main arch, and I was thinking about making a mask/template that I can put over the already painted arches. However, this is the problem: the "negative" spaces on the design, are the parts that are darker than the actual wall color. Any ideas how I can make a mask that would accommodate that?

(Here's pics of what I'm talking about):

The actual set:

 Jabba The Hutt Diorama (The Viewing Frame WIP) - Page 21 Jabba_19


The Hasbro arch design:

 Jabba The Hutt Diorama (The Viewing Frame WIP) - Page 21 Img_0018

A detail of the Hasbro design:

 Jabba The Hutt Diorama (The Viewing Frame WIP) - Page 21 Screen54


As you can see, the parts of the design that stay the same color as the current wall color don't touch each other -- so all the new paint has to be in the surrounding areas, but I want it to look faded, and worn, not fully detailed like it is in the Hasbro design, or I'd just draw the design right on the arch and start painting over and in-between the pencil marks. Any and all suggestions would be greatly appreciated.


_________________
Mark

He who dies with the most toys wins!

 Jabba The Hutt Diorama (The Viewing Frame WIP) - Page 21 C8485110

GubernatorFan

GubernatorFan
Founding Father
I see your dilemma. First off the arch design is clearly painted on (and faded), so the good news is that indeed there will be no need for relief sculpting as implied by the Hasbro image.

One possibility is to blow up and print in sections parts of the film set photo covering the arch decoration. Then carefully cut out the "hollow" or "light" sections and place the cutouts with removable tape (test how that performs on one of your experimental surfaces) in the desired configuration around the edge of the arch. Then start lightly (dry-?) brushing the darker color in an imperfect fashion over them, reproducing what you see on the screen (essentially a darker arch-shaped band, containing the lighter sections). Then remove the cutouts and gently/slightly mess them up so they don't look too perfect compared to the darker surface around them. I hope it makes sense. It would be quite a bit of work, but that's what I would do.

Another idea would be -- depending on available technology -- to project the image onto the surface and then use that as a painting guide.

Another idea -- print out the design in sections, flip them over against a window or backlit transparent hard surface, paint the (reversed) dark surfaces in a sufficiently distinctive color, and while this is still wet, rub it onto your arch surface. If it works as intended, it should "print" off the desired pattern, and then you would go over it with a brush and paint, making it look more realistic.

Or import Alex to help with that part. Smile


_________________
I'll be back!
https://onesixthfigures.forumotion.com

Stryker2011

Stryker2011
Founding Father
Funny, I thought of that cutout idea, as well. Time-consuming, but it’s probably one of the better options. Someone else suggested drawing the design on with colored pencil and pastel chalk to fill the dark spots in. If I had been thinking I would have painted a dark ring around the arch first, then made the mask to paint the rest of the arch, including the light design parts.


_________________
Mark

He who dies with the most toys wins!

 Jabba The Hutt Diorama (The Viewing Frame WIP) - Page 21 C8485110

GubernatorFan

GubernatorFan
Founding Father
Stryker2011 wrote:If I had been thinking I would have painted a dark ring around the arch first, then made the mask to paint the rest of the arch, including the light design parts.

I thought of that, but the lighter color applied on top of the darker color might not match the lighter color that is not on top of the darker color (i.e., beyond the darker band), if your paint is even a tiny bit transparent.


_________________
I'll be back!
https://onesixthfigures.forumotion.com

skywalkersaga

skywalkersaga
If you are going to paint the arch on, then at the very least it might be an idea to apply the paint lightly with a sponge (after dabbing most of the paint off), to give it that effect. Heck, even if you use the ‘reverse stencil’ idea that might still work. Though I guess just using dry brushing could also achieve the look. So many options.... wish I could help, as I love painting! Smile


_________________
"The happy ending of the fairy tale, the myth, and the divine comedy of the soul, is to be read,
not as a contradiction, but as a transcendence of the universal tragedy of man."

Ignoring current 'official' Star Wars content for my own sanity.

shovelchop81

shovelchop81
Oooh that arch pattern is going to be a bitch! Ideally you want it 3D, makes painting it super simple then, I'd recommend printing it out to the size you want, just in B/W, use that as a template for later. Get some Balsa wood or high density sculpting foam (usually blue in colour and feels like a light brick would) then use the template with a sharp spike to make the pattern transfer through the paper onto the chosen material by poking lots of holes along the boarders of the pattern; I remember doing this on pumpkins for Halloween in Florida over 20 years ago! Very Happy  then either use a hot-wire cutter for the foam or a scroll saw for the wood to cut out the pattern; you might be able to do it with a wood burner 'pen' which is like a soldering iron. Or to make it easier use cardboard and scissors. Then once mounted on the arch, apply the dark colour first over everything in that particular area, then get a mini roller to paint the lighter tone on the raised surface only so the inner pattern stays dark. The choice of material you use really depends on availability, comfort using it, tools available and the depth needed for the carvings. Just to be clear, you would cut out the internal part of the pattern. I hope this makes sense to you. If you don't want to do it this way and are happy with 2D then I recommend liquid mask which is basically latex. You will have to put the diorama on its back to do this though since the surface will need to be horizontal.
P.S. Are you getting custom HS etc.. from Enaud on SSF? I have most of his, many doubles too but asked him years ago to do a 'squid head' for me but he never got back to me about it. I think Dorgmal Snow was another guy doing SW heads too. I still want a Squid head!

Stryker2011

Stryker2011
Founding Father
Interesting idea about the 3D, but I think I’m going to stick to 2D since that is what it was in the movie. I wonder if that liquid mask would take the paint that’s already on off... I might have to give that a try on a test piece first.

The heads, etc. are by Cagoda over at the Freaks. There’s also a guy on Shapeways that does SW alien heads and hands (a few of the aliens most prominent in the sail barge/skiff scene) that some guys are getting, but I haven’t gotten any of those.


_________________
Mark

He who dies with the most toys wins!

 Jabba The Hutt Diorama (The Viewing Frame WIP) - Page 21 C8485110

shovelchop81

shovelchop81
Stryker2011 wrote:Interesting idea about the 3D, but I think I’m going to stick to 2D since that is what it was in the movie. I wonder if that liquid mask would take the paint that’s already on off... I might have to give that a try on a test piece first.

The heads, etc. are by Cagoda over at the Freaks. There’s also a guy on Shapeways that does SW alien heads and hands (a few of the aliens most prominent in the sail barge/skiff scene) that some guys are getting, but I haven’t gotten any of those.

Cheers for the names! Got most of the Cantina patrons and Jabba guards, pilots etc.. did I ever show you those? Might help with your figure builds for the Jabba dio. Liquid mask is designed for use with water colours originally so won't tear paper if you carefully peel it away, I've used it to make 'chocolate chip' camo years ago on a scratch built Iron Man 2 Artillery Drone I made.

Stryker2011

Stryker2011
Founding Father
Nope, I don’t think I ever saw your Jabba palace figures or Cantina figures. I’d love to see them. There are a couple customizers over at the Freaks who’ve been making some of both, there’s even a guy who’s been making Rogue One and Solo background aliens — neat stuff. I recently acquired a custom made Gamorrean Guard (from Son of Dengar) that’s poseable — the body’s already painted, but I have to paint all the other parts; it’s not perfect, but it is kind of cool. He’s also working on a Hermi Odle figure, but he’s a bit too big for my dio.


I’ve been researching liquid mask since you brought it up, and I’ve found varying reviews when it comes to +/- results — paper tearing, paint lifting up. I found info from a now defunct site that mentioned using over the top of acrylic (what I’m using) works ok, but you have to be very timely with the stuff. I’m a little concerned with the uneven texture of the vinyl wallpaper that trying to not only get areas covered sufficiently, but the difficulty in getting it all off when finished. I might just have to draw the design on and dry brush the dark areas as best as possible — if it comes out too dark, oh well. I’ll just pretend Jabba’s interior decorators came by to spruce the place up! Very Happy


_________________
Mark

He who dies with the most toys wins!

 Jabba The Hutt Diorama (The Viewing Frame WIP) - Page 21 C8485110

shovelchop81

shovelchop81
If you can knock up some sort of stencil using pictures of the design printed to the right scale for your arch it could be the way to go or free-hand it with pencil then use light colours first, let them dry and then see if it needs to be darker. Sorry not a lot of use without it in front of me but then again there are only so many ways you can do it really. Have you tried googling ROTJ stencil patterns? You never know what you might find! LOL.

Stryker2011

Stryker2011
Founding Father
That last picture above of the Hasbro arch (the closeup detail) is actually at the size I need (gives a 3” border), but I’ll search for SW stencils and see what I get. I do think making a stencil to at least draw the pattern on would be the way to go, and a lot less time consuming for that part; I was even thinking of making the shapes smaller so I could dry brush “outside the lines” to see if I can’t get the edges to look softer.


_________________
Mark

He who dies with the most toys wins!

 Jabba The Hutt Diorama (The Viewing Frame WIP) - Page 21 C8485110

shovelchop81

shovelchop81
You can always print on different materials to get the effect you want right away then just attach that to the arch as a complete section, ink blotting paper might work well looking like plaster or that rough recycled paper etc.. fabrics can be printed on too, I've done that a lot in the past for 1/6 projects.

AHA! Googled myself for finding pics and found the perfect thread page to show you all the things I've talked about with you on this thread technique wise! Just scroll down for: EL-panels (under my Titanium Man's chest armour AND HELMET, he's all lit up in green EL-Wire), liquid mask used on the desert camo on the Drone for each colour so removed from various paint layers safely, My large Iron Man Dio I had forgotten I'd made (plenty of pics of that), also my scratch built Mandarin figure (way before HT did theirs, I made everything myself even the furniture) for plenty of examples of custom printed fabric I did just using a regular ink printer on silk and cotton printable 'sheets'. You'll need to scroll down a bit before they start but they go on all the way down the page. Saved me loads of work finding this link! pirat

Link to loads of examples of my techniques in 1/6

Stryker2011

Stryker2011
Founding Father
Will do. Thanks for the link.


_________________
Mark

He who dies with the most toys wins!

 Jabba The Hutt Diorama (The Viewing Frame WIP) - Page 21 C8485110

GubernatorFan

GubernatorFan
Founding Father
Shovelchop, I too would love to see more of your Jabba-related figures. Interesting suggestions for how to approach the arch decorative pattern, although I suspect they are often more advanced than most of us are ready to play with. The liquid mask idea sounds brilliant, but it not only needs to work as intended, it also would work best with a sort of stencil that would have cut out the parts that one shouldn't paint dark. And if you're going to have that stencil and cut out those cut outs, you could just use the cut outs to protect the underlying surface (supposing that you can attach them securely yet keep them removable).

Stryker, I'm very excited about your additional characters. Depending on what is available and how far you're willing to go, I have a couple of additional suggestions. You already have or are getting Jabba and Crumb, and Bib, slave Leia, Jedi Luke, Gamorrean Guard, Squidhead, ReeYees, and Amanaman, all of whom are iconic. There are two other alien types that were also very frequent in Jabba's palace -- there were multiples of each. These are now described as two subspecies of Niktos. Originally one subtype was called Klaatu (which has subsequently been reduced to the given name of one of the characters, the other being renamed Wooof; now the subtype is called Green Nikto; and in a remarkably infelicitous development even by Star Wars standards, the very similar-sounding "Klatooinian" has been applied to a species previously called Barada); the other Nikto (now called Red Nikto). You can see the former Klaatu (Green Nikto, Wooof) in the iconic photo below at far right, and a (Red) Nikto in the background on the left (above and between two Gamorrean guards' heads). If you were able to assemble these, you would have an even more fully representative set of Jabba's palace denizens; I do realize that the photo, however iconic, shows a scene that would be looking inward into your diorama, so you would not be likely to try to recreate that for display purposes. Just thinking out loud and excited for your project. Of course, where does one stop? The same photo also shows one of Greedo's "cousins," and also a "starfish" or "birdlizard" alien later called Ishi Tib.

 Jabba The Hutt Diorama (The Viewing Frame WIP) - Page 21 Main-qimg-ca85e5e7a9a21f337e452402b994ca25


_________________
I'll be back!
https://onesixthfigures.forumotion.com

Stryker2011

Stryker2011
Founding Father
Yep. Nikto, Weequay and Barada are the ones that I can remember that are available as head and hands from Shapeways. The cost for unpainted heads isn’t cheap, and the hands are generally separate purchases.


_________________
Mark

He who dies with the most toys wins!

 Jabba The Hutt Diorama (The Viewing Frame WIP) - Page 21 C8485110

GubernatorFan

GubernatorFan
Founding Father
I didn't think they would be cheap. Anyway, it is definitely up to you and what you like and are willing to spend -- obviously. We don't see much of Weequay and Barada in the "audience chamber," so if you "had" to choose between them, Nikto would be a more desirable choice.


_________________
I'll be back!
https://onesixthfigures.forumotion.com

Sponsored content


Back to top  Message [Page 21 of 39]

Go to page : Previous  1 ... 12 ... 20, 21, 22 ... 30 ... 39  Next

Permissions in this forum:
You cannot reply to topics in this forum