OneSixthFigures
Would you like to react to this message? Create an account in a few clicks or log in to continue.
OneSixthFigures

An online community to discuss and share news about sixth-scale figures, with an emphasis on either custom or commercial articulated figures.


You are not connected. Please login or register

The evolution of Jake's Study

Go to page : 1, 2  Next

Go down  Message [Page 1 of 2]

1The evolution of Jake's Study Empty The evolution of Jake's Study Sat Oct 31, 2020 5:54 am

BAMComix

BAMComix
I always wanted to build a set for my Commander Rivers character. In this thread I will show the evolution of its humble beginnings to what it is now. It's gonna be a long one, so grab yourself a coffee Very Happy . You will also no doubt notice that my photography gets better as the thread goes on.

Version 1.

I didn't take too many pics of the first build, but basically it was a wooden box that I constructed from chipboard. Here are a few pics of the first study.

The evolution of Jake's Study JakesCrib13_zps73ce75cb
The evolution of Jake's Study JakesCrib12_zpsa6138295
The evolution of Jake's Study JakesCrib3_zpse924463a
The evolution of Jake's Study JakesCrib16_zps26258881

I learned a lot while building this, and even more when trying to use it for pics, The glare for instance on the wallpaper was an issue, and most importantly, that the walls were too low for certain shots Sad . I stuck with this version for about a year.

I decided that it was time it needed improving. I learned quite a few lessons making the first study, so with this in mind, I set to work. However, I needed a place to start! Very Happy .
The wife had decided that an old PC unit had to go, so before she could throw it out, I whisked it off to the vam room! (Vintage action man) Very Happy , stripped it out, re positioned the doors from the front to the rear and sealed it up, making a much larger area for Jake's new study. I added some cladding to make the floor boards and began to seal up the gaps.

The evolution of Jake's Study P8090002_zpsnihxt389

Not much happened for the next few weeks, as 1;1 stuff kept getting in the way Suspect .

A few weeks later, I picked back up with the project Very Happy I wallpapered the walls, and have now began to add more cladding around the walls, and using recycled parts from the original study, added some doors bounce

The evolution of Jake's Study P8200007_zpsvwrwv7yv
The evolution of Jake's Study P8200009_zpswludos1g

I added a new window with a view

The evolution of Jake's Study P8200010_zpshgvzrwgw

and test fitted the new fire place bounce

The evolution of Jake's Study P8200011_zpsee2rthlz

As you can see Minty looks very pleased with his work so far!

The door frame is now finished, as is the cladding along the side wall. Also you may notice a window sill.

The evolution of Jake's Study P9020001_zpsia7femuz

Also starting adding the upper wall cladding,

The evolution of Jake's Study P9020002_zpsvmc3vt20
The evolution of Jake's Study P9020005_zps5h4z52oj

I also finished off and tidied up the cladding on the other side of the room, I also need now to sand it down and get rid of the glue residue

The evolution of Jake's Study P9020003_zpsvycpmqs2
The evolution of Jake's Study P9020004_zpsdudbeqgm
The evolution of Jake's Study P9020005_zps5h4z52oj

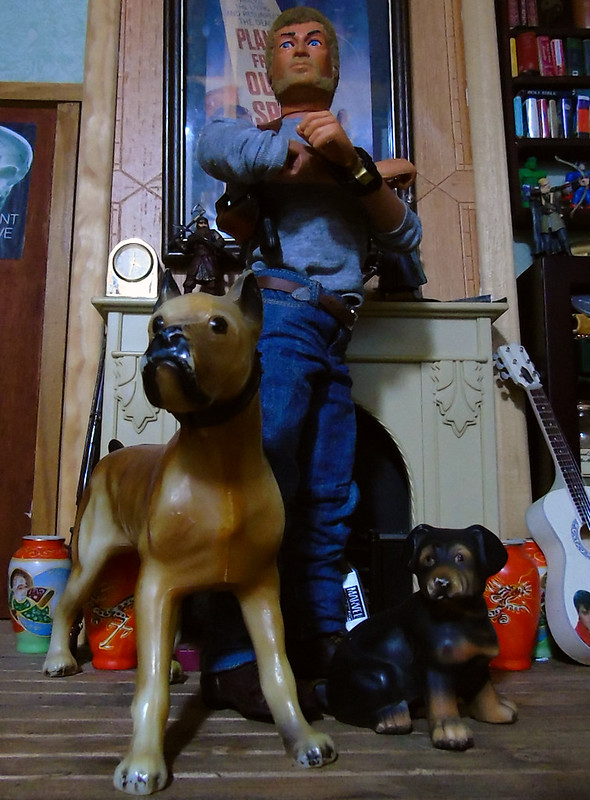
After this, there was a fair bit of sanding, staining and tidying up done (sorry there aren't more pics of the rebuild) and then of course putting the props inside. Here are some pics of the finished version 2 of the study.

The evolution of Jake's Study Electra%20Agent%20Of%20BAM_zpszwu3vcga
The evolution of Jake's Study IMG_0164
The evolution of Jake's Study DSC00048_2
The evolution of Jake's Study DSC00049
The evolution of Jake's Study IMG_0084

I kept this version for quite a while until I decided that it needed rebuilding again, for the third and final time bounce bounce bounce

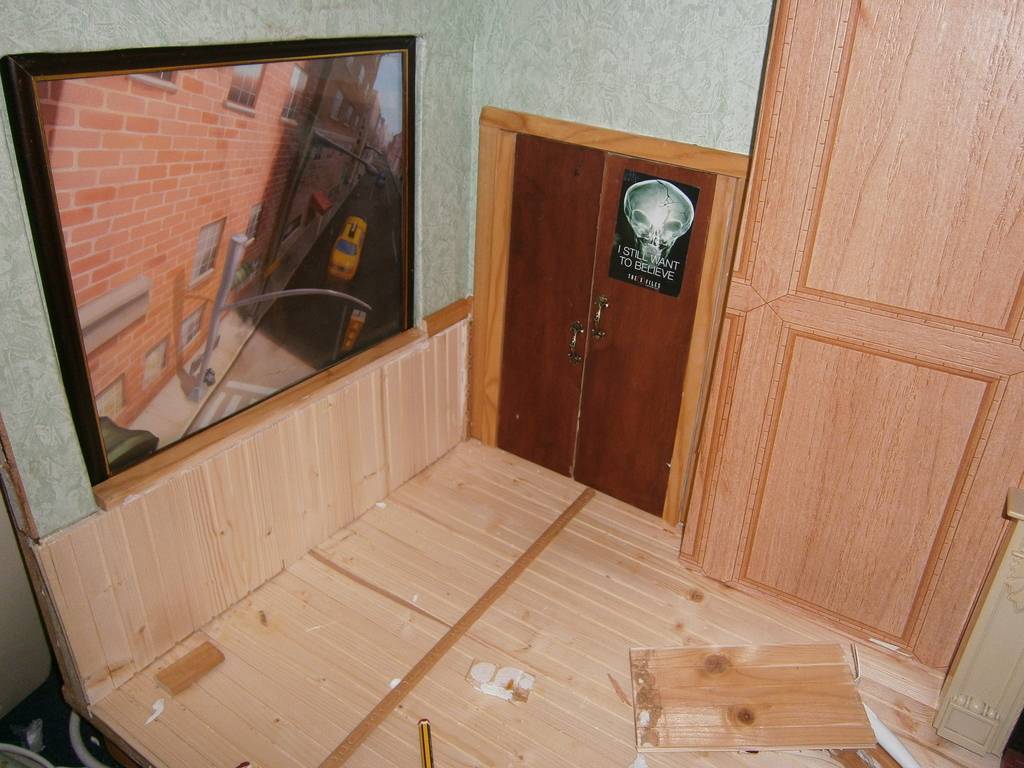
Its that time again, Jake has decided that its time for a complete remodel. Here are a couple of the very last shots from inside the old study, hope you guys like them...,

The evolution of Jake's Study 48056058006_cabdb0ed50_c
The evolution of Jake's Study 48056174172_805104a0b0_c

and what does it looks like now???..., anyone of a nervous disposition, look away now!

The evolution of Jake's Study DSC00013
The evolution of Jake's Study DSC00014

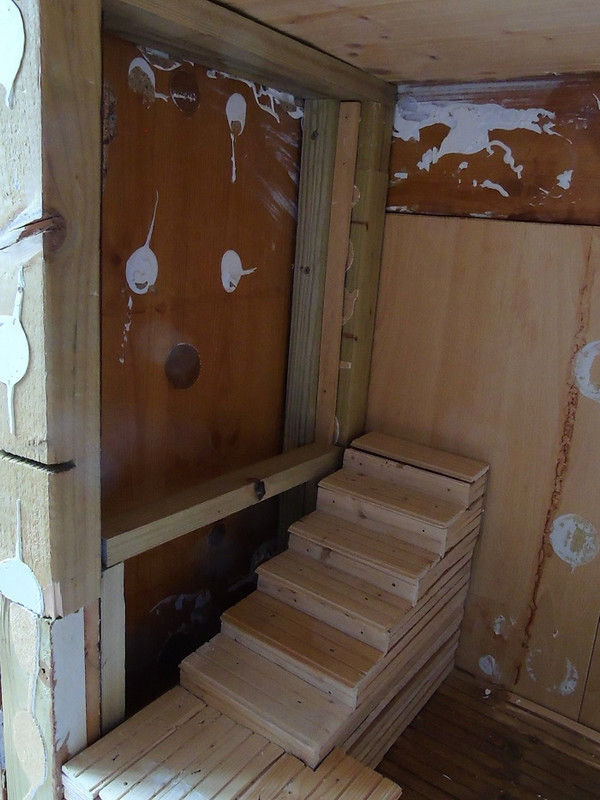
I started to make a false wall, this hopefully will give the feel of depth when you look through the windows. This is something I experimented with when I built the bedroom, however, placing the window on the back wall did pose a few problems when photographing. So this time, the windows are going on the wall.
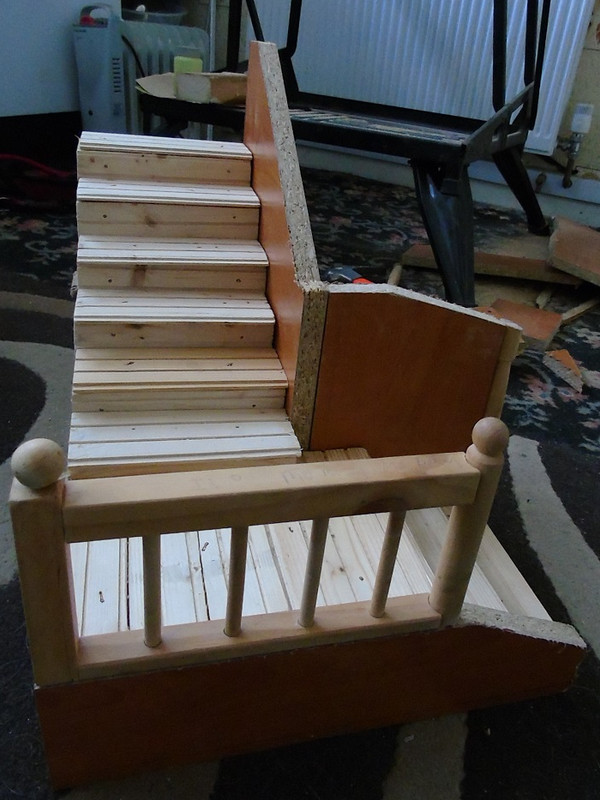
The gap between the window and outer wall will be about 1 - 2" depending on my final design. The stairs are not yet fixed in place, they are just there for show. Hope you enjoyed the update

The evolution of Jake's Study DSC00001
The evolution of Jake's Study DSC00002

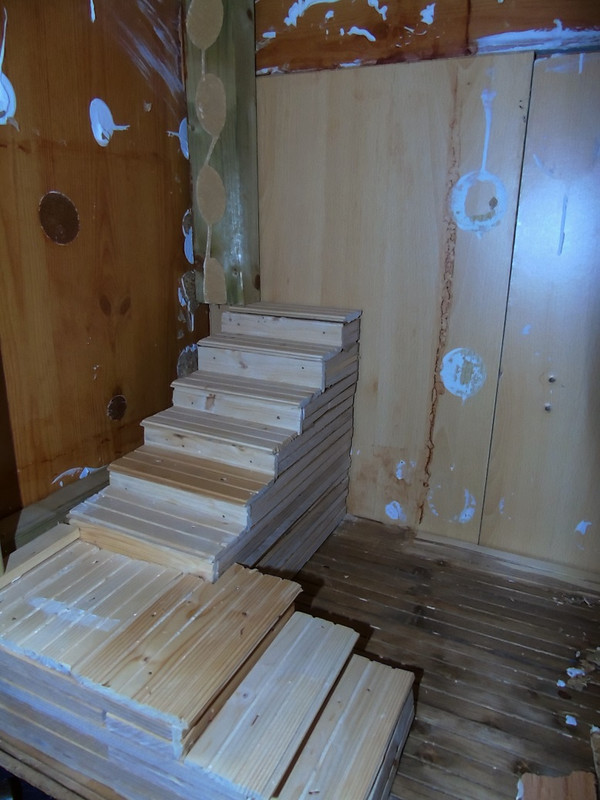
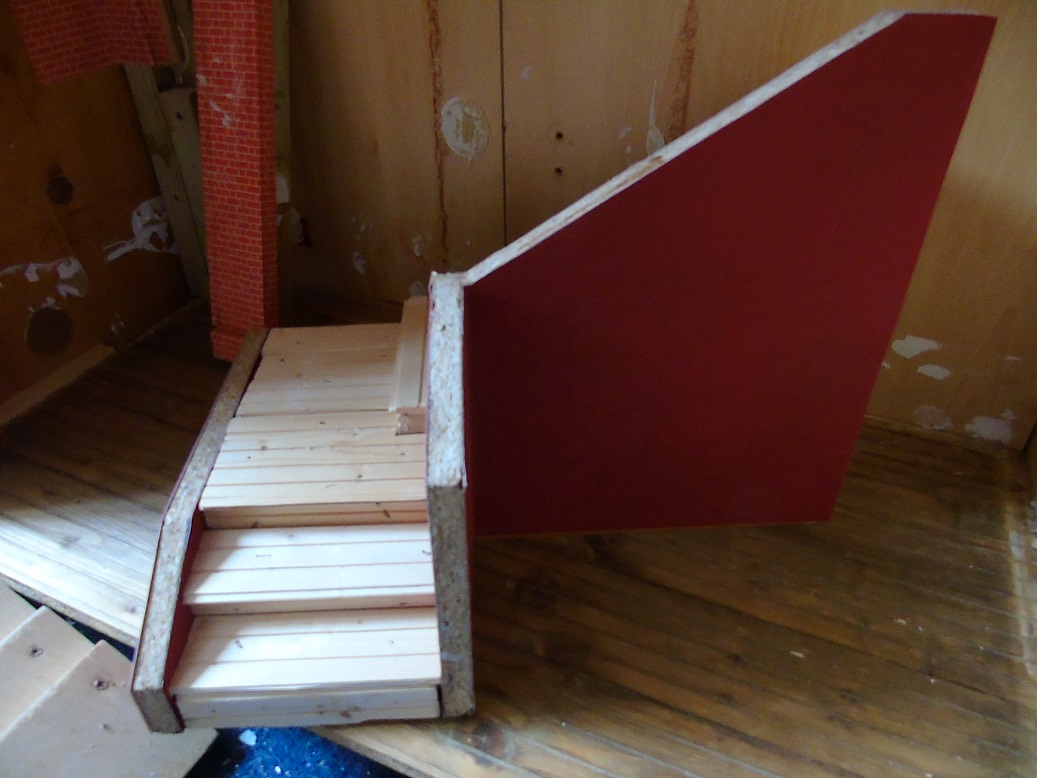
I decided today to make the framework for the staircase, this is only the dry run and still has to be tidied up a bit.

The evolution of Jake's Study Staircase-A-00-1
The evolution of Jake's Study Staircase-A-00-2

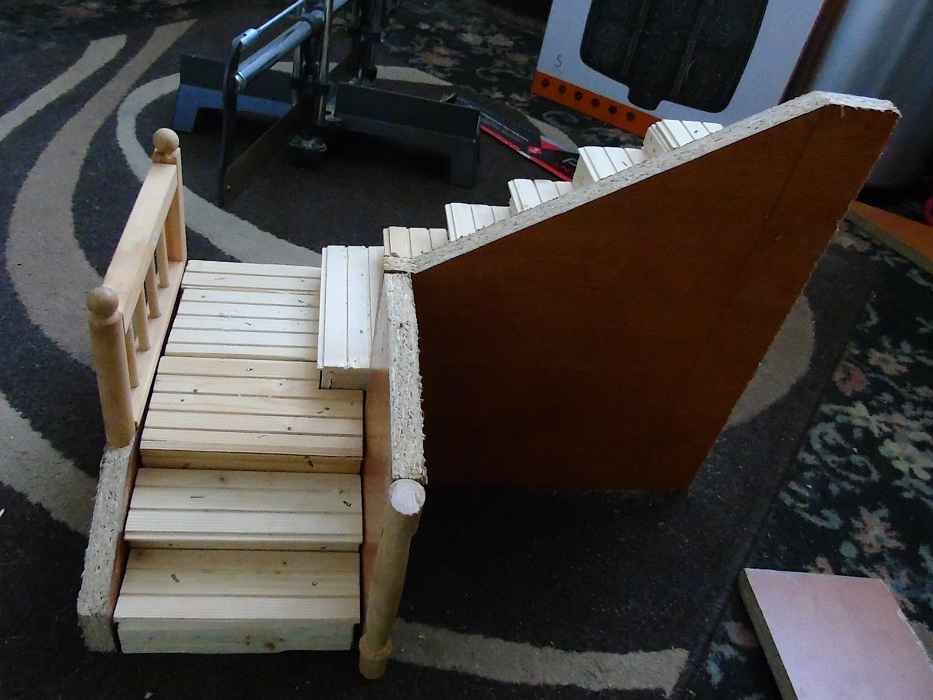
To give an idea of how it will all fit into the study, I have placed the parts in roughly so you guys can get the idea. I have also placed in a door at the top of the stairs, which yes I know, still needs a door frame, but hey we're getting there!

The evolution of Jake's Study Staircase-B-00-1
The evolution of Jake's Study Staircase-B-00-2

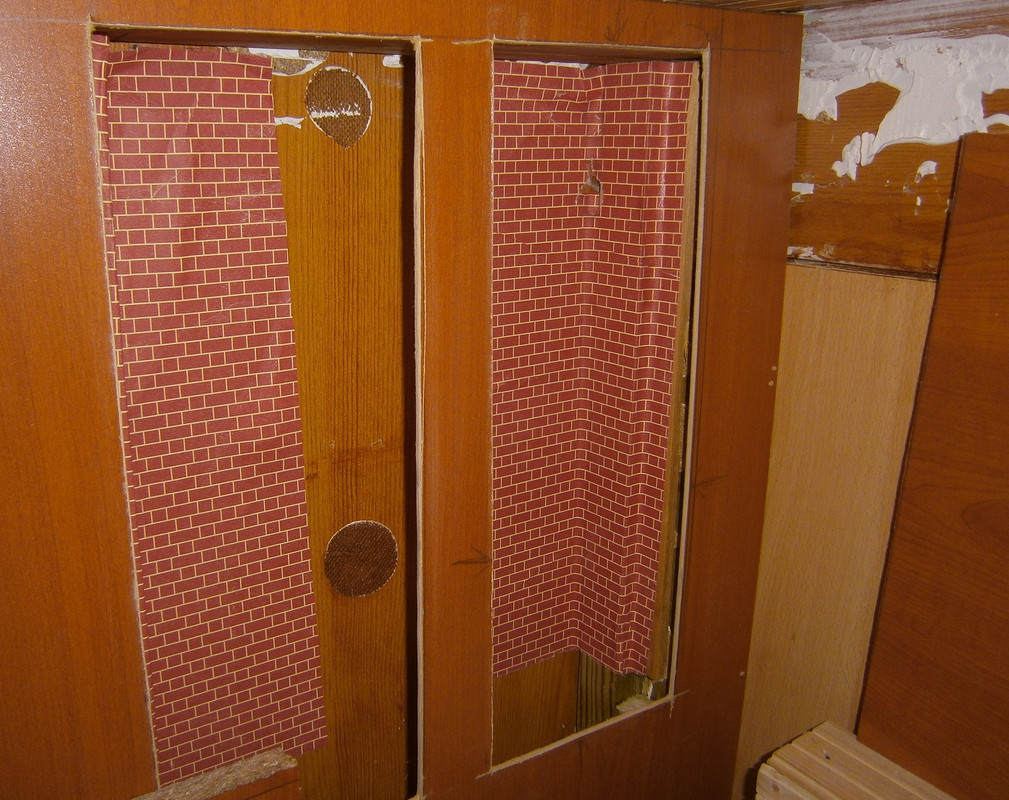
I did do a spot of 1/6 scale wallpapering,

The evolution of Jake's Study Papering

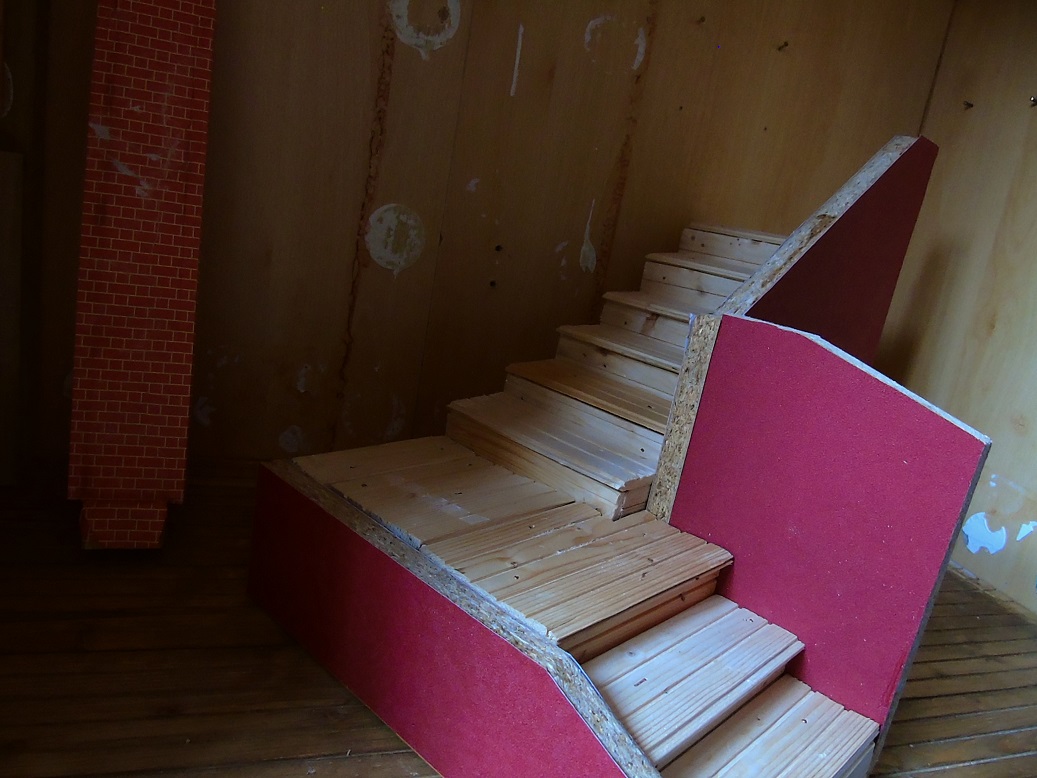
Having sorted the outside of the windows I decided to put the staircase together permanently, and I also wallpapered them. still some odds and ends to add to the staircase, so not quite finished yet.

The evolution of Jake's Study Staircase-B-00-3
The evolution of Jake's Study Staircase-B-00-4

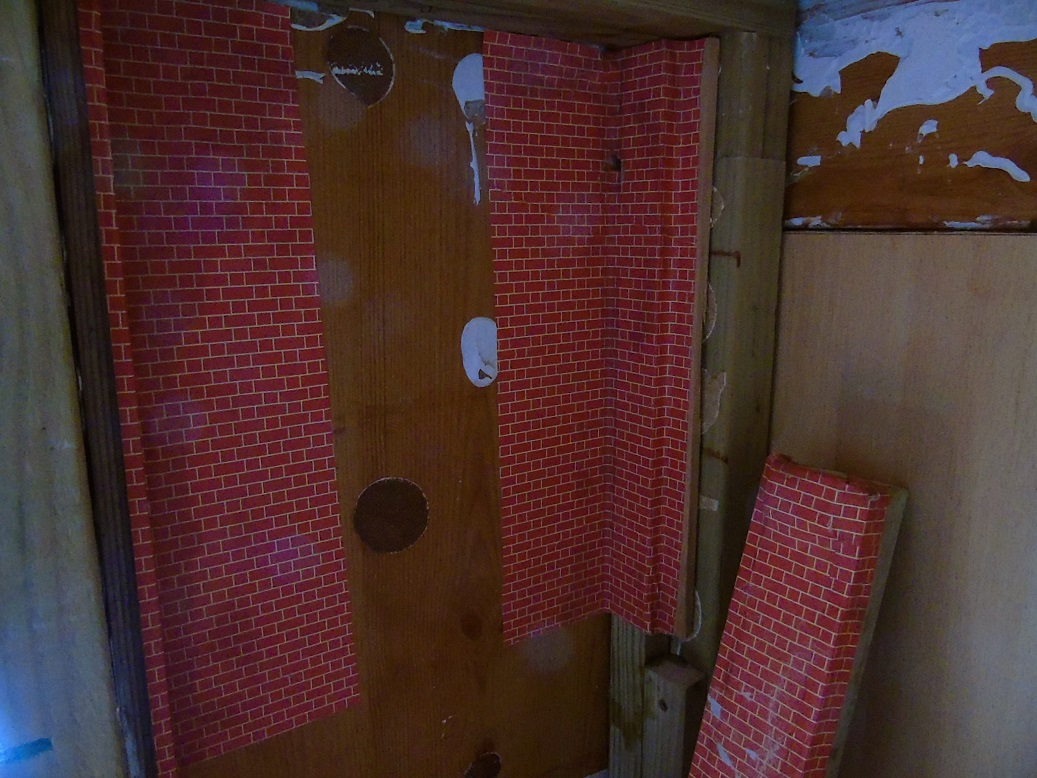
I boarded out the one wall and wallpapered it. then made the boarded wall for the windows, it might give you some idea of how the view from the window will work .

The evolution of Jake's Study Wall-Window-frame-A-1
The evolution of Jake's Study Wall-Window-frame-A-2

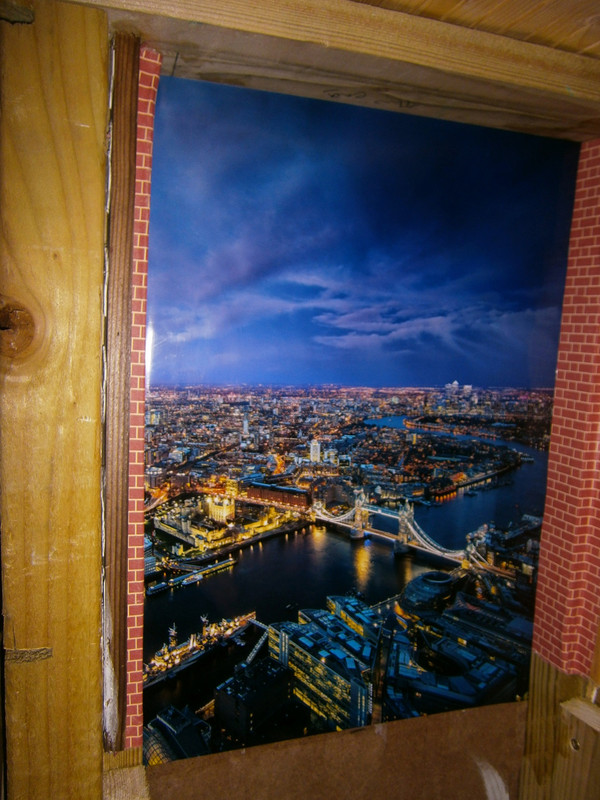
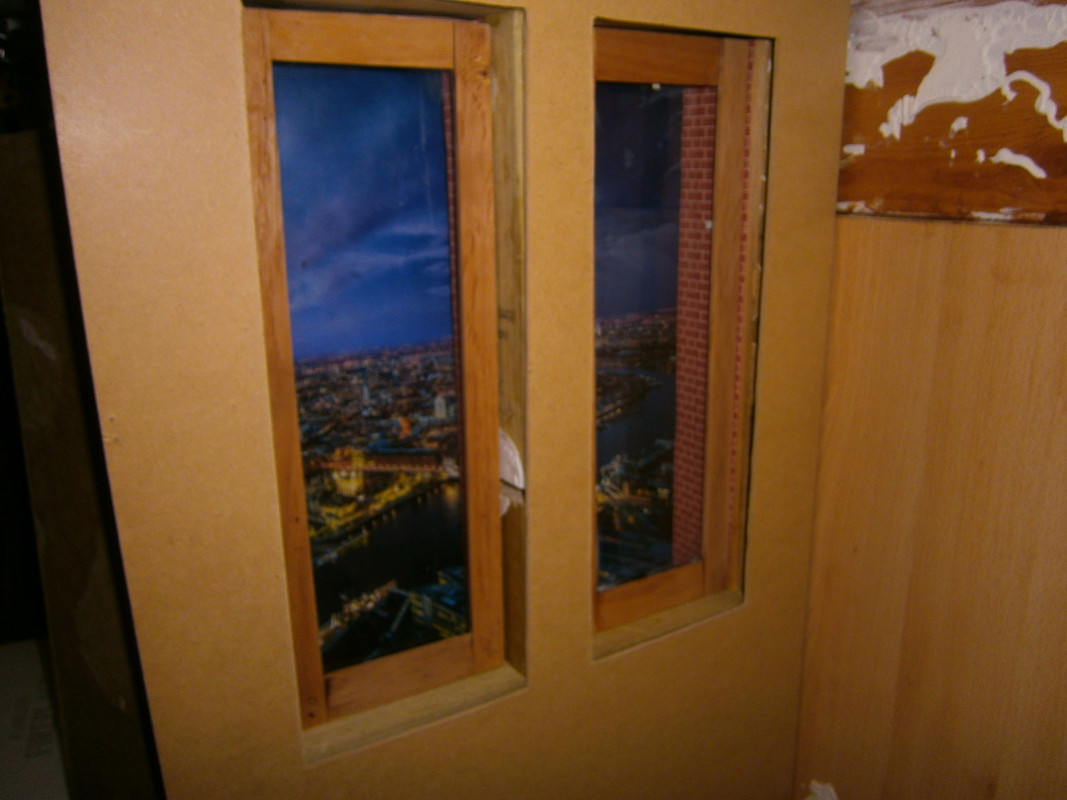
The background I ordered for the windows arrived. I cut and pasted it to a purposely cut board, then when dry fitted it in place,

The evolution of Jake's Study Window-background-A-1

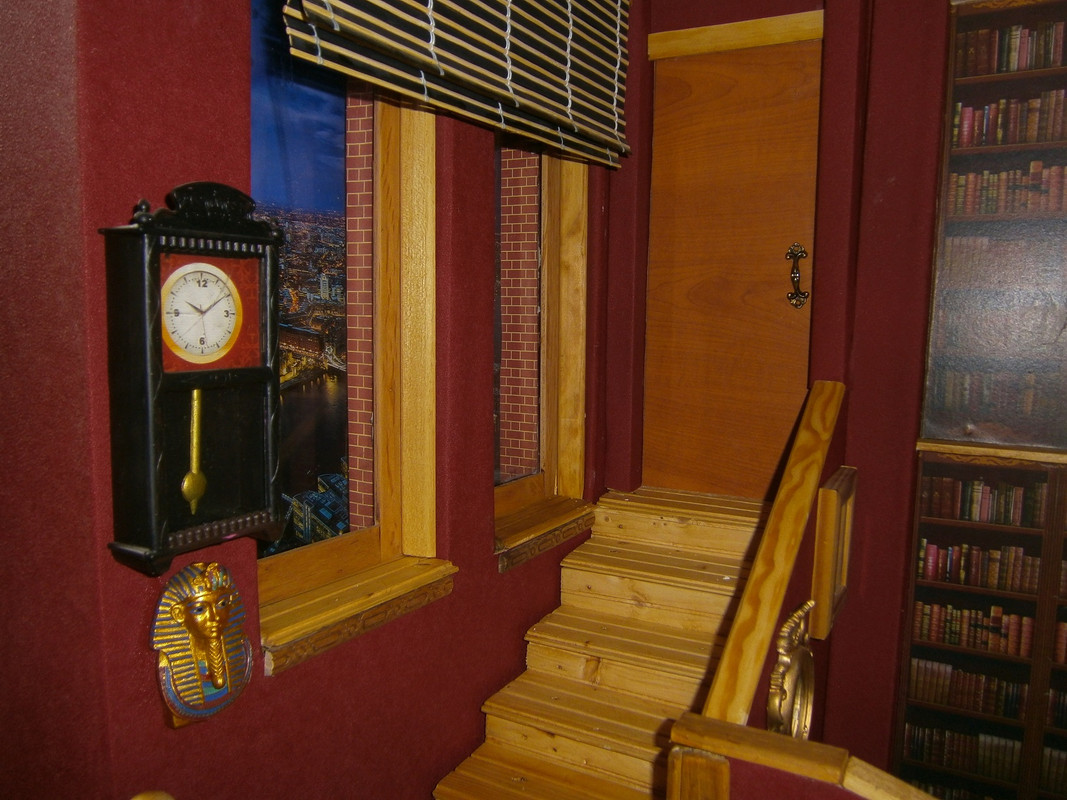
I also rubbed down the old window frames, as I wanted them to be a little lighter than before. I have only popped in the front temporarily just to show what the finished windows will look like.

The evolution of Jake's Study Window-background-A-2

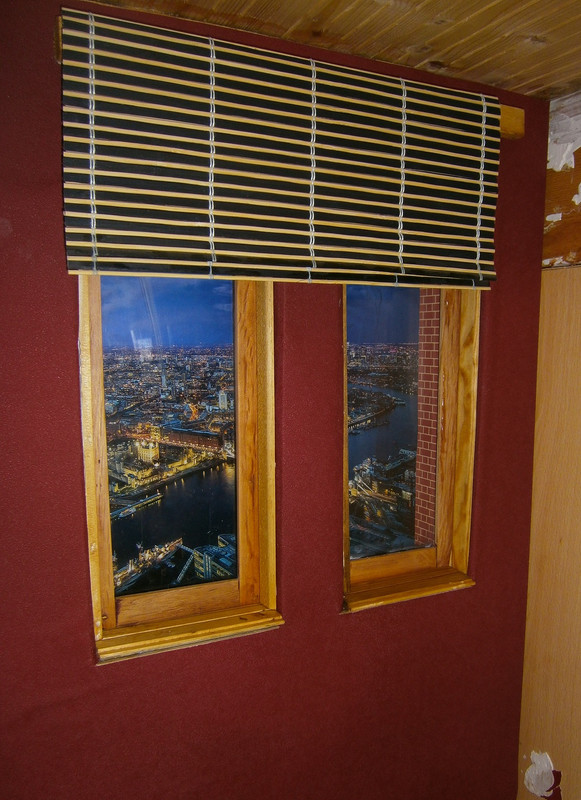
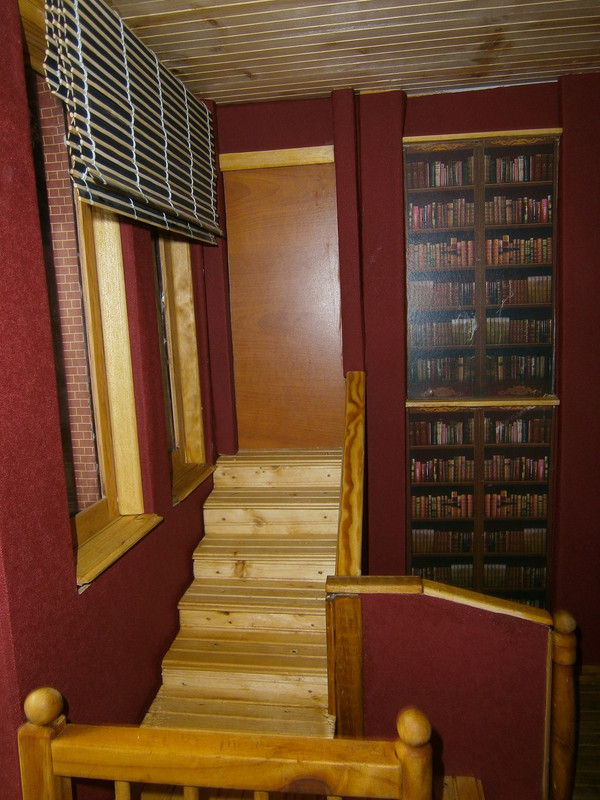
I finished building and staining the window frames, I also wallpapered the window wall, I added the blind to give you guys an idea of what it will look like when finished.

The evolution of Jake's Study P6200001

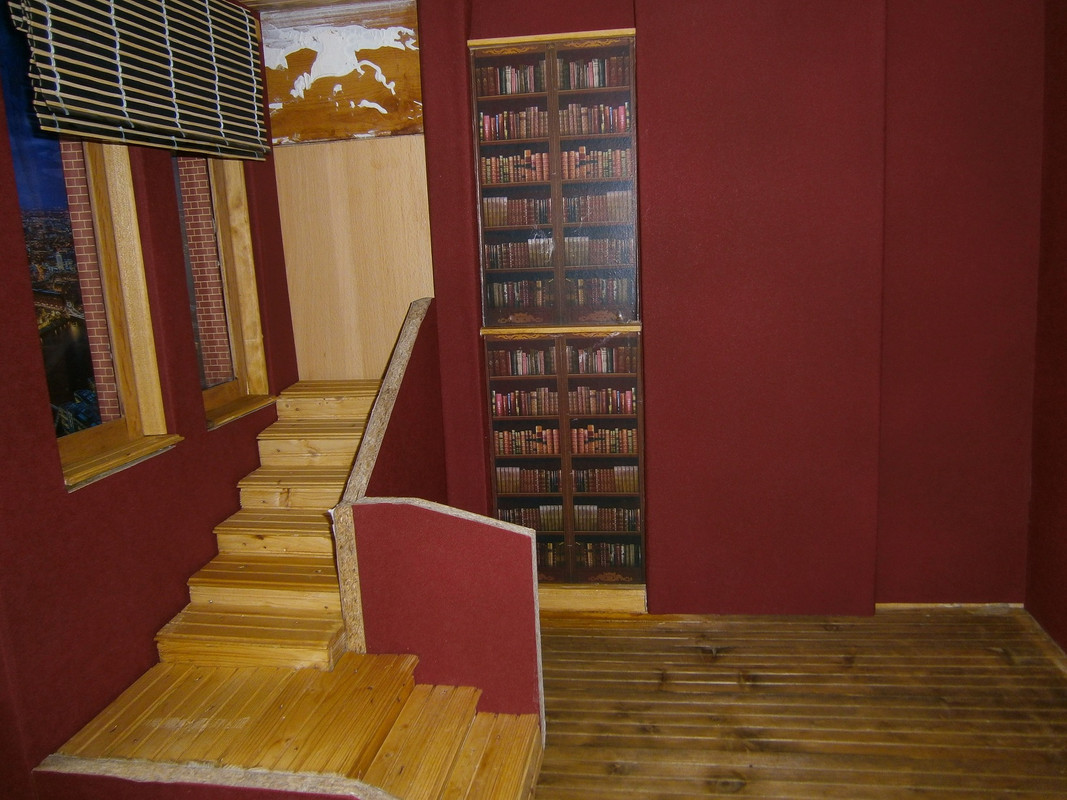
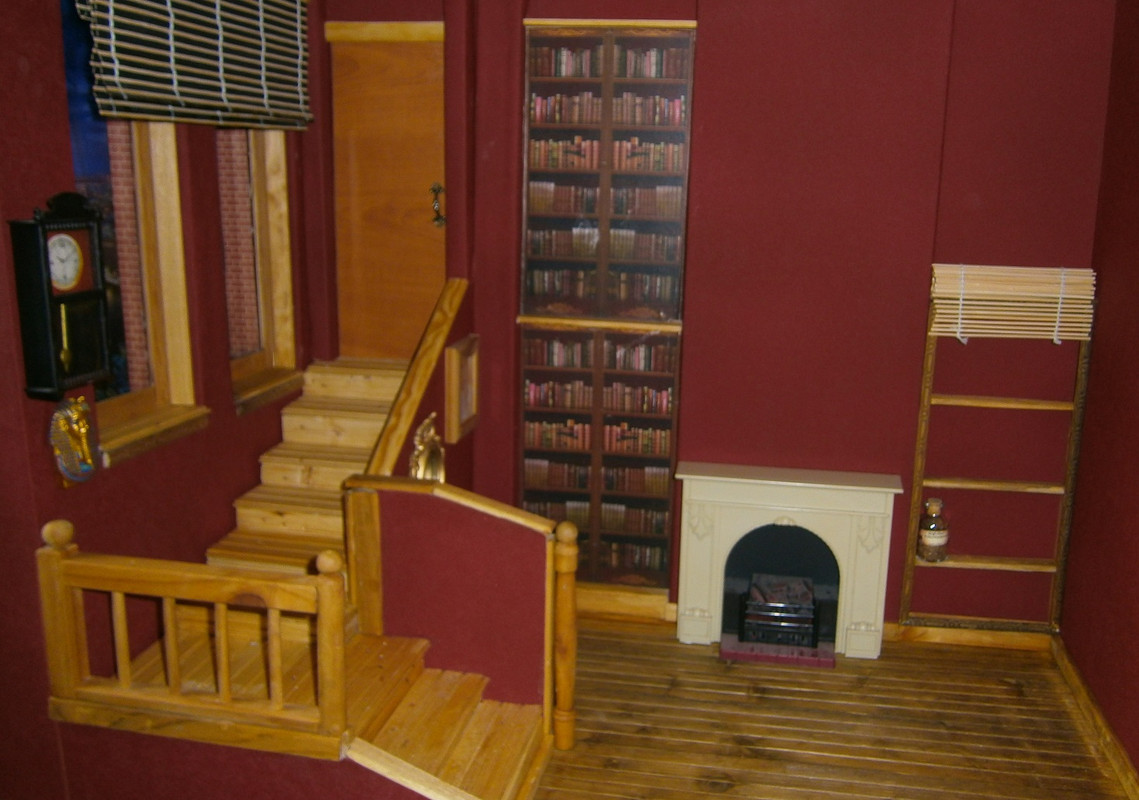
Next the work involved building some bookcases, and a bit of wallpapering, and then building the second half of Jake's study. First up, the bookcases,

The evolution of Jake's Study Bookcases-00-1
The evolution of Jake's Study Bookcases-00-2

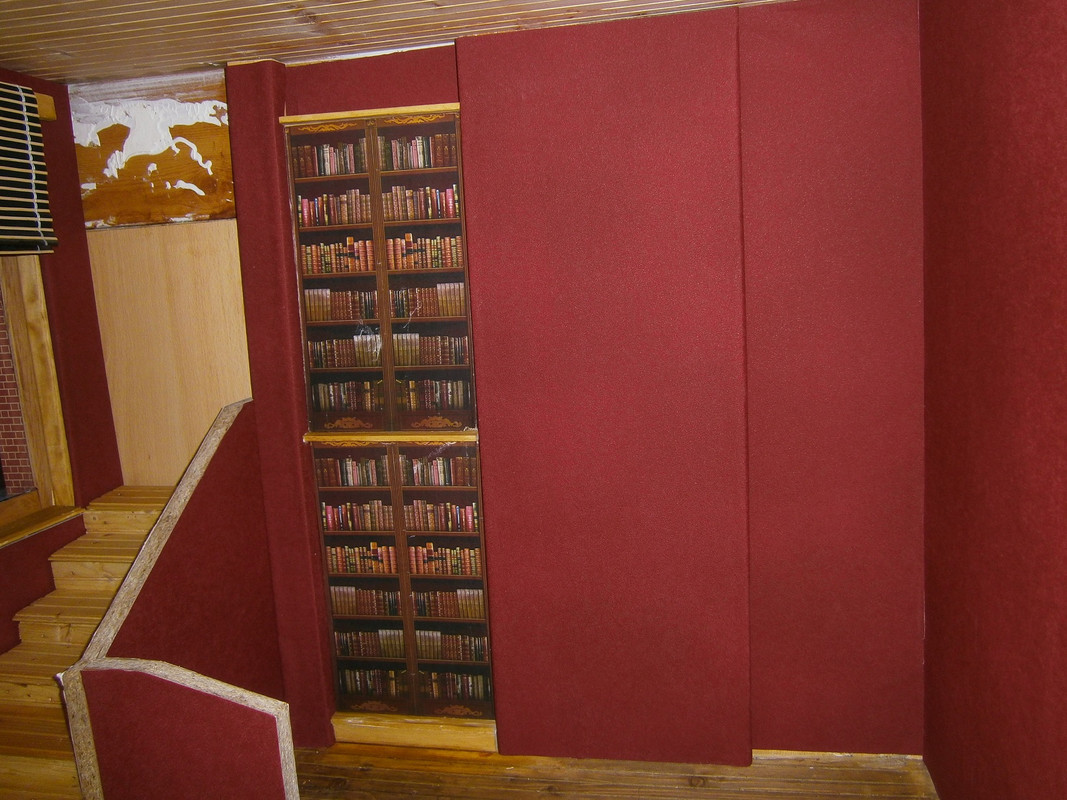
Okay,okay, so I cheated!, but they do look good, and I think once other bits have been added they will look fine. Okay, so next up was the second half of Jake's study, no progress pics this time, I kinda got carried away! lol! but here is the progress so far.

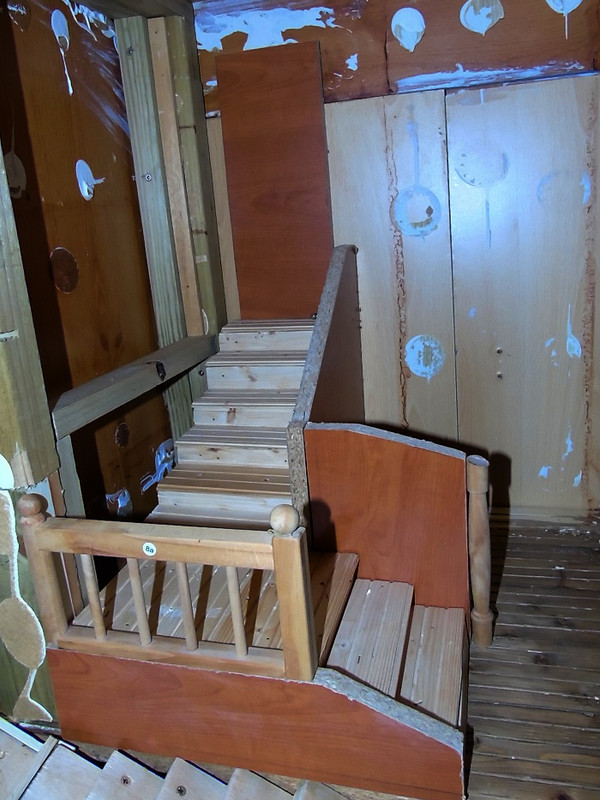
I  got around to fitting the door and frame, I also added the top of the banister, It is getting there now. I still have a few jobs to do, mainly finishing touches.

The evolution of Jake's Study Room-00-4
The evolution of Jake's Study Room-00-1
The evolution of Jake's Study Room-00-2
The evolution of Jake's Study Room-00-3

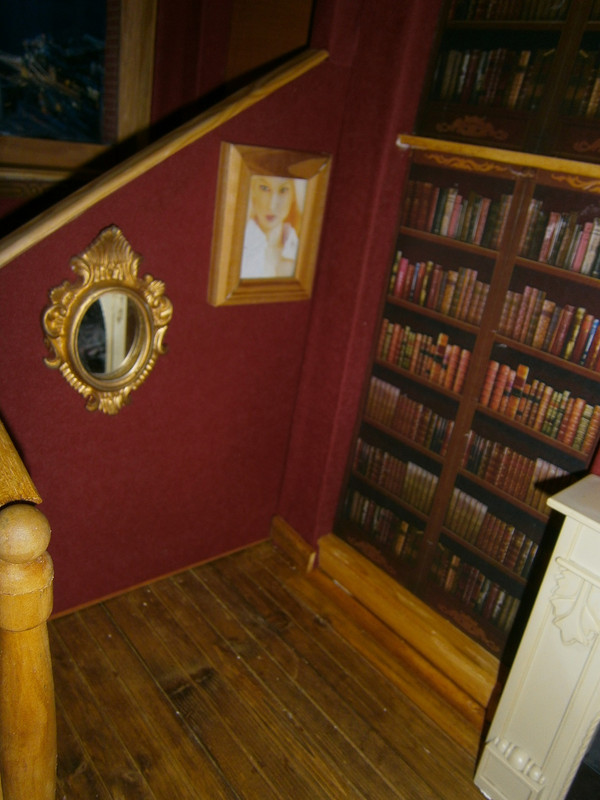
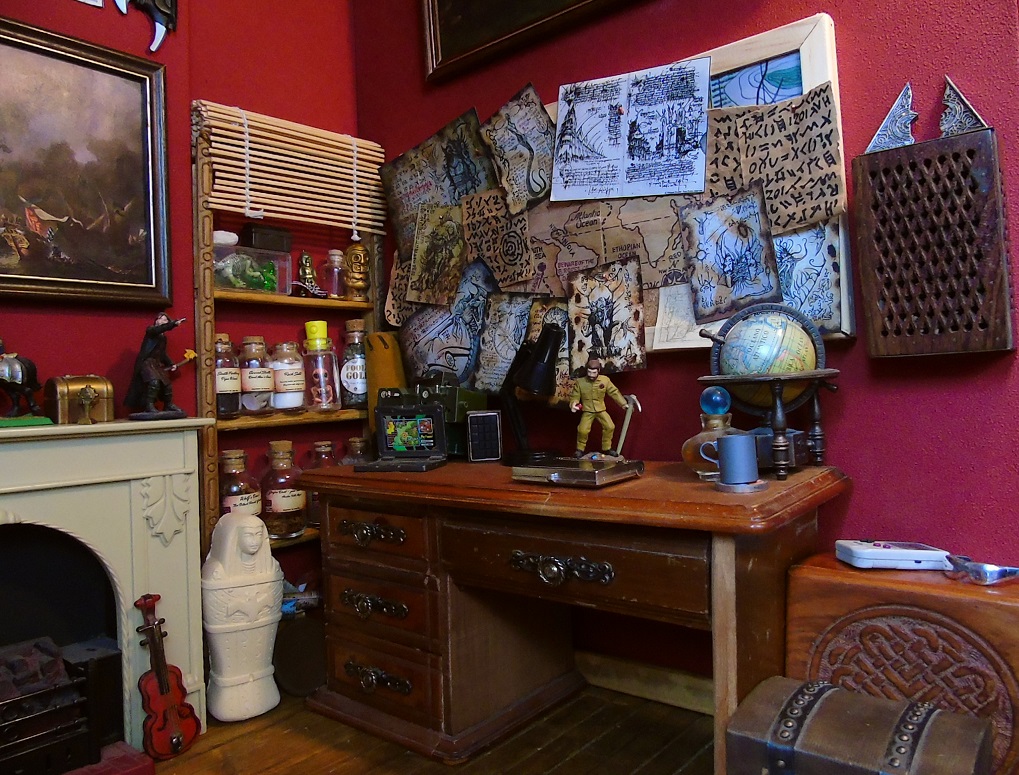
I spent the day removing no nails glue from old recycled wood from the old study. Very time consuming and boring Shocked . With that done, today I decided to use the cleaned up wood to finish a few bits, I popped in some skirting board and built a unit into one of the walls. I also caved and put a few bits back in the study. Here are a few pics

The evolution of Jake's Study Study-Items-00-1
The evolution of Jake's Study Study-Items-00-2
The evolution of Jake's Study Study-Items-00-3
The evolution of Jake's Study Je-taking-a-look

Added a few more bits, would have posted some pics yesterday, but lost my alien in a jar Suspect , found him now tho! cheers . Can you spot him???

The evolution of Jake's Study DSC00021
The evolution of Jake's Study 48160626066_c2ce7cde77_c

Oh no! the adipose has ventured into Jake's unfinished study! I hope they don't get into any mischief!..., still it could be worse, the minions could have found their way in there!!

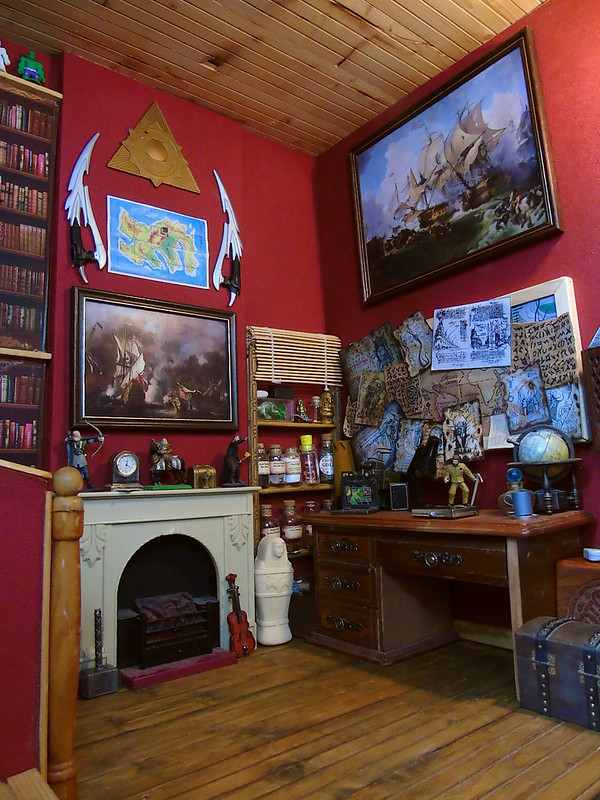
A few pics now of the study when things started to go back in,

The evolution of Jake's Study 48205396431_303df3bc14_c
The evolution of Jake's Study 48205451942_301384ddcb_c
The evolution of Jake's Study DSC00020
The evolution of Jake's Study 49679401206_afbd3f138c_c
The evolution of Jake's Study 49923326927_01e2634c77_c
The evolution of Jake's Study 49912724516_e964947ea0_c

Thanks for looking! bounce bounce bounce bounce

2The evolution of Jake's Study Empty Re: The evolution of Jake's Study Sat Oct 31, 2020 8:54 am

ThePhotogsBlog

ThePhotogsBlog
Thanks for posting this. What always struck me in the photos of Jake's study was the incredible amount of detail you put into it, which makes it rather come alive. But seeing in stages how you built it and how you got there is even more interesting.

3The evolution of Jake's Study Empty Re: The evolution of Jake's Study Sat Oct 31, 2020 9:02 am

BAMComix

BAMComix
ThePhotogsBlog wrote:Thanks for posting this. What always struck me in the photos of Jake's study was the incredible amount of detail you put into it, which makes it rather come alive. But seeing in stages how you built it and how you got there is even more interesting.

Thanks Gary Very Happy . I am really pleased you found it interesting, it took me a long time to get to the final build of Jake's study. I learned a lot from each diorama I have built, which I usually incorporate into the next. The study was at one time the biggest dio I had built, until I rebuilt the 'Ammo Arms' which is 7ft x 2.5ft x 2ft.

4The evolution of Jake's Study Empty Re: The evolution of Jake's Study Sat Oct 31, 2020 9:13 am

ThePhotogsBlog

ThePhotogsBlog
BAMComix wrote:
ThePhotogsBlog wrote:Thanks for posting this. What always struck me in the photos of Jake's study was the incredible amount of detail you put into it, which makes it rather come alive. But seeing in stages how you built it and how you got there is even more interesting.

Thanks Gary Very Happy . I am really pleased you found it interesting, it took me a long time to get to the final build of Jake's study. I learned a lot from each diorama I have built, which I usually incorporate into the next. The study was at one time the biggest dio I had built, until I rebuilt the 'Ammo Arms' which is 7ft x 2.5ft x 2ft.

I have three projects in mind for this winter.

1. To build a more substantial version of Kamiko's operations room.  

2. To build Kamiko's personal quarters, which would feature Southwestern architecture but with elements of Japanese decor.  

3. To get together the elements of a changeable diorama based on your Dinosaur Valley concept, and which could be changed to look like the Valley of Strange Occurrences or Dinosaur Valley or some other place depending on the need.

Your AMMO Arms is almost as big as my (small) model railroad, which is 7' x 3.5'.

5The evolution of Jake's Study Empty Re: The evolution of Jake's Study Sat Oct 31, 2020 9:17 am

BAMComix

BAMComix
ThePhotogsBlog wrote:
BAMComix wrote:
ThePhotogsBlog wrote:Thanks for posting this. What always struck me in the photos of Jake's study was the incredible amount of detail you put into it, which makes it rather come alive. But seeing in stages how you built it and how you got there is even more interesting.

Thanks Gary Very Happy . I am really pleased you found it interesting, it took me a long time to get to the final build of Jake's study. I learned a lot from each diorama I have built, which I usually incorporate into the next. The study was at one time the biggest dio I had built, until I rebuilt the 'Ammo Arms' which is 7ft x 2.5ft x 2ft.

I have three projects in mind for this winter.

1. To build a more substantial version of Kamiko's operations room.  

2. To build Kamiko's personal quarters, which would feature Southwestern architecture but with elements of Japanese decor.  

3. To get together the elements of a changeable diorama based on your Dinosaur Valley concept, and which could be changed to look like the Valley of Strange Occurrences or Dinosaur Valley or some other place depending on the need.  

Awesome! bounce bounce Lots of interesting projects to get stuck into and for us to enjoy! I'm always a pm away for advice if you need any, I am no expert in dio building, but I will happily share any tips I have picked up Very Happy

6The evolution of Jake's Study Empty Re: The evolution of Jake's Study Sat Oct 31, 2020 9:30 am

ThePhotogsBlog

ThePhotogsBlog
BAMComix wrote:
ThePhotogsBlog wrote:
BAMComix wrote:
ThePhotogsBlog wrote:Thanks for posting this. What always struck me in the photos of Jake's study was the incredible amount of detail you put into it, which makes it rather come alive. But seeing in stages how you built it and how you got there is even more interesting.

Thanks Gary Very Happy . I am really pleased you found it interesting, it took me a long time to get to the final build of Jake's study. I learned a lot from each diorama I have built, which I usually incorporate into the next. The study was at one time the biggest dio I had built, until I rebuilt the 'Ammo Arms' which is 7ft x 2.5ft x 2ft.

I have three projects in mind for this winter.

1. To build a more substantial version of Kamiko's operations room.  

2. To build Kamiko's personal quarters, which would feature Southwestern architecture but with elements of Japanese decor.  

3. To get together the elements of a changeable diorama based on your Dinosaur Valley concept, and which could be changed to look like the Valley of Strange Occurrences or Dinosaur Valley or some other place depending on the need.  

Awesome! bounce bounce  Lots of interesting projects to get stuck into and for us to enjoy! I'm always a pm away for advice if you need any, I am no expert in dio building, but I will happily share any tips I have picked up Very Happy

My biggest problem is lack of space to put it all, especially when not in use. On the other hand, my railroad bench is about 43" in height, so there is lots of space to store stuff under there, as long as I build it ruggedly enough, and right now, the rather crude dios I have are built using half-inch foarm core walls, which though very light, are easily damaged and so will have to be replaced by something more rugged when I get to the permanent builds.

7The evolution of Jake's Study Empty Re: The evolution of Jake's Study Sat Oct 31, 2020 10:00 am

BAMComix

BAMComix
ThePhotogsBlog wrote:
BAMComix wrote:
ThePhotogsBlog wrote:
BAMComix wrote:
ThePhotogsBlog wrote:Thanks for posting this. What always struck me in the photos of Jake's study was the incredible amount of detail you put into it, which makes it rather come alive. But seeing in stages how you built it and how you got there is even more interesting.

Thanks Gary Very Happy . I am really pleased you found it interesting, it took me a long time to get to the final build of Jake's study. I learned a lot from each diorama I have built, which I usually incorporate into the next. The study was at one time the biggest dio I had built, until I rebuilt the 'Ammo Arms' which is 7ft x 2.5ft x 2ft.

I have three projects in mind for this winter.

1. To build a more substantial version of Kamiko's operations room.  

2. To build Kamiko's personal quarters, which would feature Southwestern architecture but with elements of Japanese decor.  

3. To get together the elements of a changeable diorama based on your Dinosaur Valley concept, and which could be changed to look like the Valley of Strange Occurrences or Dinosaur Valley or some other place depending on the need.  

Awesome! bounce bounce  Lots of interesting projects to get stuck into and for us to enjoy! I'm always a pm away for advice if you need any, I am no expert in dio building, but I will happily share any tips I have picked up Very Happy

My biggest problem is lack of space to put it all, especially when not in use. On the other hand, my railroad bench is about 43" in height, so there is lots of space to store stuff under there, as long as I build it ruggedly enough, and right now, the rather crude dios I have are built using half-inch foarm core walls, which though very light, are easily damaged and so will have to be replaced by something more rugged when I get to the permanent builds.  

Flat pack style walls could be the answer?that way you can take apart the dio and store when finished with. Although I do use a lot of foamboard, when it comes to room dios, I tend to build mind from plywood. However, maybe you could make some plywood board walls and use magnets or hooks to lock them together to form a room?

8The evolution of Jake's Study Empty Re: The evolution of Jake's Study Sat Oct 31, 2020 10:09 am

ThePhotogsBlog

ThePhotogsBlog
BAMComix wrote:
ThePhotogsBlog wrote:
BAMComix wrote:
ThePhotogsBlog wrote:
BAMComix wrote:
ThePhotogsBlog wrote:Thanks for posting this. What always struck me in the photos of Jake's study was the incredible amount of detail you put into it, which makes it rather come alive. But seeing in stages how you built it and how you got there is even more interesting.

Thanks Gary Very Happy . I am really pleased you found it interesting, it took me a long time to get to the final build of Jake's study. I learned a lot from each diorama I have built, which I usually incorporate into the next. The study was at one time the biggest dio I had built, until I rebuilt the 'Ammo Arms' which is 7ft x 2.5ft x 2ft.

I have three projects in mind for this winter.

1. To build a more substantial version of Kamiko's operations room.  

2. To build Kamiko's personal quarters, which would feature Southwestern architecture but with elements of Japanese decor.  

3. To get together the elements of a changeable diorama based on your Dinosaur Valley concept, and which could be changed to look like the Valley of Strange Occurrences or Dinosaur Valley or some other place depending on the need.  

Awesome! bounce bounce  Lots of interesting projects to get stuck into and for us to enjoy! I'm always a pm away for advice if you need any, I am no expert in dio building, but I will happily share any tips I have picked up Very Happy

My biggest problem is lack of space to put it all, especially when not in use. On the other hand, my railroad bench is about 43" in height, so there is lots of space to store stuff under there, as long as I build it ruggedly enough, and right now, the rather crude dios I have are built using half-inch foarm core walls, which though very light, are easily damaged and so will have to be replaced by something more rugged when I get to the permanent builds.  

Flat pack style walls could be the answer?that way you can take apart the dio and store when finished with. Although I do use a lot of foamboard, when it comes to room dios, I tend to build mind from plywood. However, maybe you could make some plywood board walls and use magnets or hooks to lock them together to form a room?


There's actually a fair amount of room to store stuff under my railroad, so building one or two solid and permanent dioramas is not impossible, especially if they can be stacked on on top fo the other for storage. One thing I would do differently from yours however is to not add a ceiling, since having an open top greatly facilitates lighting.

9The evolution of Jake's Study Empty Re: The evolution of Jake's Study Sat Oct 31, 2020 10:13 am

BAMComix

BAMComix
ThePhotogsBlog wrote:
BAMComix wrote:
ThePhotogsBlog wrote:
BAMComix wrote:
ThePhotogsBlog wrote:
BAMComix wrote:
ThePhotogsBlog wrote:Thanks for posting this. What always struck me in the photos of Jake's study was the incredible amount of detail you put into it, which makes it rather come alive. But seeing in stages how you built it and how you got there is even more interesting.

Thanks Gary Very Happy . I am really pleased you found it interesting, it took me a long time to get to the final build of Jake's study. I learned a lot from each diorama I have built, which I usually incorporate into the next. The study was at one time the biggest dio I had built, until I rebuilt the 'Ammo Arms' which is 7ft x 2.5ft x 2ft.

I have three projects in mind for this winter.

1. To build a more substantial version of Kamiko's operations room.  

2. To build Kamiko's personal quarters, which would feature Southwestern architecture but with elements of Japanese decor.  

3. To get together the elements of a changeable diorama based on your Dinosaur Valley concept, and which could be changed to look like the Valley of Strange Occurrences or Dinosaur Valley or some other place depending on the need.  

Awesome! bounce bounce  Lots of interesting projects to get stuck into and for us to enjoy! I'm always a pm away for advice if you need any, I am no expert in dio building, but I will happily share any tips I have picked up Very Happy

My biggest problem is lack of space to put it all, especially when not in use. On the other hand, my railroad bench is about 43" in height, so there is lots of space to store stuff under there, as long as I build it ruggedly enough, and right now, the rather crude dios I have are built using half-inch foarm core walls, which though very light, are easily damaged and so will have to be replaced by something more rugged when I get to the permanent builds.  

Flat pack style walls could be the answer?that way you can take apart the dio and store when finished with. Although I do use a lot of foamboard, when it comes to room dios, I tend to build mind from plywood. However, maybe you could make some plywood board walls and use magnets or hooks to lock them together to form a room?


There's actually a fair amount of room to store stuff under my railroad, so building one or two solid and permanent dioramas is not impossible, especially if they can be stacked on on top fo the other for storage.  One thing I would do differently from yours however is to not add a ceiling, since having an open top greatly facilitates lighting.  

Yes taking the roof away would give better lighting options, but I have found the ed strip lights are fantastic for indoor dio lighting. bounce

10The evolution of Jake's Study Empty Re: The evolution of Jake's Study Sat Oct 31, 2020 10:24 am

ThePhotogsBlog

ThePhotogsBlog
BAMComix wrote:
ThePhotogsBlog wrote:
BAMComix wrote:
ThePhotogsBlog wrote:
BAMComix wrote:
ThePhotogsBlog wrote:
BAMComix wrote:
ThePhotogsBlog wrote:Thanks for posting this. What always struck me in the photos of Jake's study was the incredible amount of detail you put into it, which makes it rather come alive. But seeing in stages how you built it and how you got there is even more interesting.

Thanks Gary Very Happy . I am really pleased you found it interesting, it took me a long time to get to the final build of Jake's study. I learned a lot from each diorama I have built, which I usually incorporate into the next. The study was at one time the biggest dio I had built, until I rebuilt the 'Ammo Arms' which is 7ft x 2.5ft x 2ft.

I have three projects in mind for this winter.

1. To build a more substantial version of Kamiko's operations room.  

2. To build Kamiko's personal quarters, which would feature Southwestern architecture but with elements of Japanese decor.  

3. To get together the elements of a changeable diorama based on your Dinosaur Valley concept, and which could be changed to look like the Valley of Strange Occurrences or Dinosaur Valley or some other place depending on the need.  

Awesome! bounce bounce  Lots of interesting projects to get stuck into and for us to enjoy! I'm always a pm away for advice if you need any, I am no expert in dio building, but I will happily share any tips I have picked up Very Happy

My biggest problem is lack of space to put it all, especially when not in use. On the other hand, my railroad bench is about 43" in height, so there is lots of space to store stuff under there, as long as I build it ruggedly enough, and right now, the rather crude dios I have are built using half-inch foarm core walls, which though very light, are easily damaged and so will have to be replaced by something more rugged when I get to the permanent builds.  

Flat pack style walls could be the answer?that way you can take apart the dio and store when finished with. Although I do use a lot of foamboard, when it comes to room dios, I tend to build mind from plywood. However, maybe you could make some plywood board walls and use magnets or hooks to lock them together to form a room?


There's actually a fair amount of room to store stuff under my railroad, so building one or two solid and permanent dioramas is not impossible, especially if they can be stacked on on top fo the other for storage.  One thing I would do differently from yours however is to not add a ceiling, since having an open top greatly facilitates lighting.  

Yes taking the roof away would give better lighting options, but I have found the ed strip lights are fantastic for indoor dio lighting. bounce

Right now I'm usually using a pair of Nikon Speedlights for my lighting; usually one off-camera as the main and slave, and another on-camera as the master and fill.  This, along with modifiers as needed, allow me to go for either a very evenly lit set up:  

The evolution of Jake's Study 50449018786_a6654df33b_csilicone by Gary  Menten, on Flickr

The evolution of Jake's Study 50426859992_324f5b8df8_cKamiko apologizes04 by Gary  Menten, on Flickr

or a more moody sort.

The evolution of Jake's Study 50325024201_eb4c59c7ba_cWhy? by Gary  Menten, on Flickr

The evolution of Jake's Study 50448526642_697ee737f9_c11 by Gary  Menten, on Flickr

As a rule, once I get permanent sets built, I will probably shoot a lot more like the last two than the first two.

11The evolution of Jake's Study Empty Re: The evolution of Jake's Study Sat Oct 31, 2020 10:28 am

BAMComix

BAMComix
Indeed! you have your lighting spot on mate! bounce bounce bounce

12The evolution of Jake's Study Empty Re: The evolution of Jake's Study Sat Oct 31, 2020 10:40 am

ThePhotogsBlog

ThePhotogsBlog
BAMComix wrote:Indeed! you have your lighting spot on mate! bounce bounce bounce

Apparently two years of professional photography training in a commercial photography school have paid off for me. Very Happy

13The evolution of Jake's Study Empty Re: The evolution of Jake's Study Sat Oct 31, 2020 10:44 am

BAMComix

BAMComix
ThePhotogsBlog wrote:
BAMComix wrote:Indeed! you have your lighting spot on mate! bounce bounce bounce

Apparently two years of professional photography training in a commercial photography school have paid off for me.  Very Happy

Most impressive! Very Happy

14The evolution of Jake's Study Empty Re: The evolution of Jake's Study Sat Oct 31, 2020 12:42 pm

GubernatorFan

GubernatorFan
Founding Father
Love the study -- its scale, complexity, and detail. It was great that you shared the change over time, plus the ways to getting so many areas look just right. I'd only add that you can invest in some miniature books to throw around the desk and pile up in some corner, although it would be a pain to assemble a whole 3D bookcase. Otherwise, the eclectic choice of items helps make this a (surprisingly) realistic, slightly cluttered space, which looks perfect alongside your characters. By the way, your alien in a bottle is easy to spot, what with that bright yellow "cork" Smile


_________________
I'll be back!
https://onesixthfigures.forumotion.com

15The evolution of Jake's Study Empty Re: The evolution of Jake's Study Sat Oct 31, 2020 12:47 pm

Theboo-bomb

Theboo-bomb
Your earlier study looks like something out of a vintage detective film, I like both of them. That said your newer one adds some more levels on the scene like those stairs, it's very pretty and really well done, I love all the small details you added to it.


_________________
I do this for fun, otherwise it would be my job. alien

All of my alt-history themed figures in one convenient link! BooBomb's alt history figures! The evolution of Jake's Study 1f60e

16The evolution of Jake's Study Empty Re: The evolution of Jake's Study Sat Oct 31, 2020 1:03 pm

ThePhotogsBlog

ThePhotogsBlog
GubernatorFan wrote:Love the study -- its scale, complexity, and detail. It was great that you shared the change over time, plus the ways to getting so many areas look just right. I'd only add that you can invest in some miniature books to throw around the desk and pile up in some corner, although it would be a pain to assemble a whole 3D bookcase. Otherwise, the eclectic choice of items helps make this a (surprisingly) realistic, slightly cluttered space, which looks perfect alongside your characters. By the way, your alien in a bottle is easy to spot, what with that bright yellow "cork" Smile

I think the bookcase just blends into the background so much that in most shots, you have to look very closely to see that it's printed, and not a 3D model. Totally agree that it would have been a cumbersome task to build one. For me, the complexity and clutter really pull this diorama together.

17The evolution of Jake's Study Empty Re: The evolution of Jake's Study Sat Oct 31, 2020 2:57 pm

BAMComix

BAMComix
GubernatorFan wrote:Love the study -- its scale, complexity, and detail. It was great that you shared the change over time, plus the ways to getting so many areas look just right. I'd only add that you can invest in some miniature books to throw around the desk and pile up in some corner, although it would be a pain to assemble a whole 3D bookcase. Otherwise, the eclectic choice of items helps make this a (surprisingly) realistic, slightly cluttered space, which looks perfect alongside your characters. By the way, your alien in a bottle is easy to spot, what with that bright yellow "cork" Smile

I am really pleased you enjoyed the thread and journey of the study. I do agree about some books, I will have too see if I can track some down at some point. Very Happy , yeah, I guess the bright yellow lid does give it away! Thanks for the awesome comment bounce

Theboo-bomb wrote:Your earlier study looks like something out of a vintage detective film, I like both of them. That said your newer one adds some more levels on the scene like those stairs, it's very pretty and really well done, I love all the small details you added to it.

Thank you, I styled the first one on an old Sherlock Holmes type set, but I quickly realized that the set wasn't quite right. I think the stairs add to the depth of the study, and I'm pleased you agree too. It took me quite q while to track down all the small bits Very Happy

ThePhotogsBlog wrote:
GubernatorFan wrote:Love the study -- its scale, complexity, and detail. It was great that you shared the change over time, plus the ways to getting so many areas look just right. I'd only add that you can invest in some miniature books to throw around the desk and pile up in some corner, although it would be a pain to assemble a whole 3D bookcase. Otherwise, the eclectic choice of items helps make this a (surprisingly) realistic, slightly cluttered space, which looks perfect alongside your characters. By the way, your alien in a bottle is easy to spot, what with that bright yellow "cork" Smile

I think the bookcase just blends into the background so much that in most shots, you have to look very closely to see that it's printed, and not a 3D model.  Totally agree that it would have been a cumbersome task to build one.  For me, the complexity and clutter really pull this diorama together.  

Thank you Gary, Jake's study sure is a busy place. The plan always was to try and build a bookcase to replace the printed one, but it would be a complicated build and I kinda like the printed one now bounce .

Thanks everyone for the great comments bounce bounce bounce

18The evolution of Jake's Study Empty Re: The evolution of Jake's Study Sat Oct 31, 2020 4:09 pm

Stryker2011

Stryker2011
Founding Father
Impressive amount of detail and work went into all three versions of the study. Impressive.


_________________
Mark

He who dies with the most toys wins!

The evolution of Jake's Study C8485110

19The evolution of Jake's Study Empty Re: The evolution of Jake's Study Sat Oct 31, 2020 4:55 pm

BAMComix

BAMComix
Stryker2011 wrote:Impressive amount of detail and work went into all three versions of the study. Impressive.

Thank you Mark bounce . It was a long haul to get it to where I wanted it, really please you like it bounce

20The evolution of Jake's Study Empty Re: The evolution of Jake's Study Sun Nov 01, 2020 8:10 am

Ovy

Ovy
Finally took the time and (tea) to get through it, beautiful sir, I really love the window illusion and all the woodworking. not all dioramas have ceilings. Reusing little old childhood figures as deco is something I want to attempt too, haha

21The evolution of Jake's Study Empty Re: The evolution of Jake's Study Sun Nov 01, 2020 8:38 am

skywalkersaga

skywalkersaga
Finally got a chance to scroll through and.. wow! So much love and care and hard work went into this, it's incredible! The detail and the design... all of it, amazing! :O

And yes, the tiny figures as collectibles for 1/6 figures is something I have planned down the line for my mini-me, as well... :'D


_________________
"The happy ending of the fairy tale, the myth, and the divine comedy of the soul, is to be read,
not as a contradiction, but as a transcendence of the universal tragedy of man."

Ignoring current 'official' Star Wars content for my own sanity.

22The evolution of Jake's Study Empty Re: The evolution of Jake's Study Sun Nov 01, 2020 9:33 am

GregT


way cool thread, thanks for posting all these ideas & tips & tricks...
I like how vintage Jake can share his digs with the most contemporary
femme figs, lucky guy but hey after all these years it's the least he deserves!

23The evolution of Jake's Study Empty Re: The evolution of Jake's Study Sun Nov 01, 2020 9:42 am

BAMComix

BAMComix
Ovy wrote:Finally took the time and (tea) to get through it, beautiful sir, I really love the window illusion and all the woodworking. not all dioramas have ceilings. Reusing little old childhood figures as deco is something I want to attempt too, haha

I am so glad you took the time to take a look  Very Happy , and a fellow Tea drinker  bounce   Thank you for your amazing comments, took me until the third time to get it right  Laughing  Laughing  Laughing . Yes, the little guys, soldiers and warhammer figures do make great statues. You can't see it but on one of the chests in the study is a cavalier on horseback that I painted gold, then dry-brushed with a brown stain so it looks like a bronze statue. I will have to take a pic for you  Very Happy

skywalkersaga wrote:Finally got a chance to scroll through and.. wow! So much love and care and hard work went into this, it's incredible! The detail and the design... all of it, amazing! :O

And yes, the tiny figures as collectibles for 1/6 figures is something I have planned down the line for my mini-me, as well... :'D

Thank you my friend for amazing comments about the study. I am planning to do the same thing with my pub Dio soon too. As I was saying about the smaller figures, they do make fantastic statues for dioramas bounce bounce

24The evolution of Jake's Study Empty Re: The evolution of Jake's Study Sun Nov 01, 2020 4:51 pm

shazzdan

shazzdan
I'm a gear-oriented person so like the accessories and backgrounds more than the figures themselves. It is great to see dioramas like this come together.


_________________
More of my work can be found at One Sixth Arsenal
https://www.etsy.com/au/shop/OneSixthArsenal

25The evolution of Jake's Study Empty Re: The evolution of Jake's Study Sun Nov 01, 2020 5:05 pm

BAMComix

BAMComix
shazzdan wrote:I'm a gear-oriented person so like the accessories and backgrounds more than the figures themselves. It is great to see dioramas like this come together.

Pleased you enjoyed it shazzdan Very Happy

Sponsored content


Back to top  Message [Page 1 of 2]

Go to page : 1, 2  Next

Permissions in this forum:
You cannot reply to topics in this forum